
Blog
Week#2 (weekly+green); Gorgeous cover crops
- On: May 26, 2021
 0
0
Our standing cover crops are beautiful and lively right now. Look at that undulating motion! I was briefly hypnotized but able to break away. When the video ends, go ahead and watch Steve’s instructions how to flatten a CSA box without damaging it.
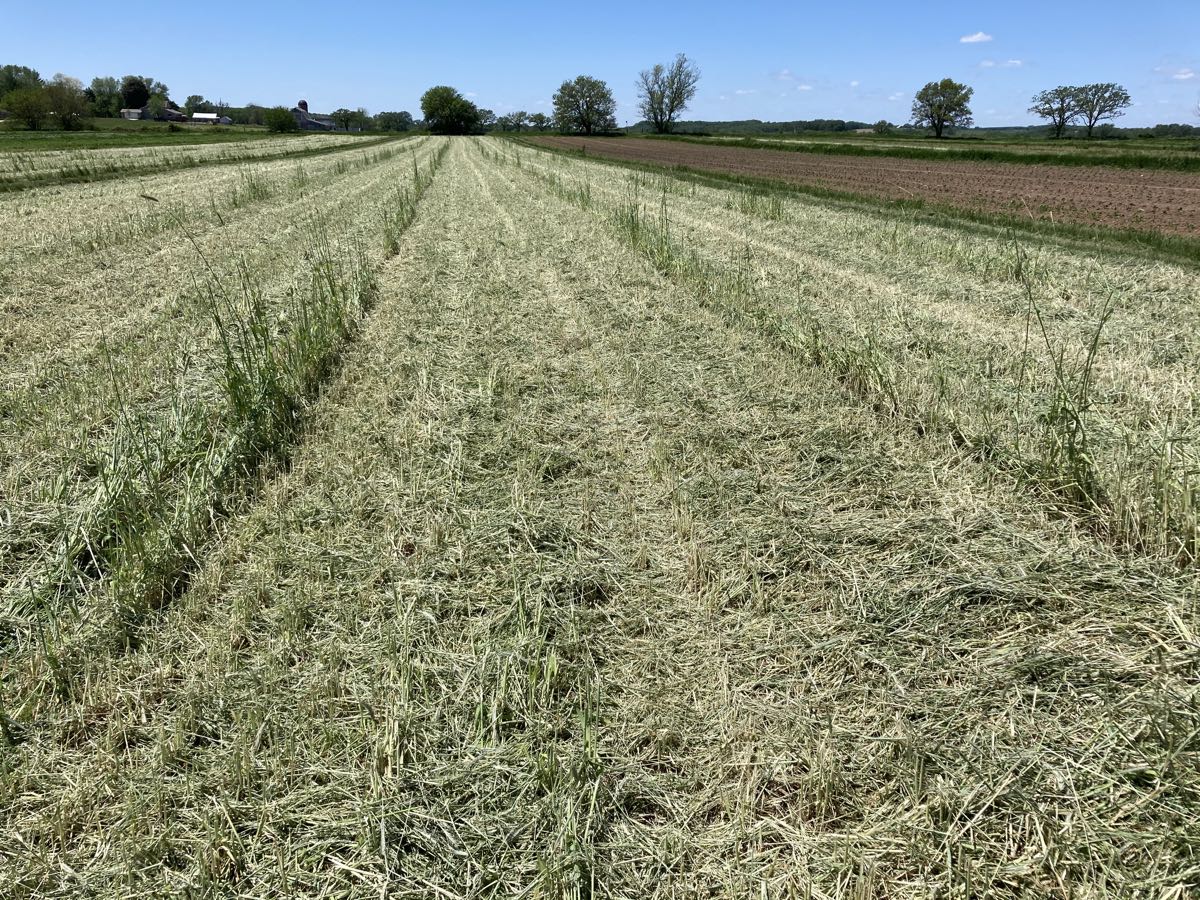
Here’s the same field, mowed just yesterday. That is a beautiful, thick layer of straw to incorporate into the soil. We chopped the straw as the rye was flowering, young & succulent enough that it will break down readily this season, nourishing the soil and future crops.
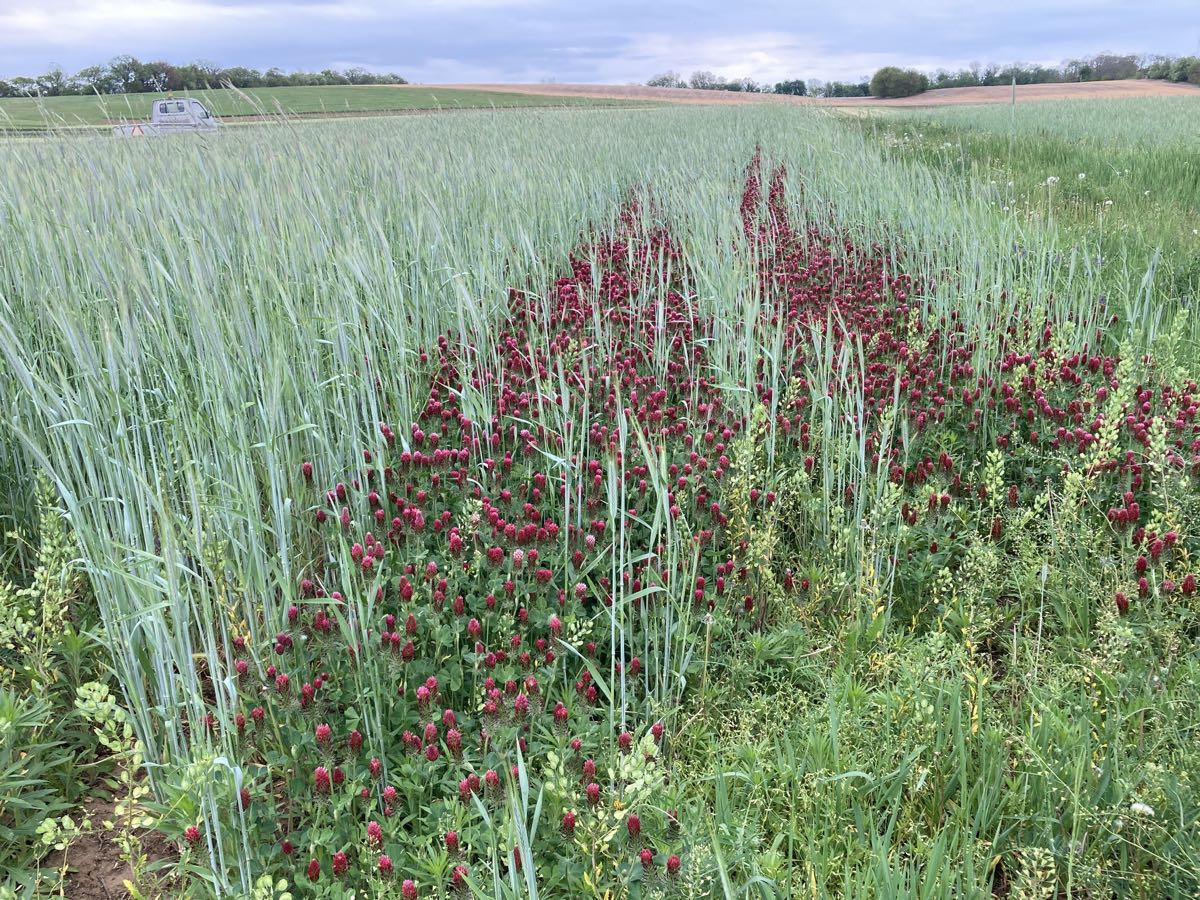
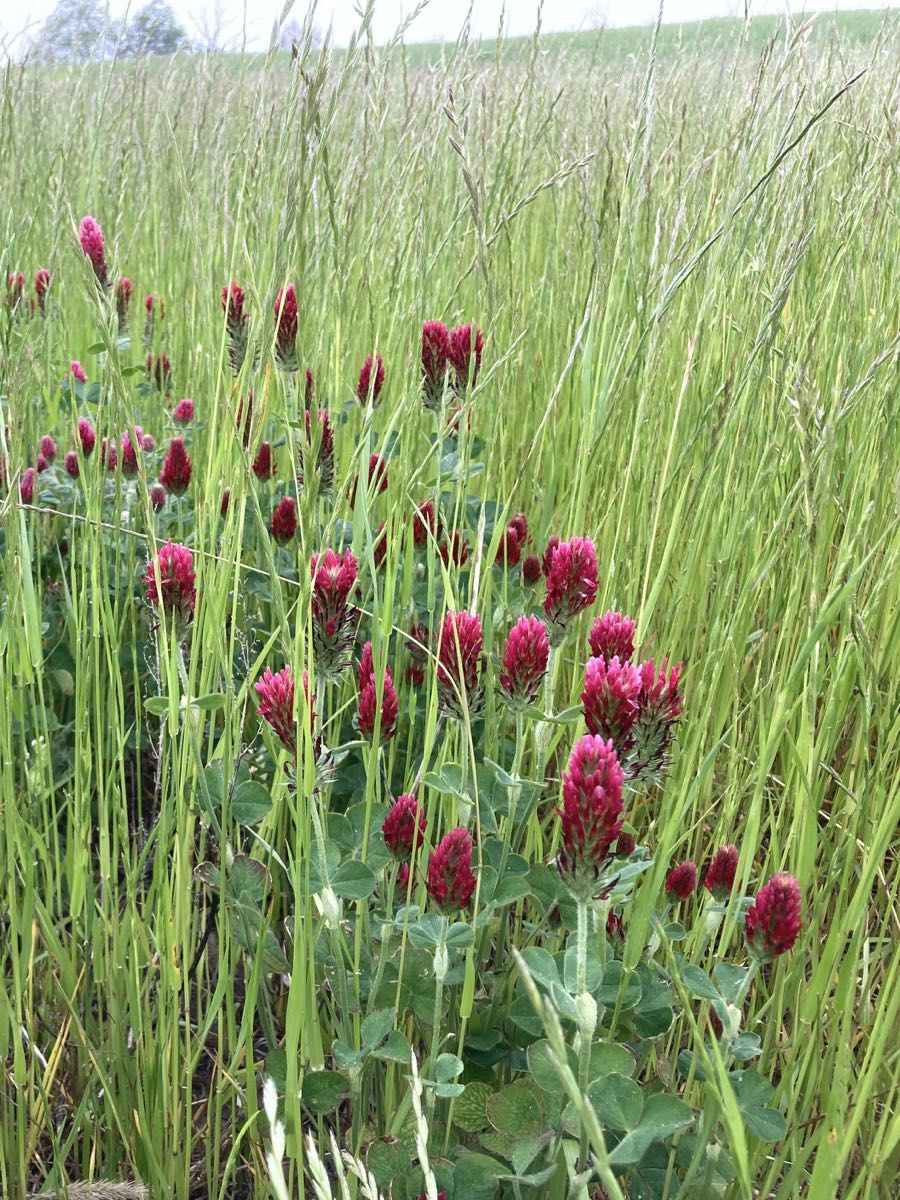
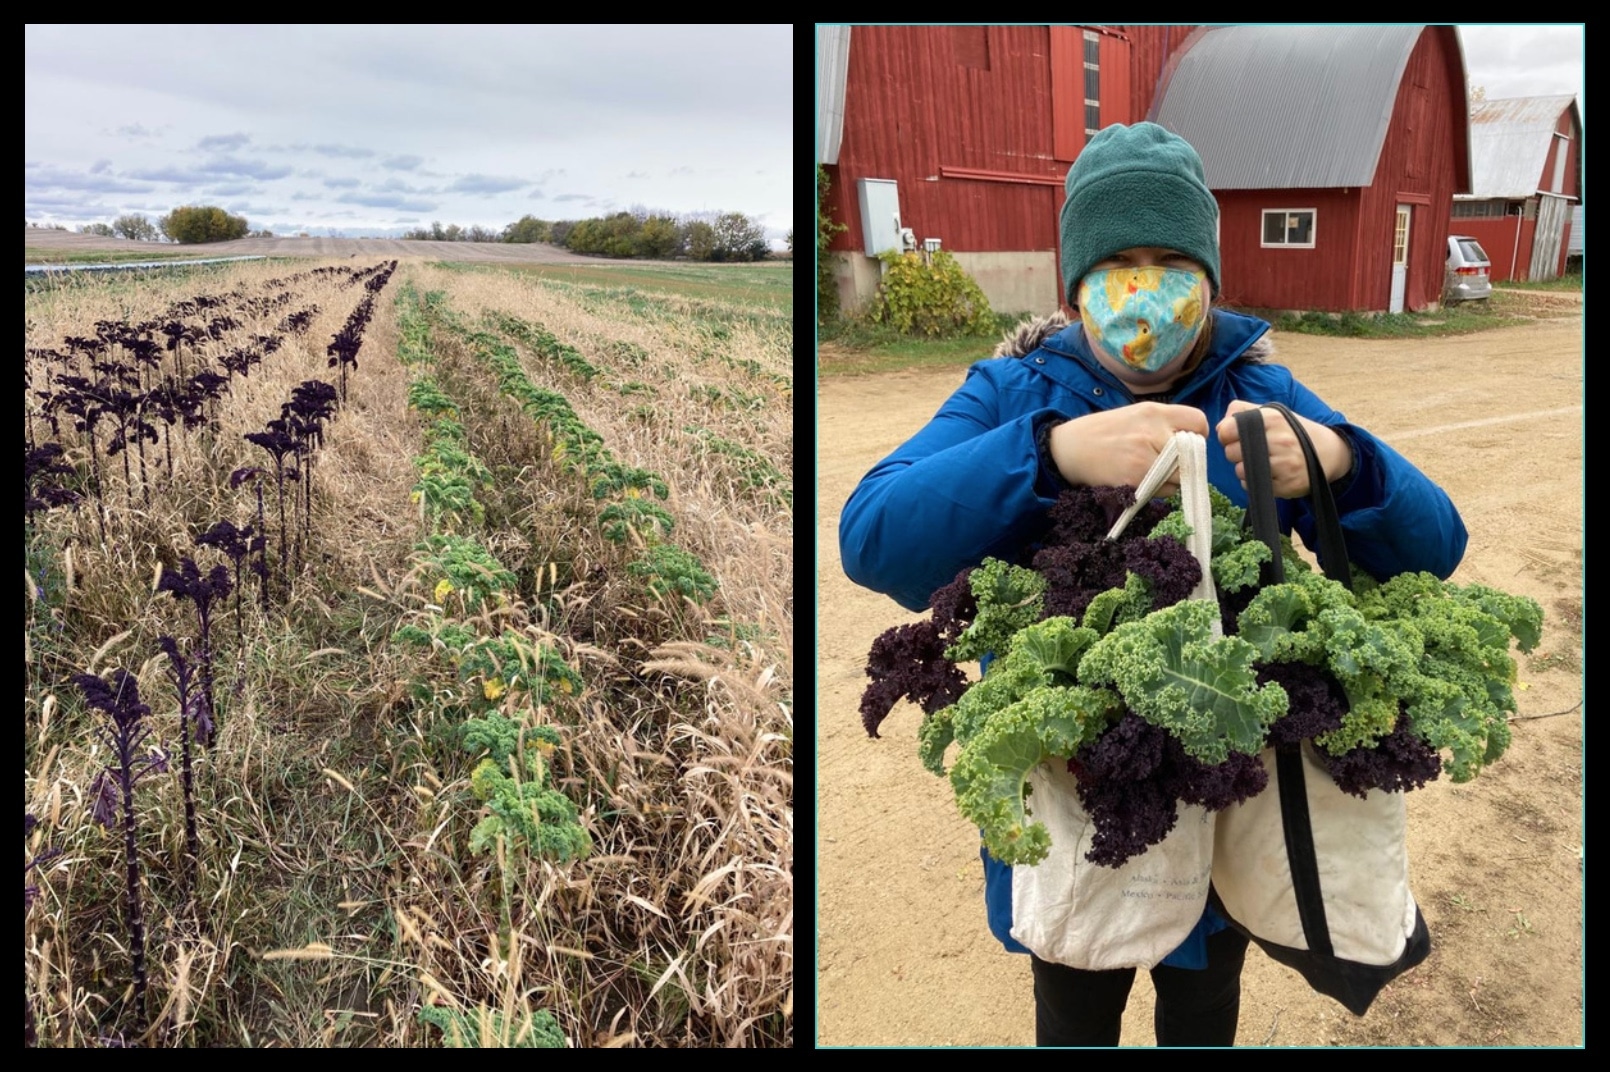
It was a nice surprise to find crimson clover peeking out of our standing cover crops this spring. Crimson clover is pretty finicky about when you seed it, and does not usually survive the winter. Steve seeded a summer cover crop mixture that included this clover. In fall there was leftover clover seed in the planter, so he just added seed for a winter-hardy cover crop and planted it all together. He was only trying to clean out the planter. The heavy snow cover must have helped the crimson clover survive the winter. It’s an excellent legume, capable of fixing lots of nitrogen, so we’re glad to have it. Plus it brightens our days with a burst of color. Beth & Steve
Veggie List & Veggie Notes
Week #2, May 27/28, 2021
– Weekly shares
– EOW/ green
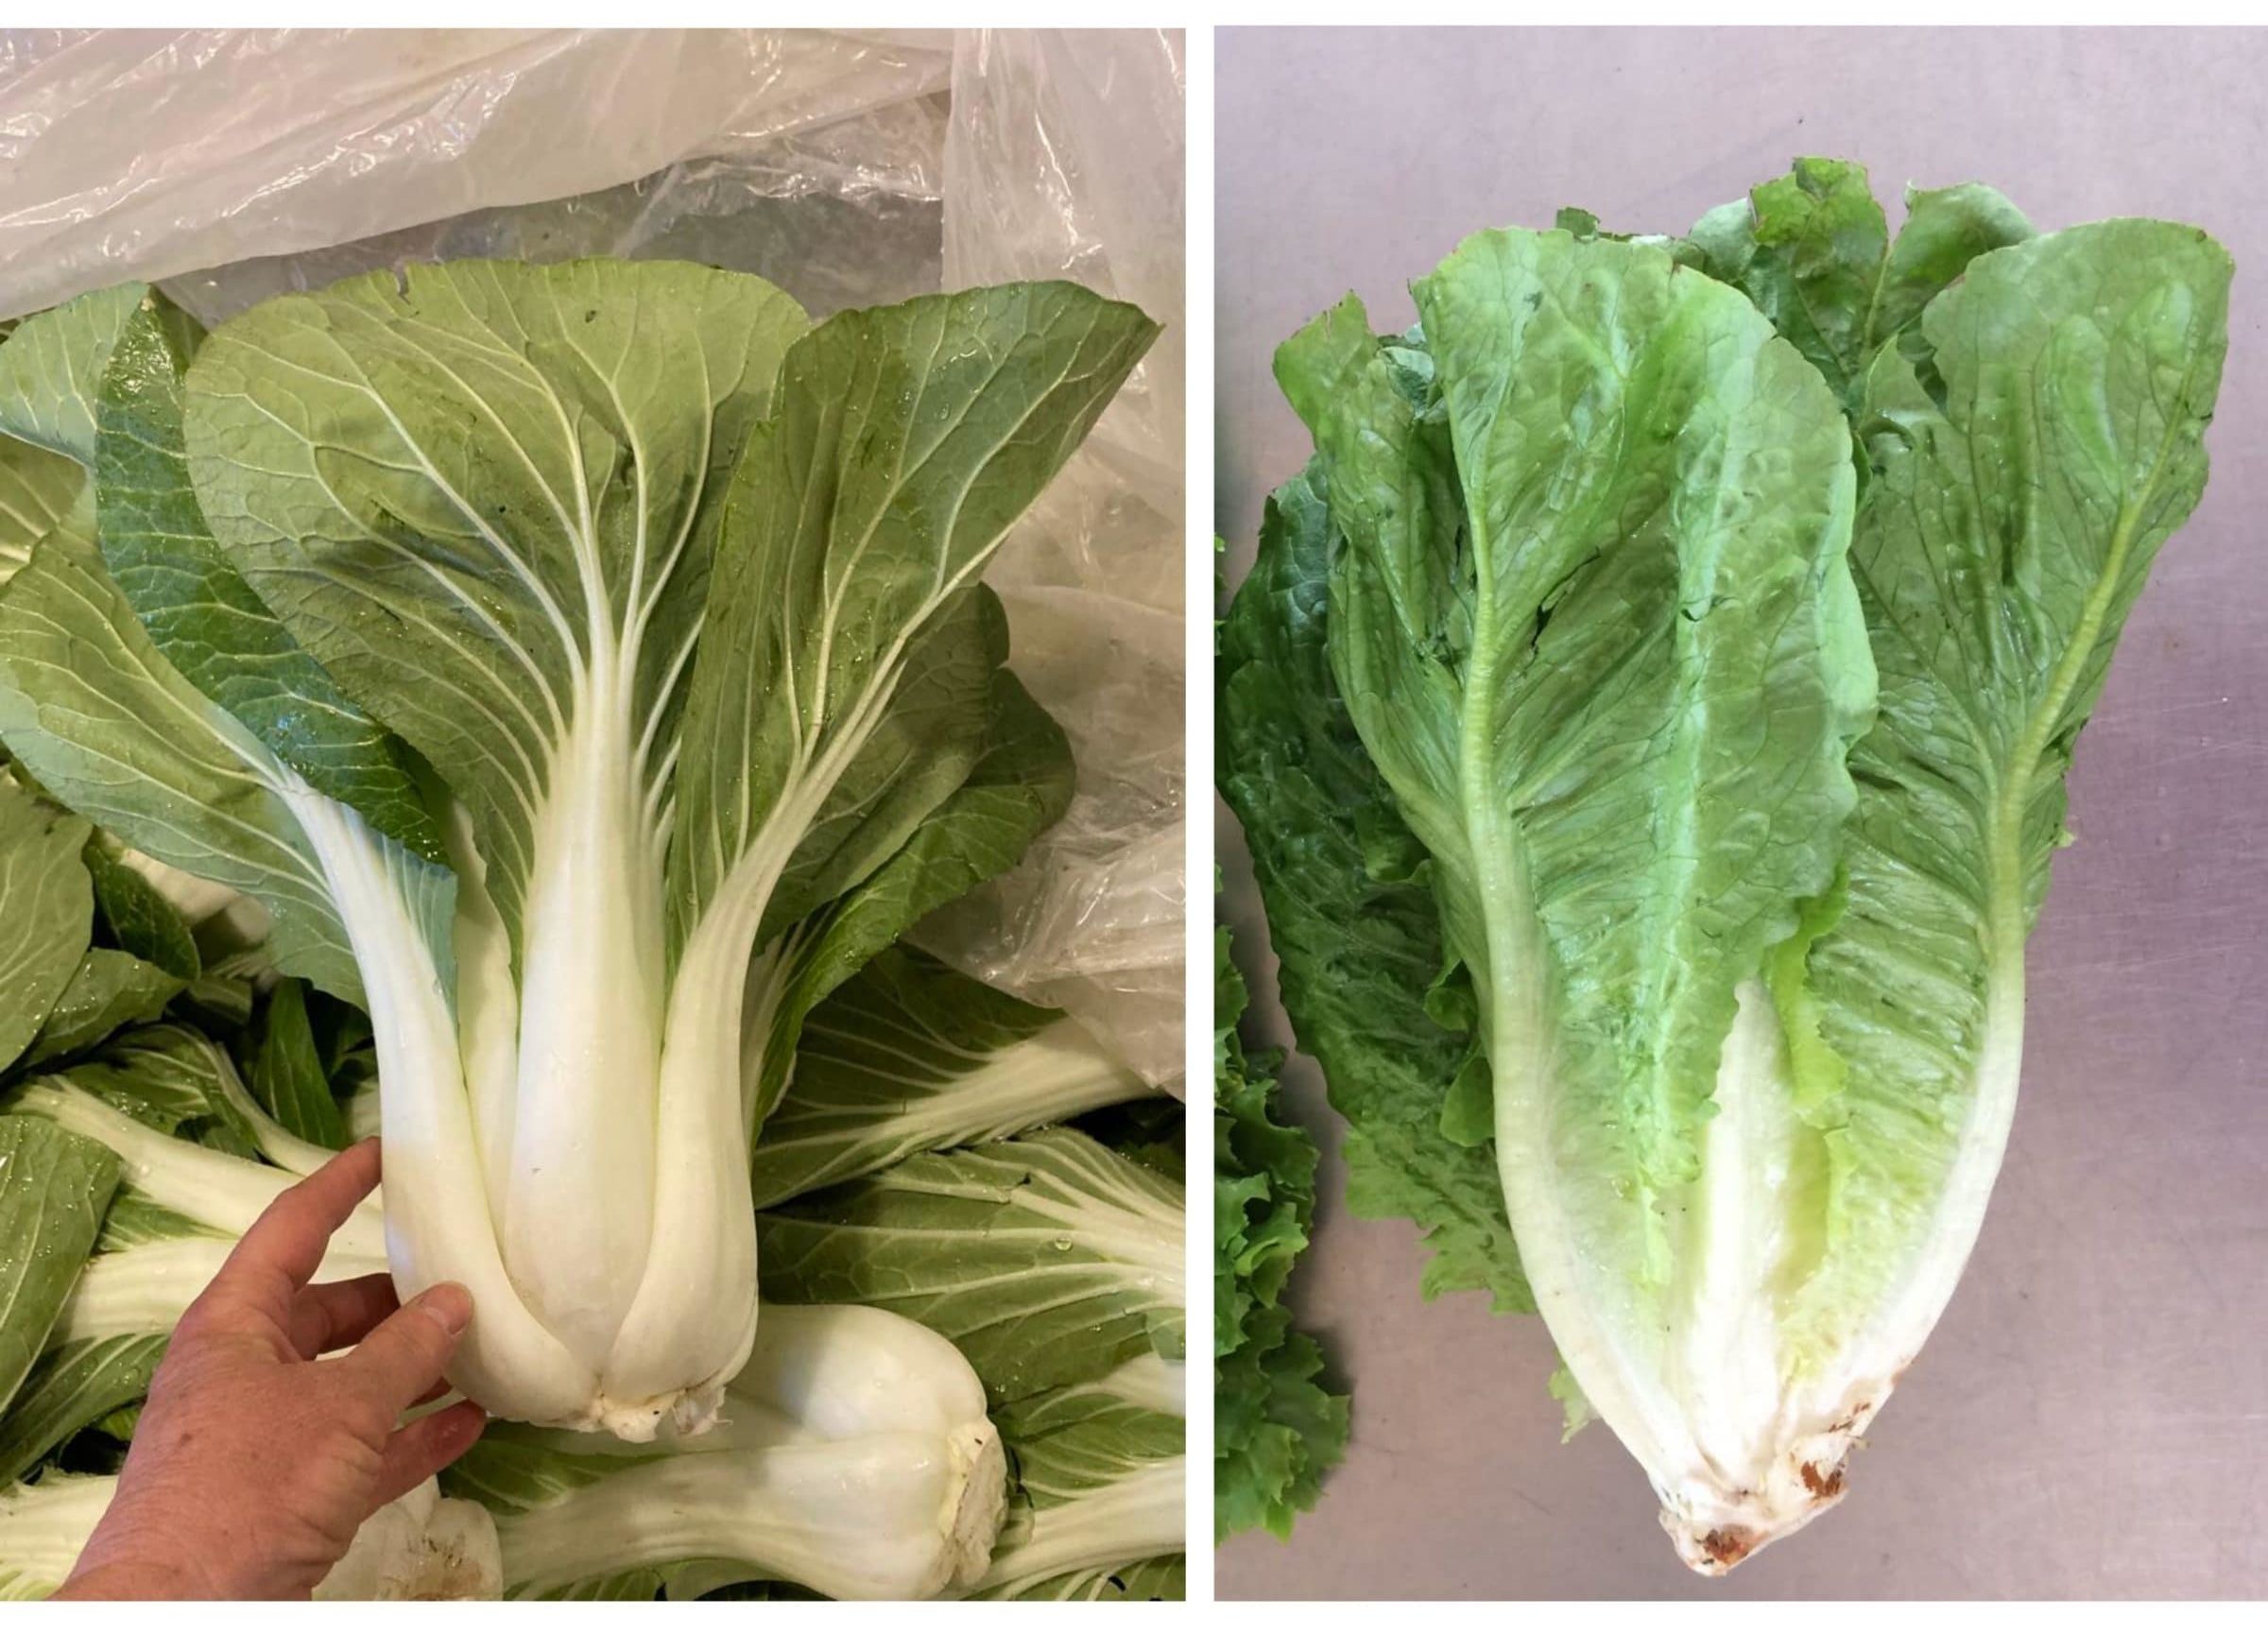
Bok choy (left) and Romaine lettuce (right)
Button mushrooms, 12 oz
Asparagus, 0.6 lb
Bok choy, 1 large
Romaine lettuce, 1 large
Spinach, 2 bunches
Salad radishes, 1 medium bunch
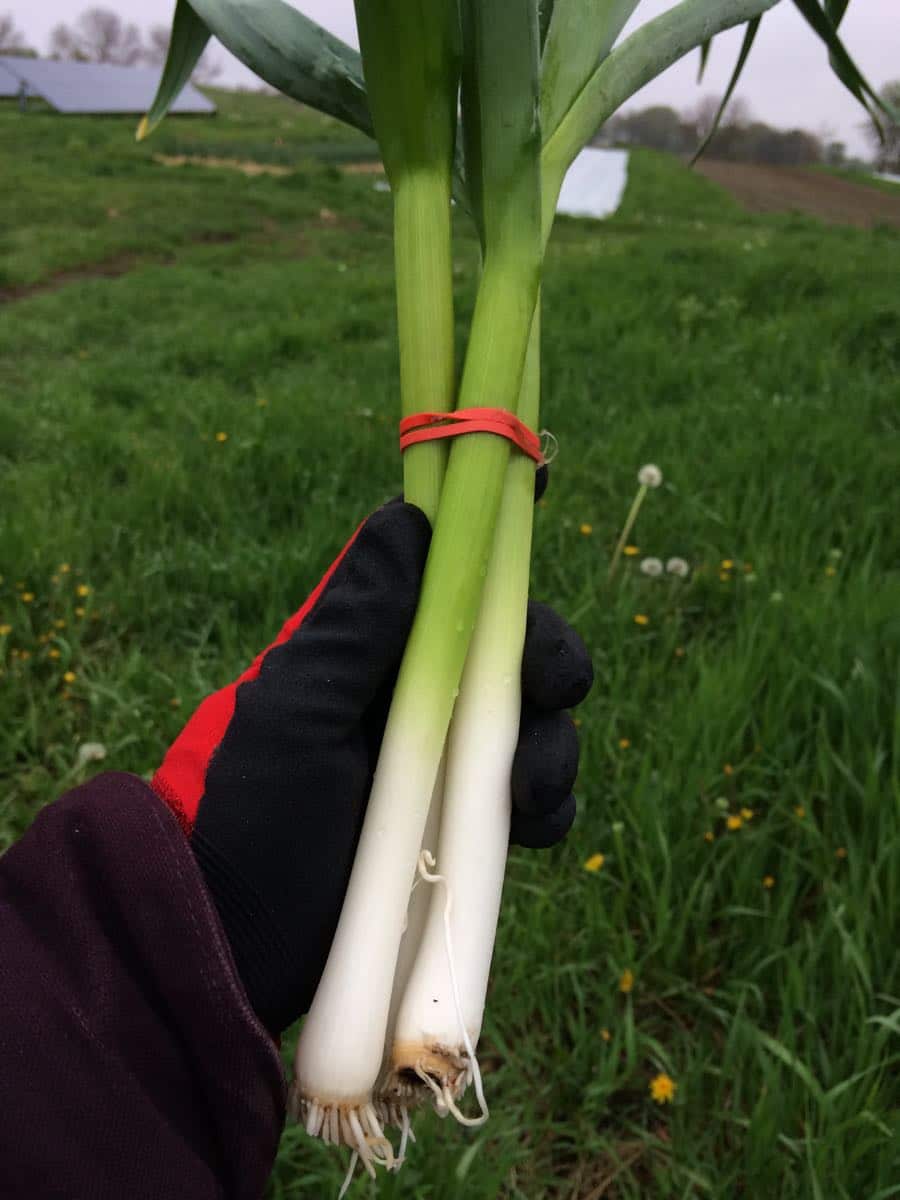
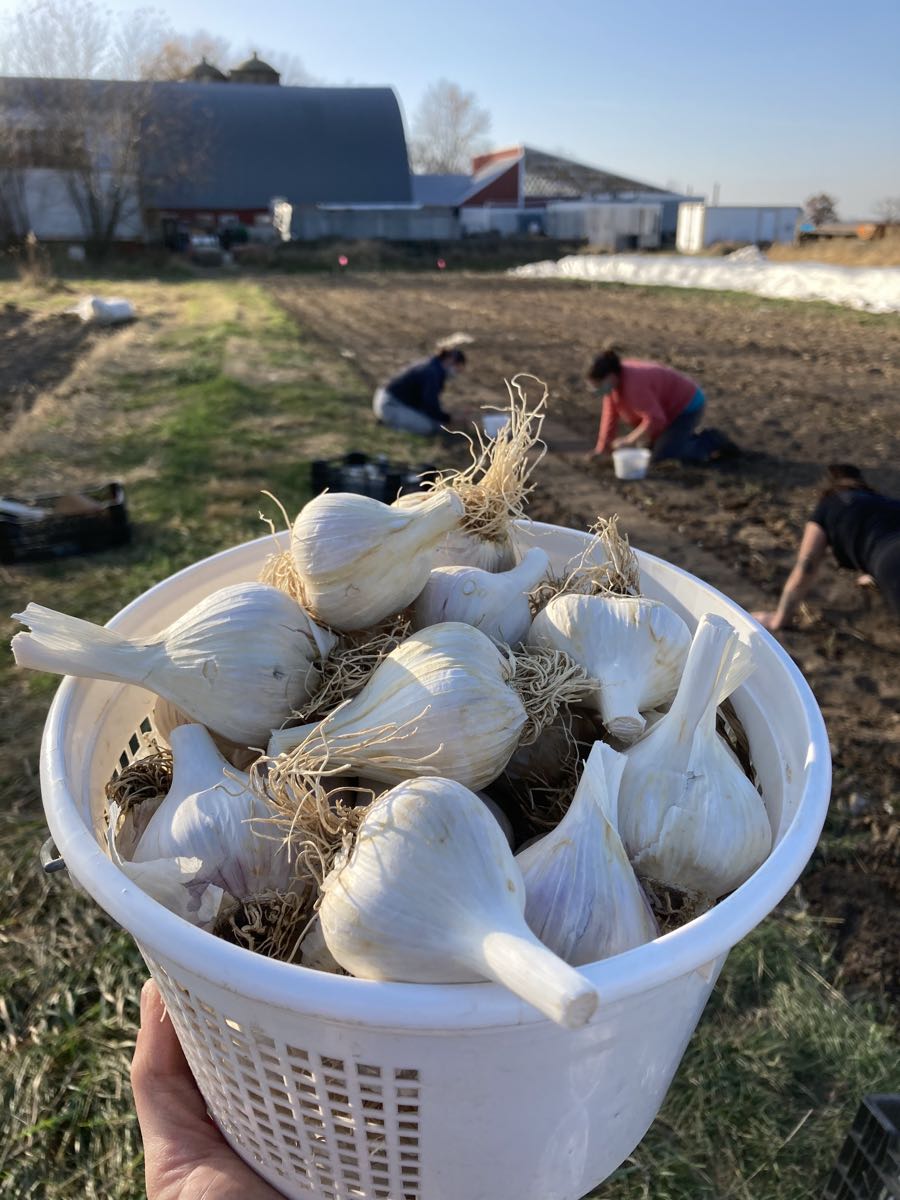
Green garlic, 1 bunch
Rhubarb, 3/4 lb
Next week’s box will probably contain shiitake mushrooms, salad turnips, lettuce, some kind of spring greens, scallions and more.
See last week’s newsletter for wash, prep, cook and storage instructions for these crops: asparagus, spinach, salad radishes. We included an entire section on “How to wash greens efficiently and to maximize storage life.”
Button mushrooms – These organic mushrooms are from Hidden Valley Mushrooms from Wisconsin Dells. We bring in mushrooms from Mary every spring, because I think they combine so perfectly with our spring vegetables, for salads, quiches, etc.
Storage: Here are Mary’s suggestions for storing the mushrooms:
– Store separate from leafy greens, which hasten mushroom aging.
– If storing for more than a few days, remove from the box and refrigerate in a paper bag with holes punched in the side. Keep dry.
– Don’t wash to clean, just wipe with a damp cloth.
Asparagus – See last week’s newsletter for info on cleaning and cooking.
Storage: Asparagus is perishable, so eat it as soon as possible. Store in a paper towel, cloth or paper bag, then wrap loosely in a plastic bag. The paper bag protects the asparagus tips from direct contact with the plastic bag. The plastic bag keeps the asparagus from wilting.
Bok choy (large rosette with thick white stems and green leaves) – This Asian green is good for stir-frying or sautéing or in soup. You can think of the stems and leaves as two separate vegetables. The stems require longer cooking. The leaves will cook almost as quickly as spinach. Bok choy stores well, so feel free to pull off leaves as you need them, or use the whole head at once. Storage: Refrigerate in a plastic bag or other container.
Romaine lettuce (upright head of lettuce with crisp leaves) – More sturdy and less fragile than our other spring lettuces. Great for Caesar Salad or lettuce wraps. If you’re intimidated by the amount of salad greens this week, Ceasar salad is a good option because it shrinks a big head of lettuce and everyone will fight over the leftovers. Poof, it’s gone.
Green garlic (looks like scallions, tastes like garlic) – Green garlic is young garlic, planted in fall but harvested before bulbs have formed.
Preparation: Green garlic is more pungent than scallions, so slice thinly and use sparingly when raw. It mellows when cooked. Chop and add to any cooked dish that would benefit from garlic. Use the white bulbs and pale green stems. Avoid the dark green stems and leaves, as these are fibrous.
Rhubarb – Storage: Refrigerate in a plastic bag. FYI, 3/4 lb of rhubarb yields about 2.25 – 2.5 cups when chopped.
Stewed rhubarb: This is the simplest way to prepare rhubarb. Chop rhubarb into one inch chunks. Stir over medium heat with a small amount of water in the bottom of the pan. The rhubarb will release moisture as it cooks. Stew until it softens and falls apart. Sweeten to taste with honey or sugar. Eat warm on its own, over vanilla ice cream, on pancakes, etc.
Preserve: Rhubarb is so easy to freeze. Wash, chop and pop it in a freezer bag. That’s it; no need for blanching. When baking muffins or cakes, add the frozen rhubarb directly to the batter.
Recipes
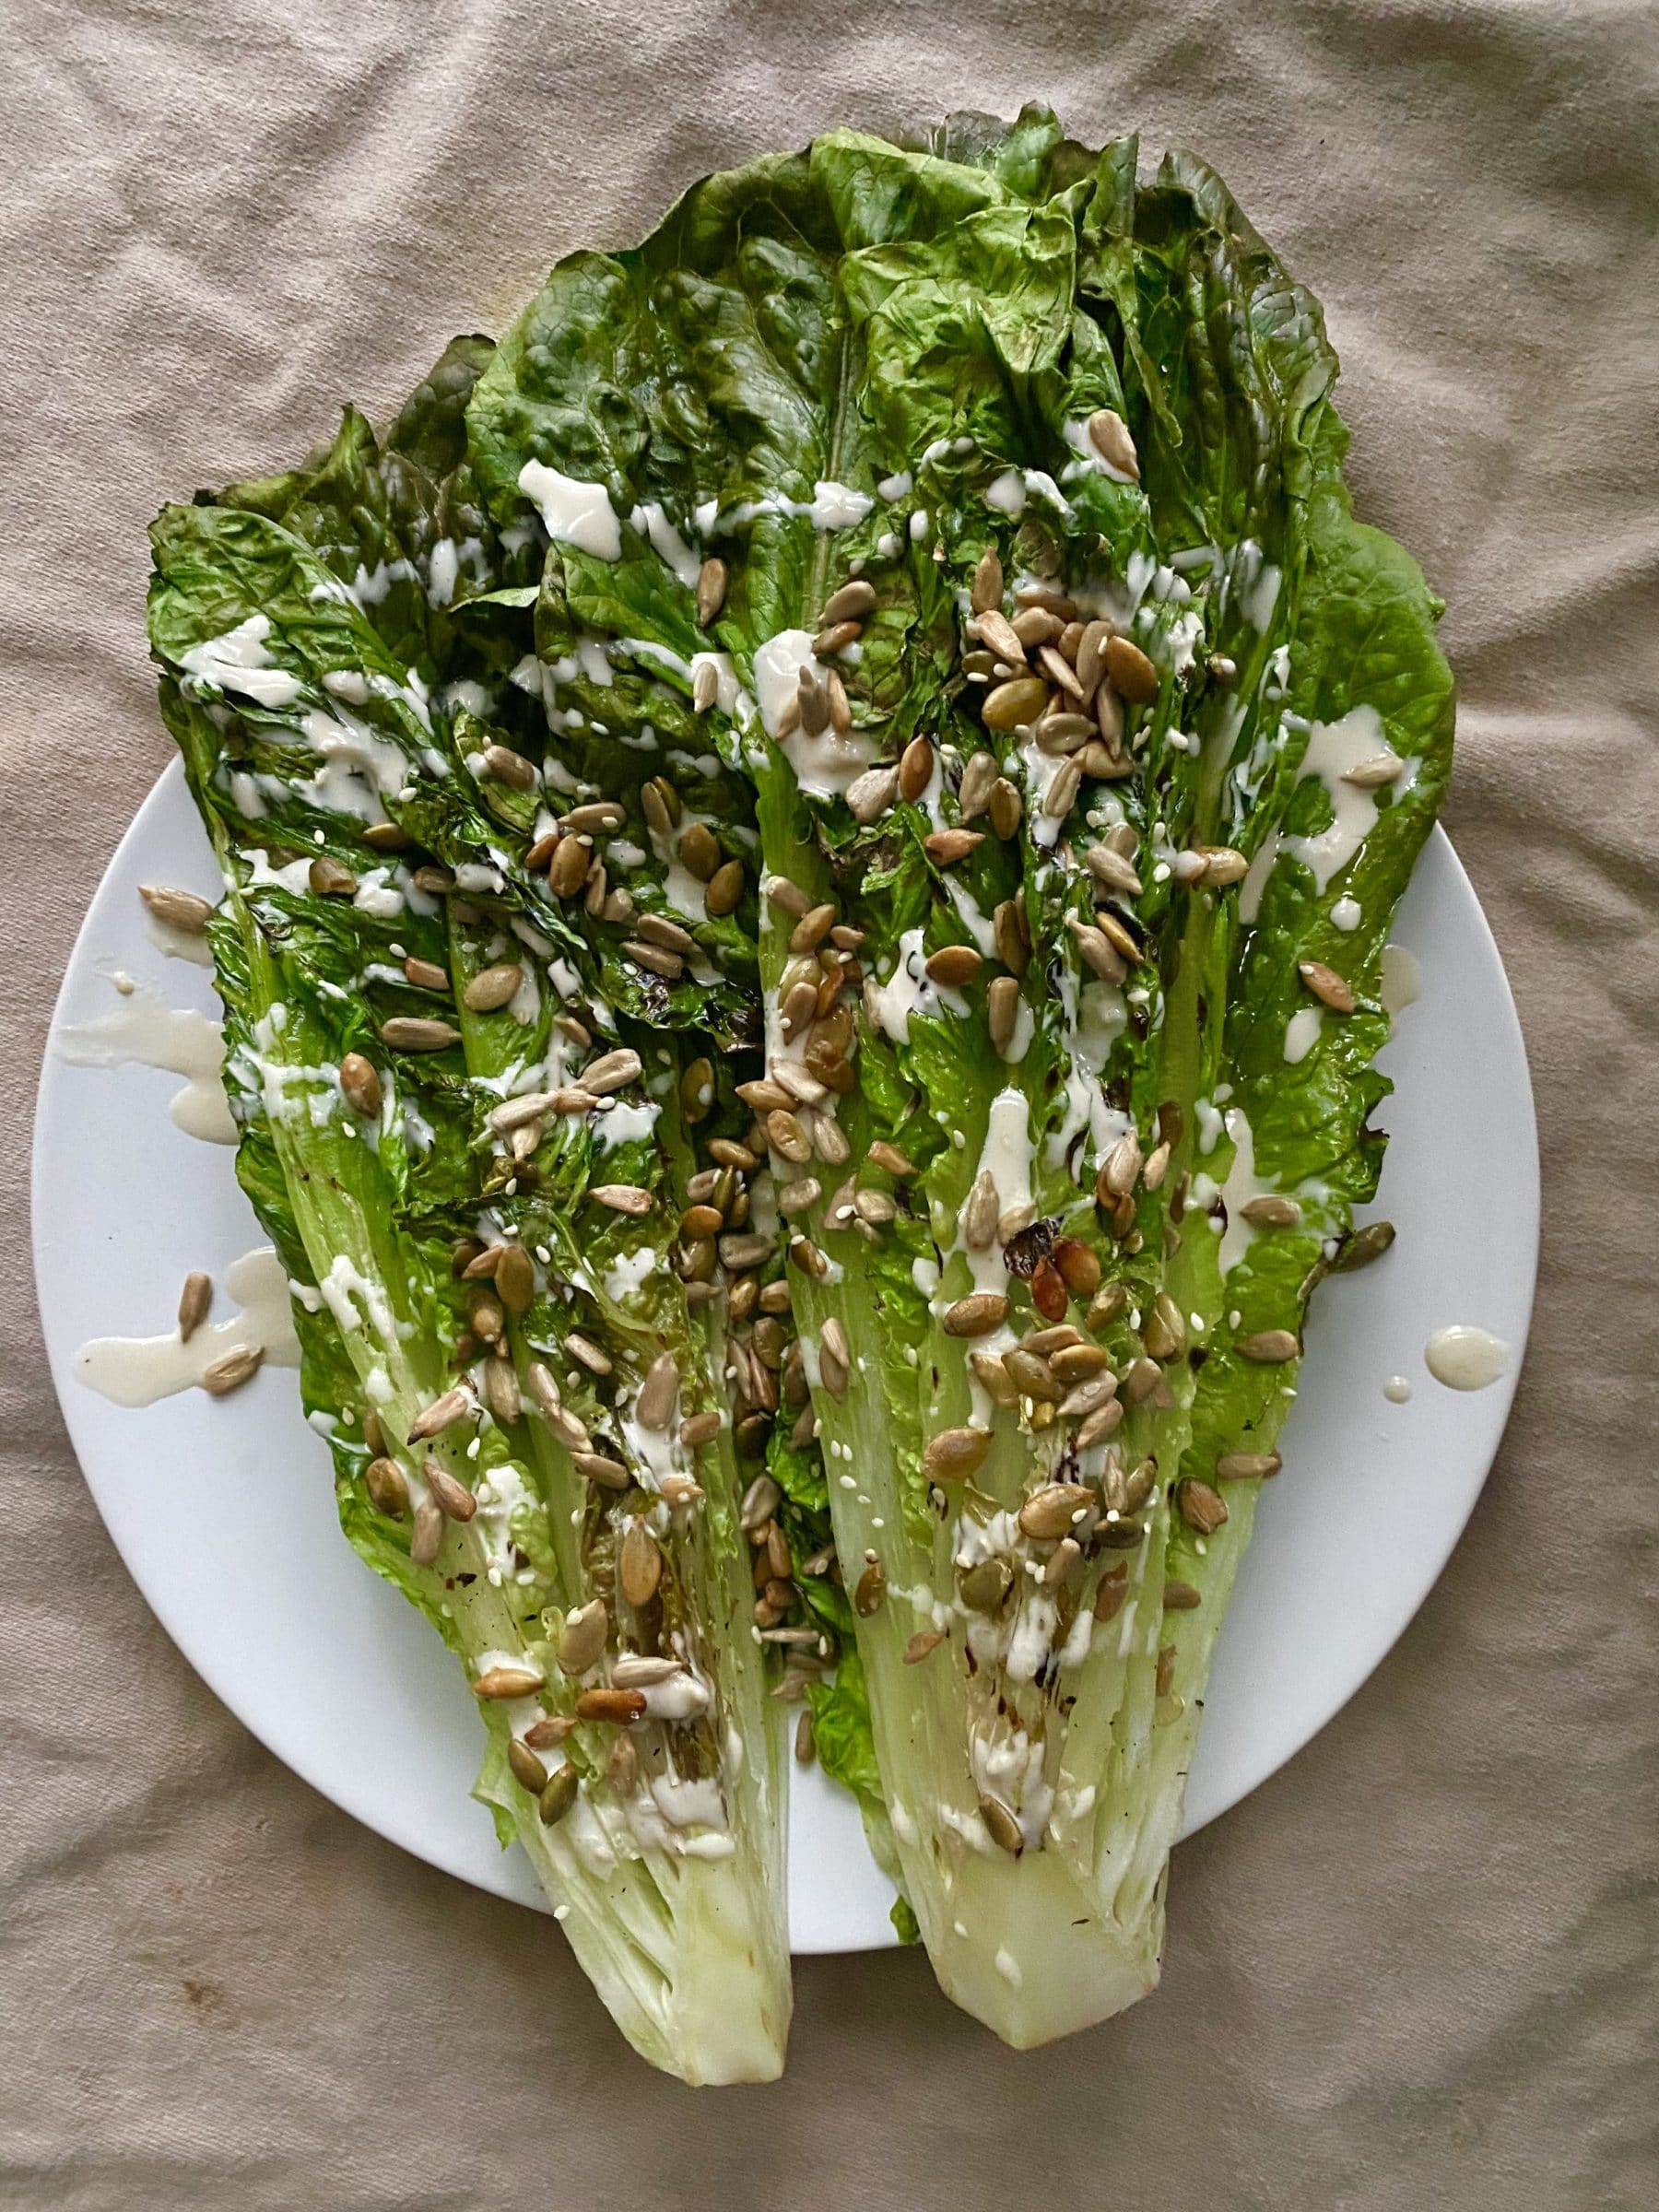
Grilled Romaine with Tahini Dressing and Super-Seedy Crunch
Serves 4
Prep time: 10 minutes
Cook time: 10 minutes
Ingredients
1/4 cup smooth tahini
3 tablespoons water, more as needed
2 tablespoons lemon juice
1 teaspoon toasted sesame oil
1 green garlic bulb or 1 garlic clove, minced
1/4 teaspoon maple syrup
1/4 teaspoon sea salt, more for sprinkling
1/4 cup sunflower seeds
1/4 cup pepitas
1 tablespoon sesame seeds
1/4 teaspoon extra-virgin olive oil, more for drizzling
1 large head romaine
Fresh black pepper
- Preheat the oven to 350 and line a baking sheet with parchment paper.
- Make the Tahini Dressing: In a small bowl, stir together the tahini, water, lemon juice, sesame oil, green garlic, maple syrup, and sea salt. If the dressing is too thick, add water, 1/2 tablespoon at a time, to thin it to your desired consistency.
- Make the Super-Seedy Crunch: Place the sunflower seeds, pepitas, and sesame seeds on the prepared baking sheet. Drizzle with the 1/4 teaspoon olive oil and sprinkle with a pinch of salt. Toss to coat, and spread the seeds in an even layer. Bake for 5-7 minutes, until fragrant and lightly browned.
- Grill the romaine: Preheat a grill or grill pan to high heat. Carefully slice the romaine in half lengthwise. Then, slice each half in half lengthwise again, keeping the core intact. Drizzle the romaine wedges with olive oil and sprinkle them with salt and pepper. Grill for 1-2 minutes on the first cut side, 1-2 minutes on the second cut side, and 1 minute on the back, until lightly charred.
- Serve the grilled romaine wedges with generous drizzles of the Tahini Dressing and plenty of the Super-Seedy Crunch.
.
.
.
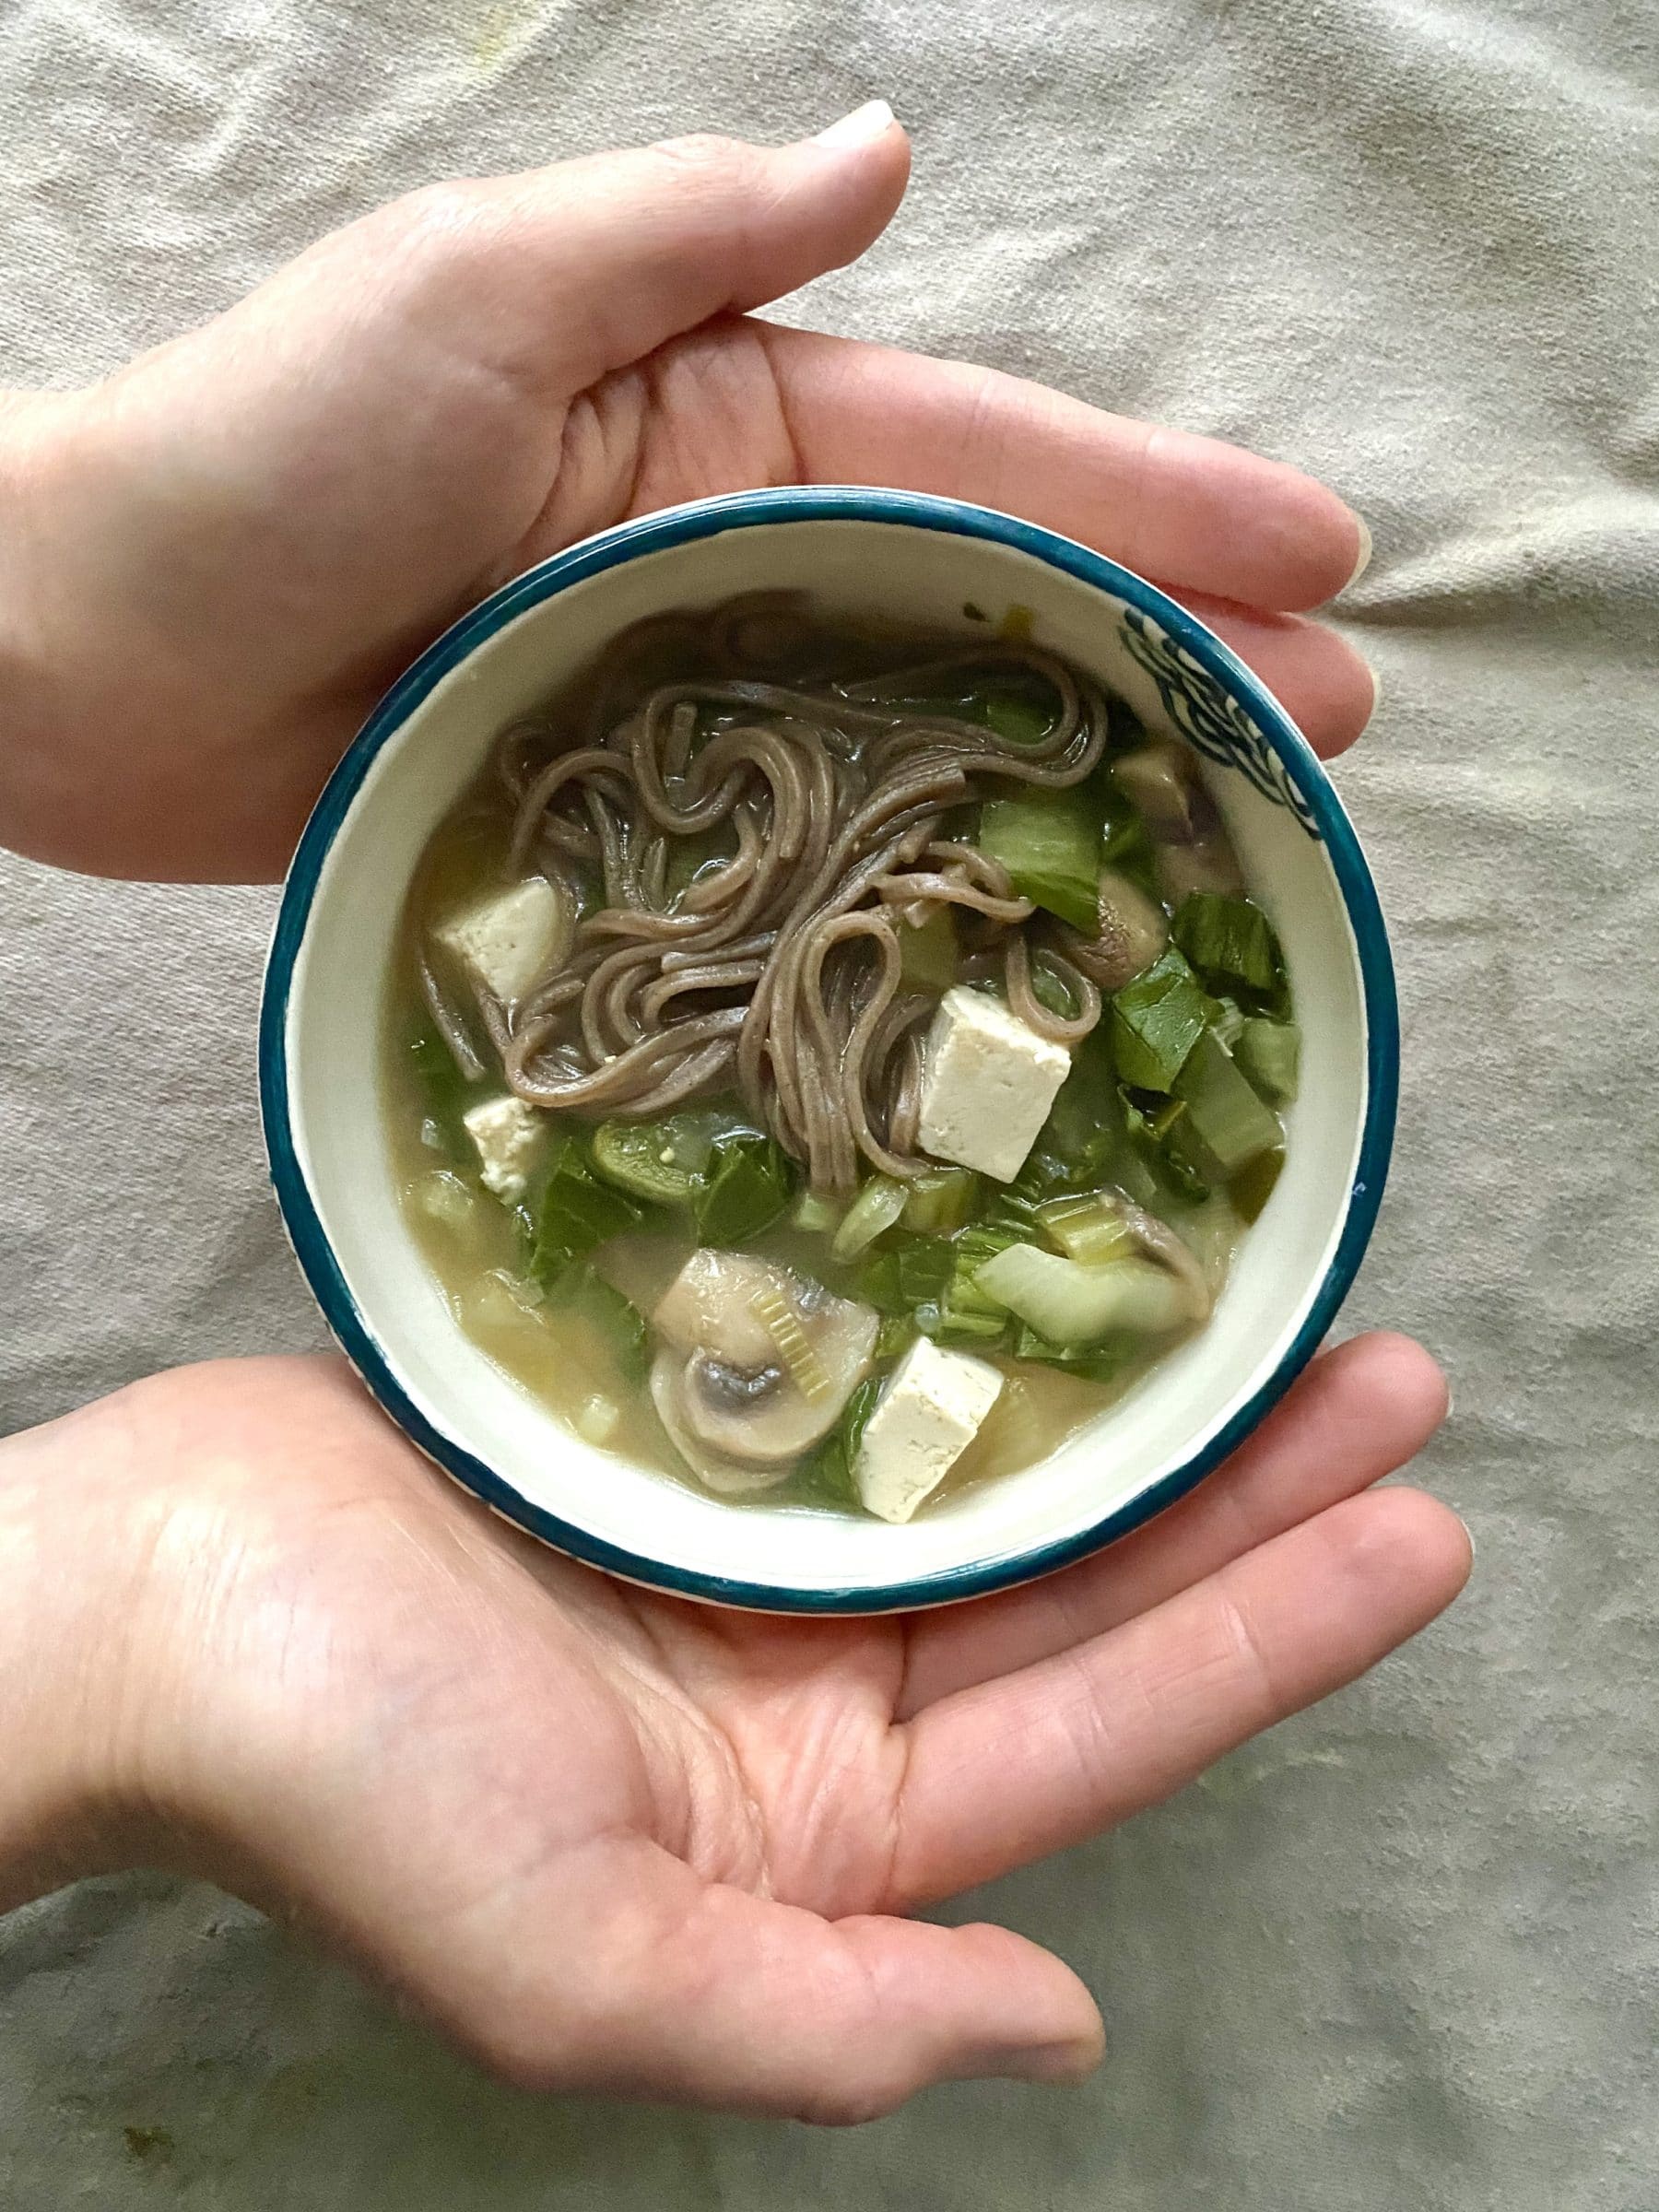
Mushroom Miso Soup with Bok Choy and Green Garlic
If you’ve never worked with miso before, you can find it in the refrigerated section of most grocery stores. Once you add it to the soup, be sure to keep it at a very low simmer. Boiling miso can destroy its beneficial enzymes.
Serves 4-6
Prep time: 20 minutes
Cook time: 30 minutes
Ingredients
1 tablespoon extra-virgin olive oil or neutral oil, such as avocado oil
12 oz button mushrooms, sliced
2 stalks green garlic, white and light green parts, sliced
1 large bok choy, sliced, stems and leaves divided
2 tablespoons tamari, more for serving
6 cups water
1/3 cup white miso paste
6 oz soba noodles, optional
Toasted sesame oil, optional, for drizzling
7 oz tofu, cut into 1/2-inch cubes
1 tablespoon rice vinegar
- Heat the oil in a large pot or Dutch oven over medium heat. Add the mushrooms and cook without stirring for 2 minutes. Stir, then cook for another 2 minutes without stirring (this helps brown the mushrooms). Add the green garlic and sliced bok choy stems and cook for 2 minutes more, until softened.
- Stir in the tamari, followed by the water. Cover and simmer for 20 minutes.
- Place the miso in a medium bowl. Uncover the pot and scoop 1/2 cup of the hot broth into the bowl with the miso. Whisk vigorously to form a smooth paste. Reduce the heat to low, and stir the miso mixture into the pot.
- If desired, cook the soba noodles in a large pot of unsalted water according to the package instructions. Drain and rinse with cold water and toss with a drizzle of sesame oil to prevent sticking.
- Add the sliced bok choy leaves and the tofu to the soup, and stir over low heat until the leaves wilt. Stir in the rice vinegar and turn off the heat.
- Portion the soba noodles into bowls and top with the soup. Serve with more tamari to taste.
.
.
.
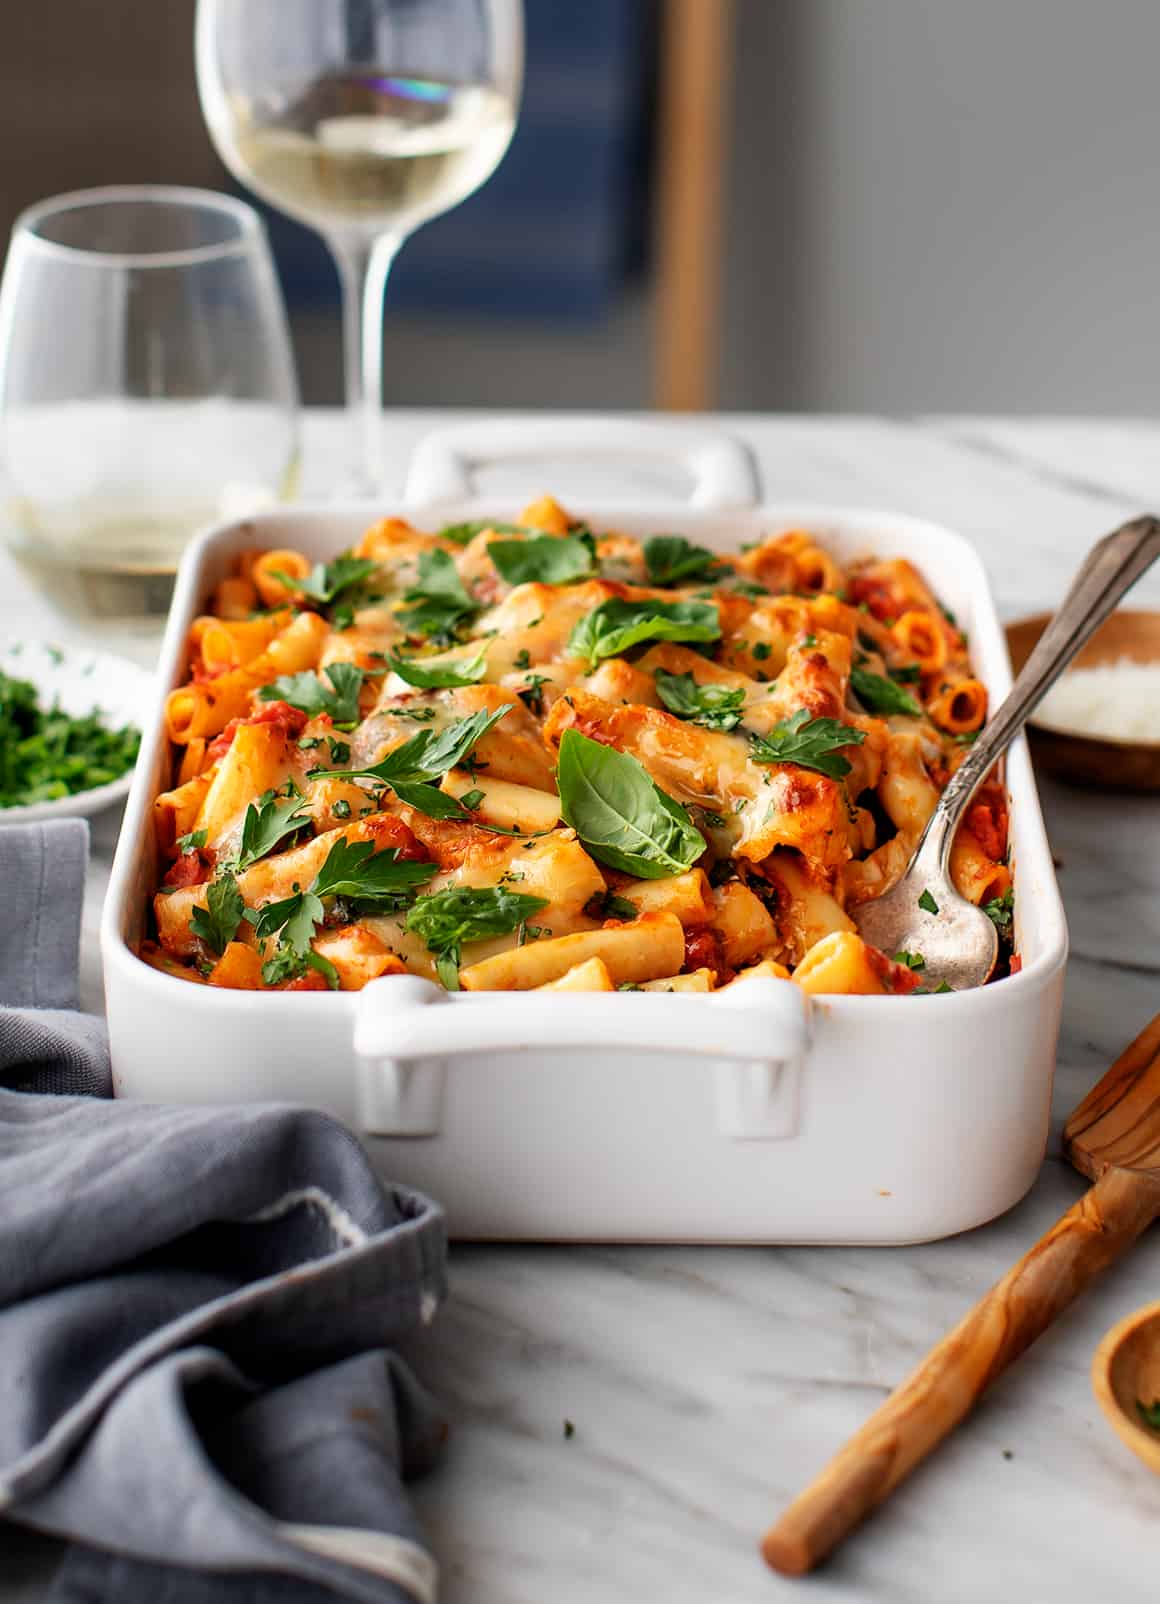
Photo by Jack Mathews
Baked Ziti from Love & Lemons
This comforting pasta has a full pound of spinach hiding inside it! There are no herbs in the box this week, so feel free to skip the parsley or basil for garnish, or top with minced green garlic.
Vegetarian
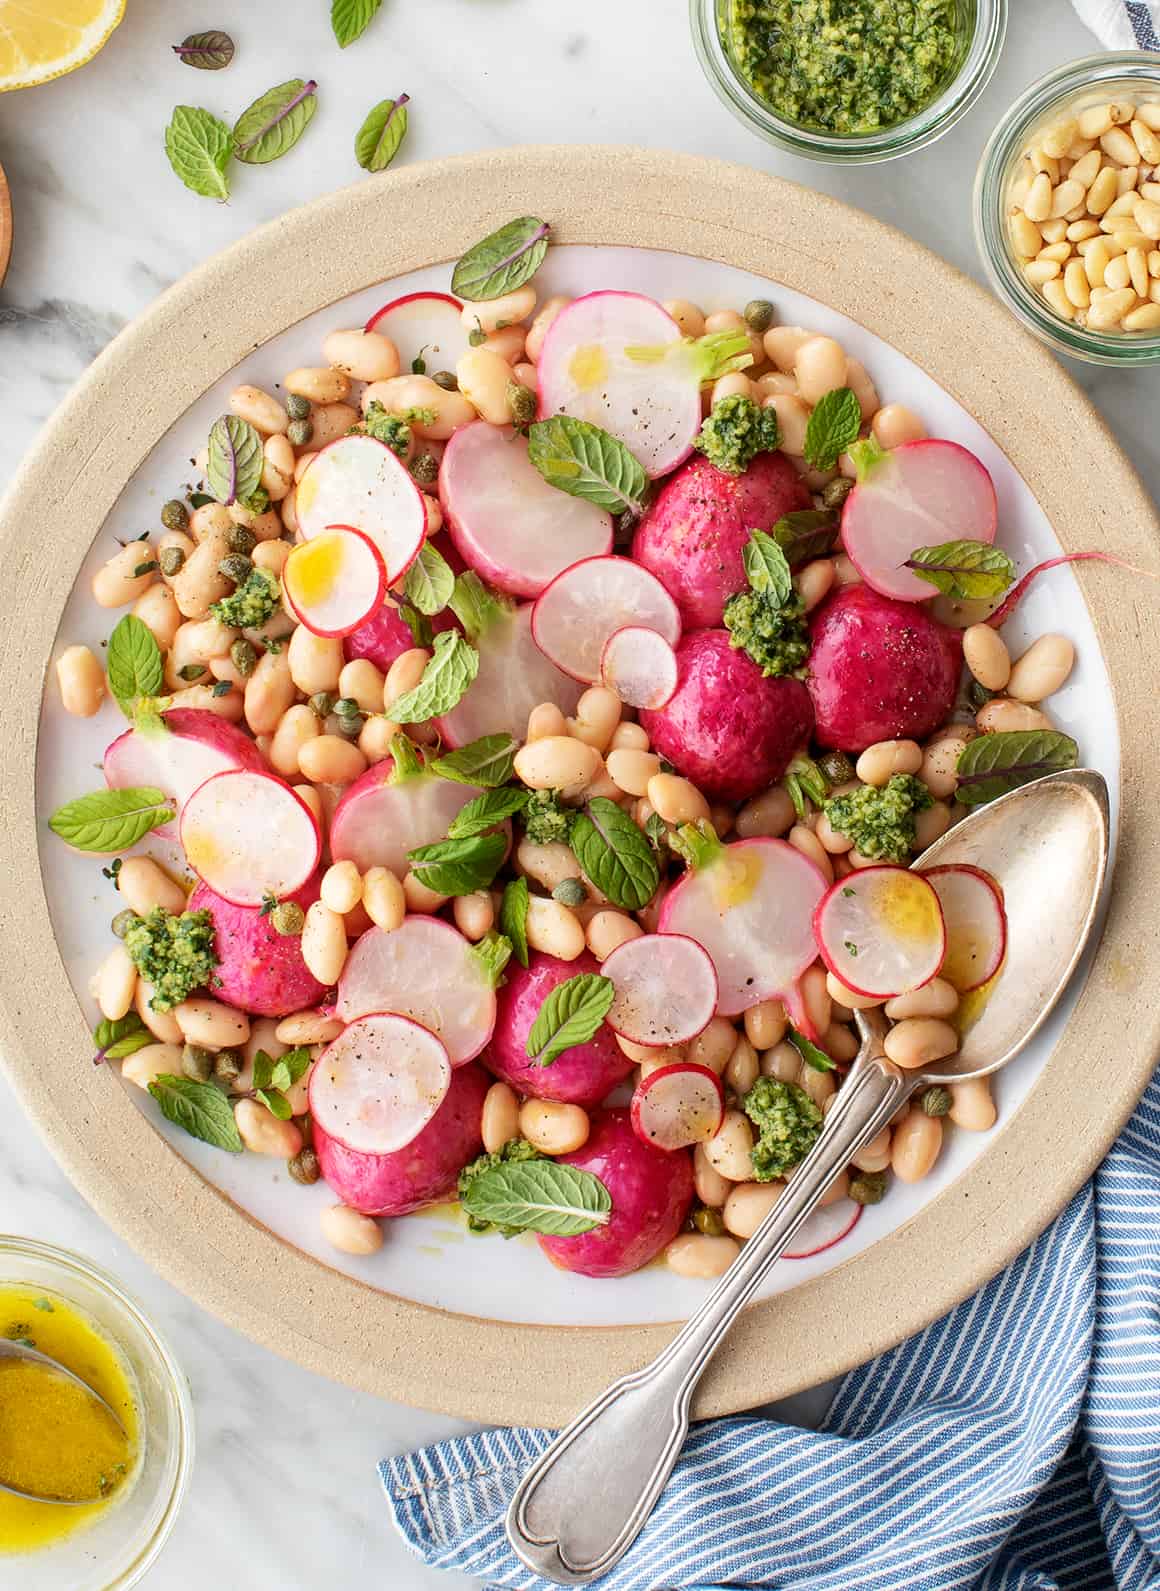
Photo by Jack Mathews
Radish Salad from Love & Lemons
This recipe will let you use your radishes three ways: you’ll roast some, leave some raw, and dollop a nutty radish green pesto on top! If you like, you can skip the mint and make the radish green pesto with half radish greens and half spinach instead of basil.
Vegan, gluten-free

Photo by Smitten Kitchen
Shaved Asparagus Pizza from Smitten Kitchen
Deb describes this pizza as “tangled and grassy, bubbly and lightly charred, and accented with mild bites of scallion.” How good does that sound? To use the box produce, replace the scallion with thinly sliced green garlic.
Vegetarian
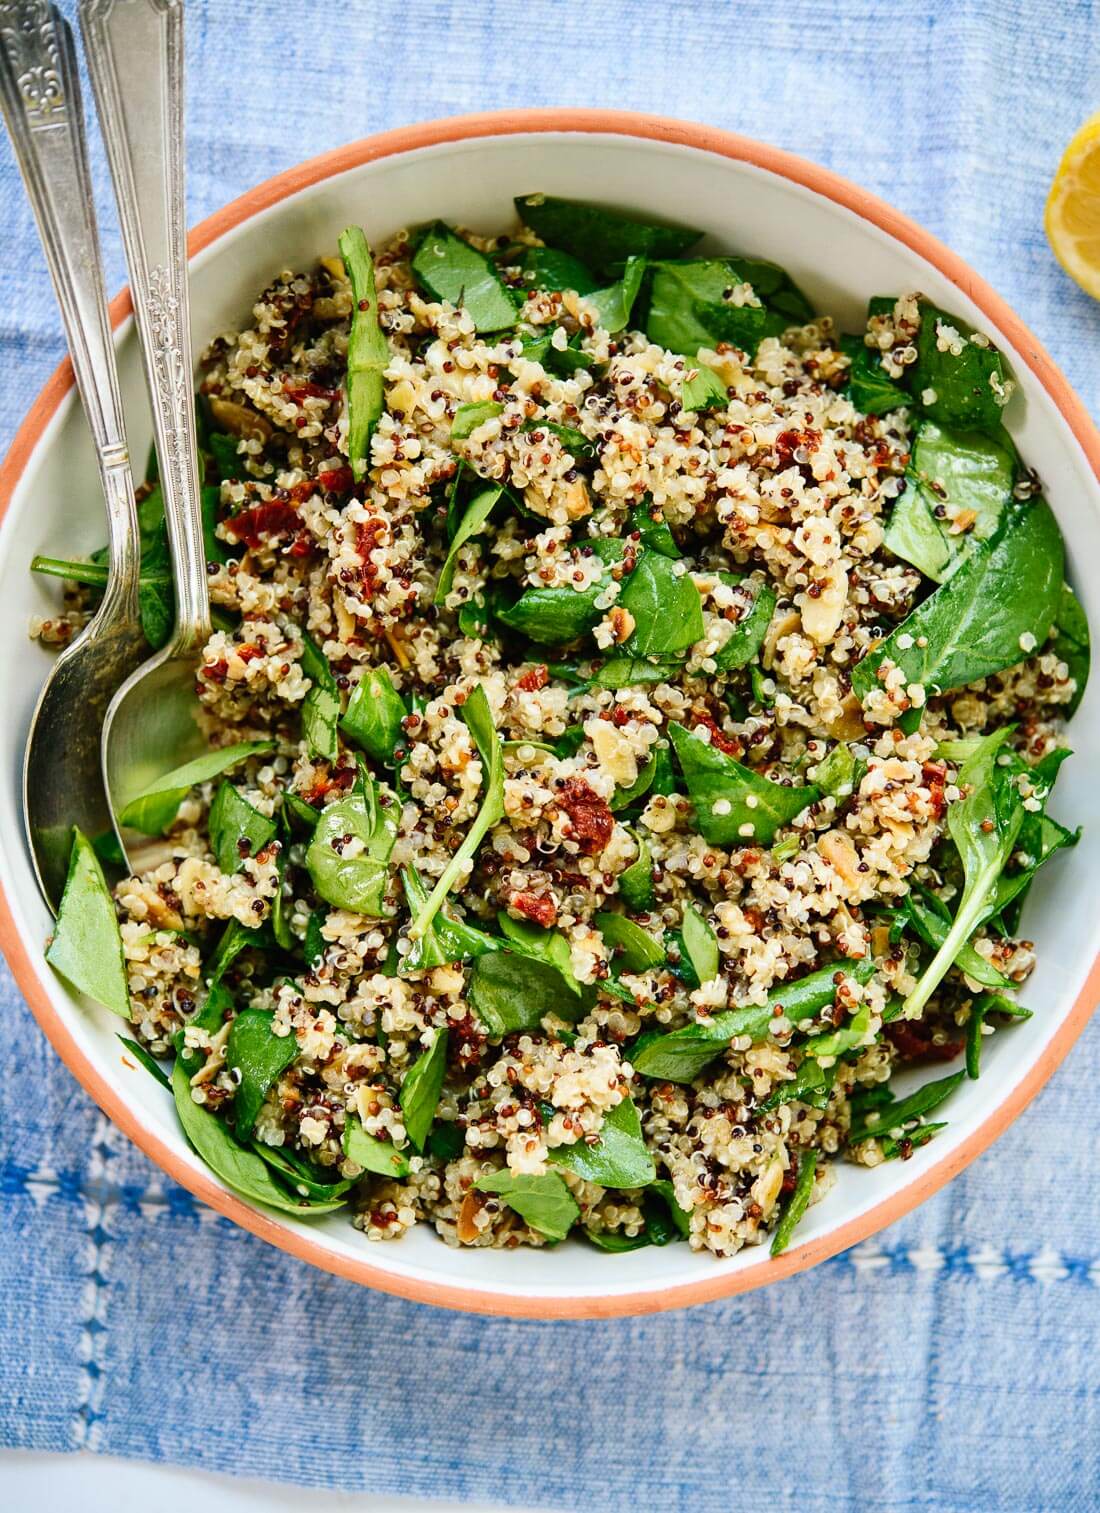
Photo by Cookie+Kate
Sun-Dried Tomato, Spinach, and Quinoa Salad from Cookie+Kate
Quinoa and sliced almonds make this salad nice and hearty, so it’d be a great one to pack for lunch!
Vegan, gluten-free

Photo by Minimalist Baker
Savory Chickpea Pancakes with Leeks and Mushrooms from Minimalist Baker
These crepe-like pancakes are made with chickpea flour, so they’re high in protein and fiber. Make them for an easy dinner or lunch! You can replace leeks with green garlic, using the white bulbs and pale green green stems (but not the fibrous, dark green leaves).
Vegan, gluten-free

Photo by Smitten Kitchen
Almond Rhubarb Picnic Bars from Smitten Kitchen
Have you ever seen rhubarb look so pretty? It’s layered over a sweet almond filling and a buttery crust. If you weren’t already planning a picnic for this weekend, I hope you are now!
.

Week #1; A low threshold for joy
- On: May 20, 2021
- 1
Welcome to our CSA! Deliveries begin this week for:
– Weekly members, and
– Every-other-week/ purple group
– Sampler/ moon group
Log into your dashboard to view your schedule, at tipiproduce.csaware.com/accounts/login.jsp .
Download this season’s calendar here.
Farm Beauty
![]()
During the pandemic, friend told me that she developed a low threshold for joy. Life was so constrained that, give her a tasty snack or a kind word and she was thrilled. “It’s all out of proportion,” she said. I feel that way too, and find myself appreciating our farm’s beauty more intensely than I ever have. All my photos seem to focus on the sky or brilliant spring colors.
In the photo above, we transplanted cabbage in April. Look at that sky!

The pea field.
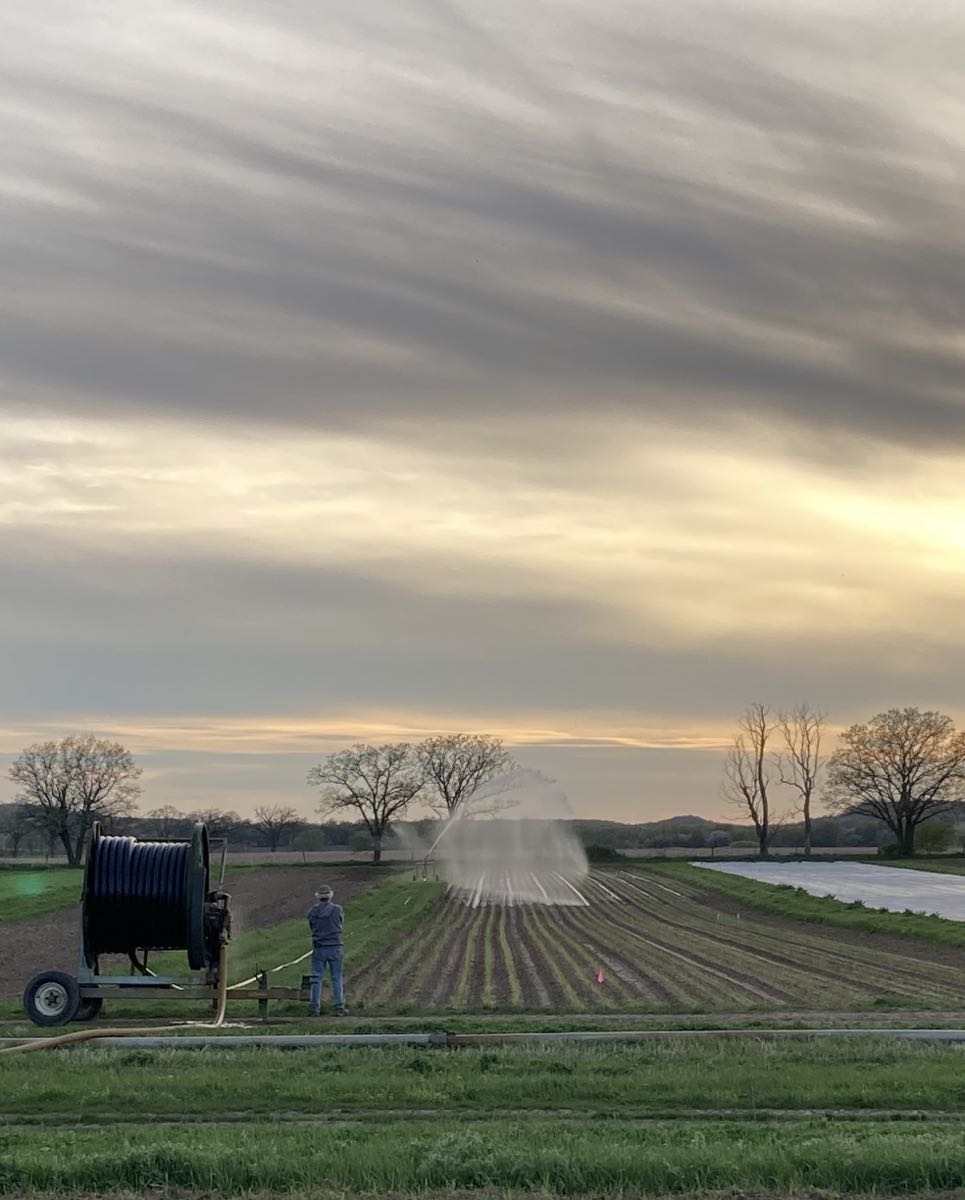
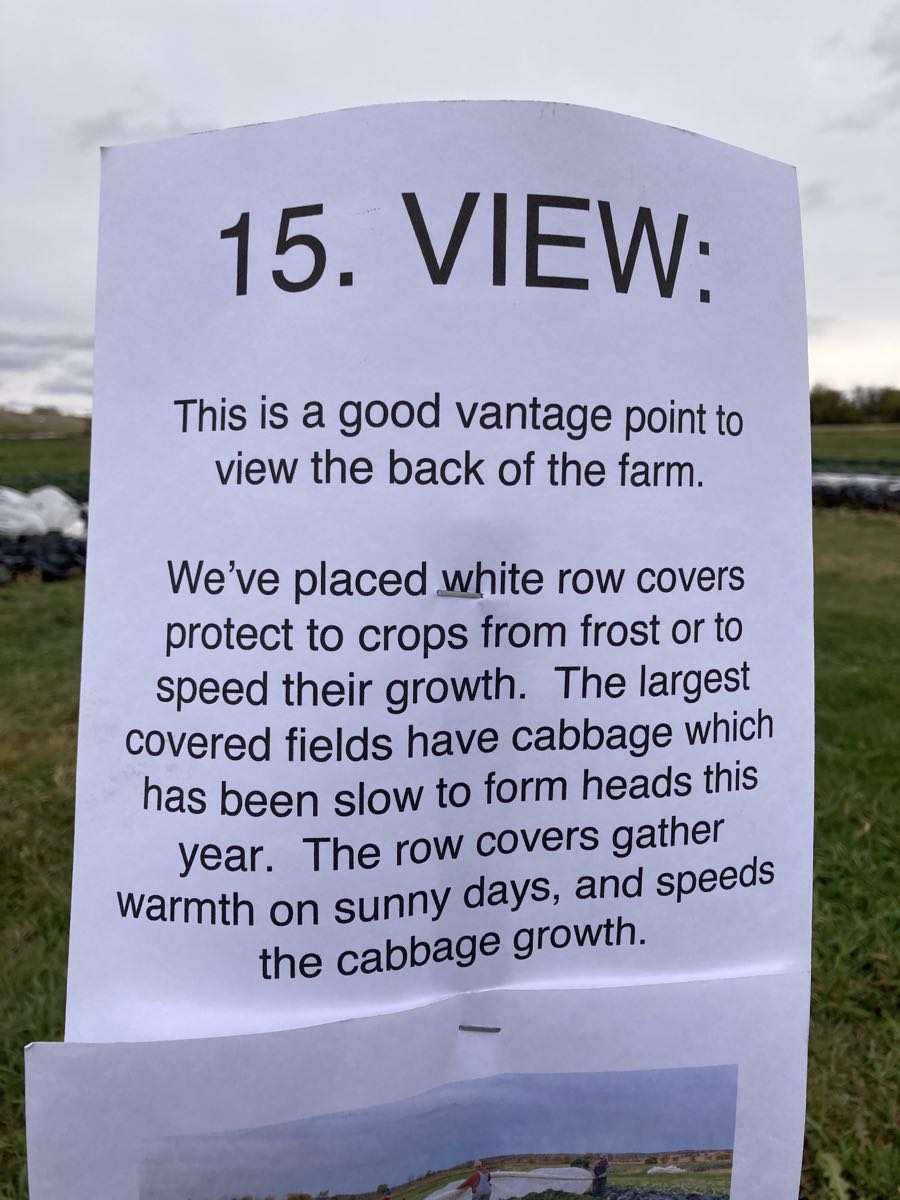
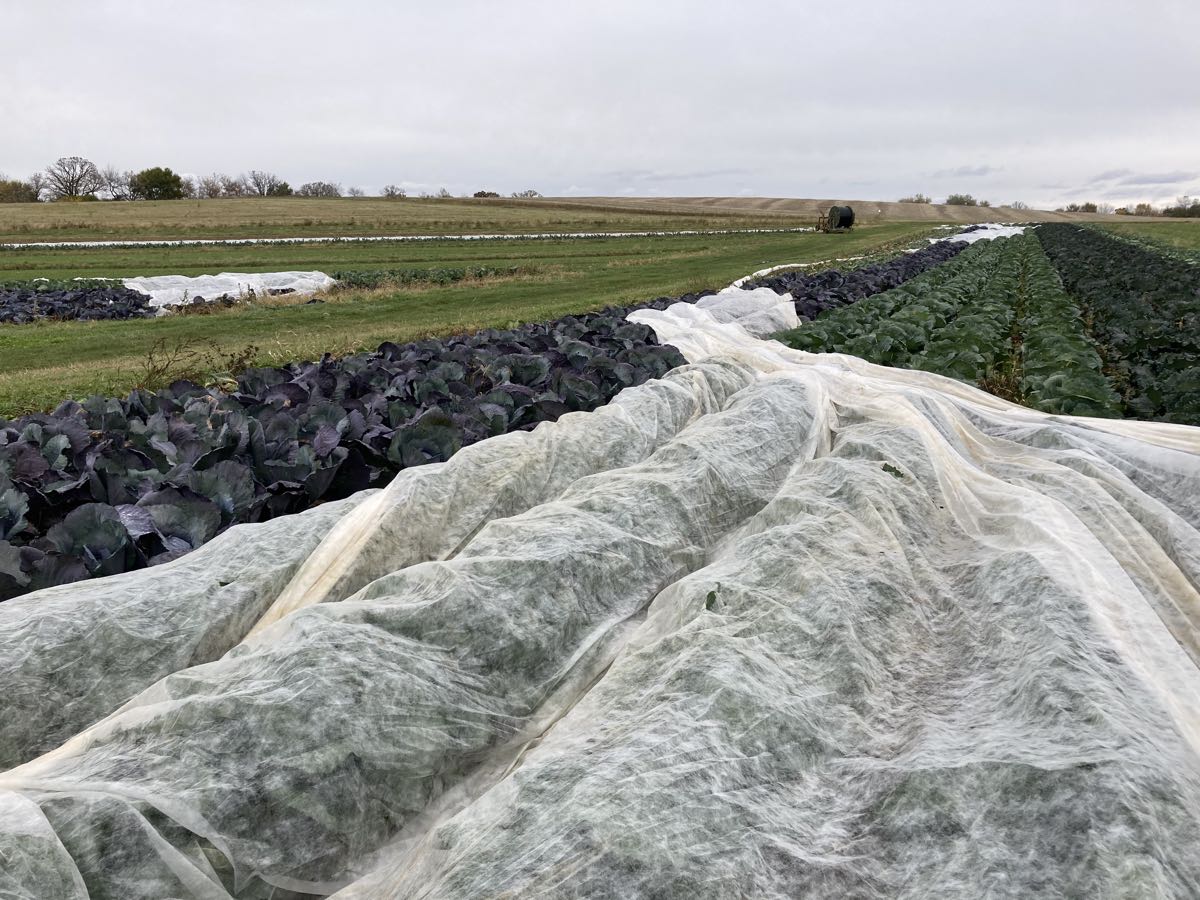
Rain has been sparse, so we’ve had to irrigate more than usual. This photo at dusk shows Steve watching our irrigation gun spew water over a field of young onions. The hose reel will slowly coil up the heavy hose, pulling the irrigator down the field. The field at right is under a white layer of row cover, a lightweight fabric that we use to cover our spring crops, to trap extra heat. Your lettuce and spinach came from that field.
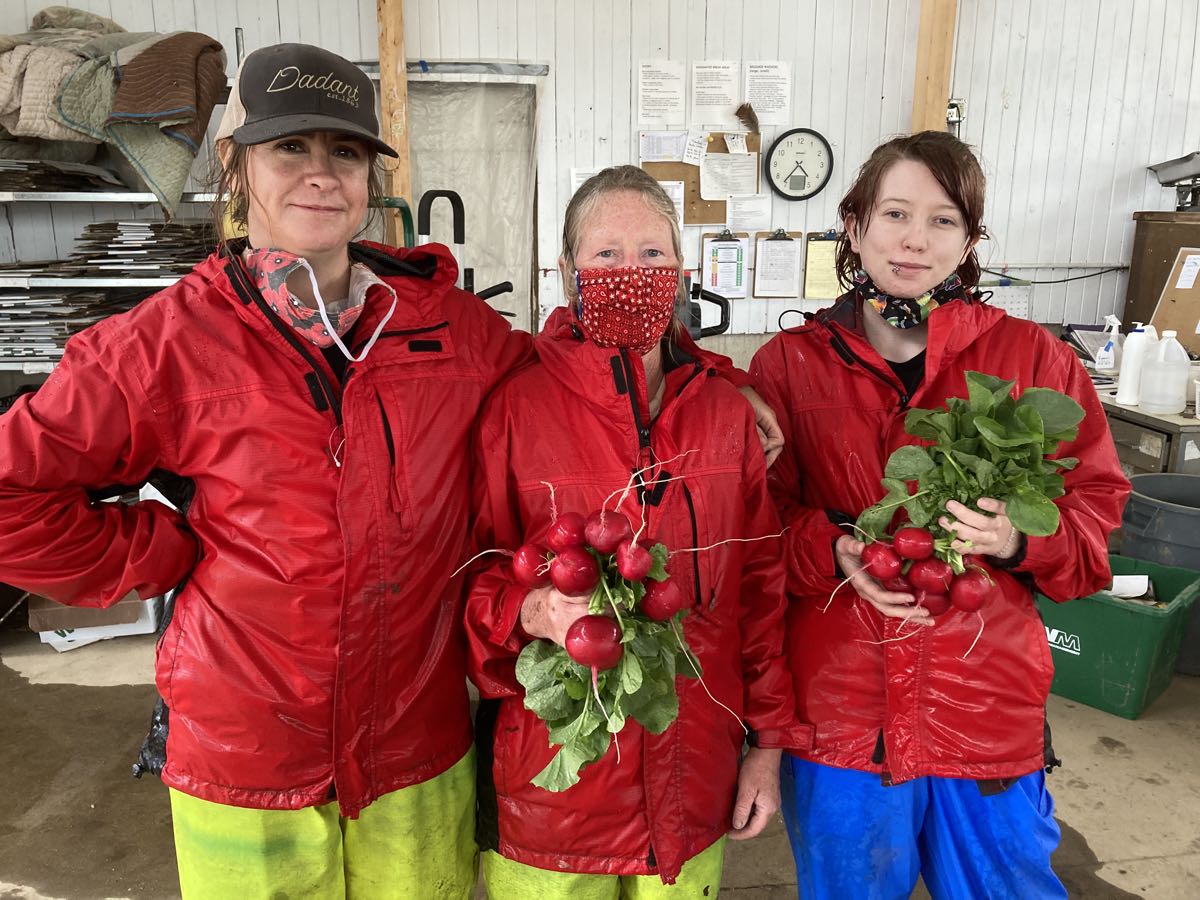
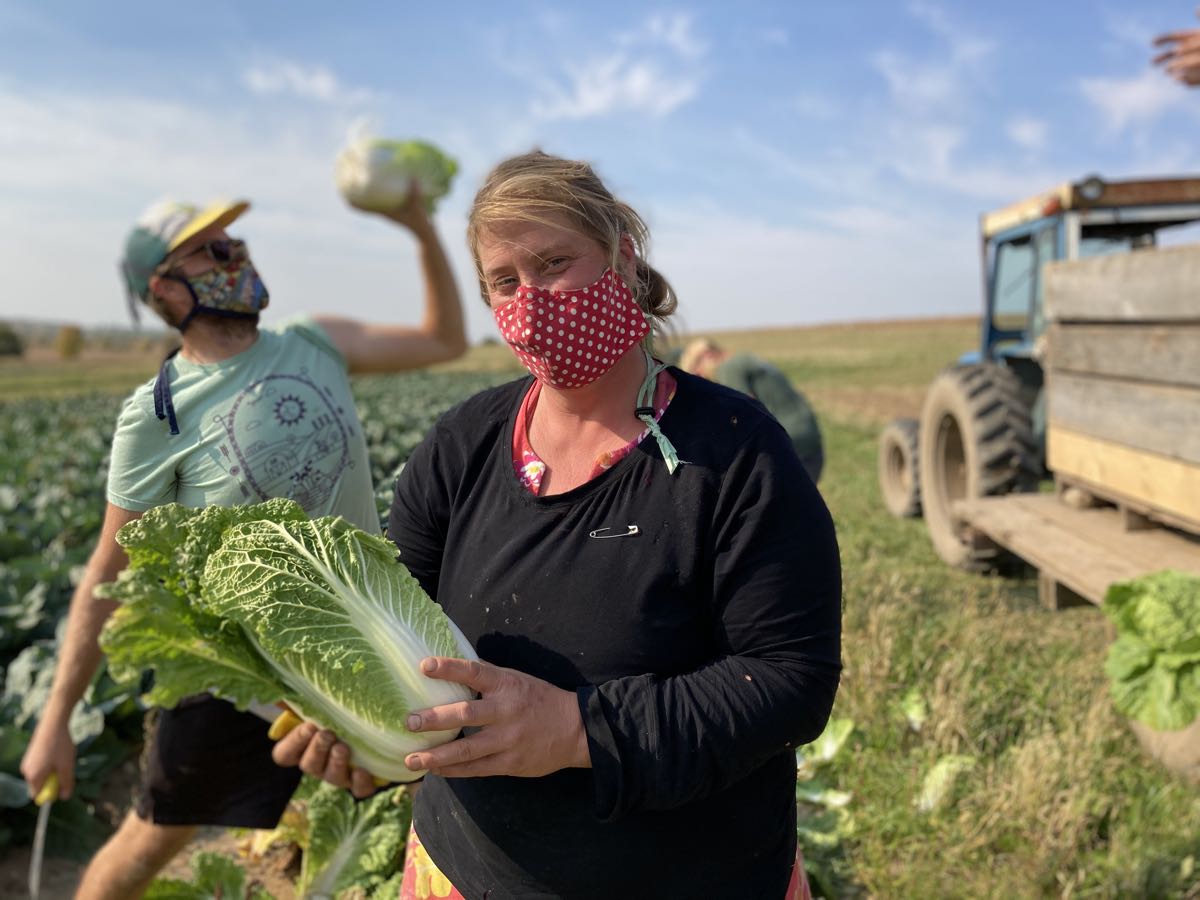
Team radish. I bought new rain gear last season. We have no trouble finding each other these days. From left, Karen, Simone, Danni.
Things you need to know.
♦ On Thursday, we deliver CSA boxes to Evansville, Fitchburg, Madison, McFarland, Middleton, Oregon and Verona.
♦ On Friday, we deliver CSA boxes to Janesville.
♦ We post this newsletter/blog each Wednesday night, with a list of veggies for the week, quantities, information about storage and preparation, news of the farm, recipes, and a forecast for the next week’s box. I’ll send you an email on Wednesday night once the newsletter is posted and ready to read.
♦ EOW, Sampler and Weekly members, we assume you read all the newsletters, even on your “off” weeks. This newsletter (and our emails to you) are our means to communicate with you.
♦ Want earlier notice of what will be in the box? Check the sidebar on our website homepage around 7 – 8 p.m. on Wednesday night. I’ll post the list under “Box Contents.” Check the Veggie List section of this newsletter each week for a forecast for the next week. The list is rarely complete but the items listed are ones we feel confident about.
♦ The first few boxes of the season are often the lightest. EOW members, do not worry that you have signed up for the wrong share! Our deliveries get heavier and more abundant as the season progresses.
♦ Wash your produce well this week to remove grit. It rained yesterday and today, driving grit into the asparagus and anything that forms a head (lettuce, arugula, spinach). Our crew took extra care with washing but expect to wash everything.
How to wash greens efficiently and to maximize storage life
Washing and drying your lettuce and other greens prolongs their storage life. Here’s our approach. It works.
1. Fill your sink or a basin halfway with cold tap water. If you have two sinks, fill one sink partway with cold water.
2. Chop your lettuce, spinach, escarole or other green to the size you wish.
3. Dump it into the water and swish around gently but thoroughly.
4. Working in two batches (for average lettuce head) or more batches (big spinach bunches, Romaine), pull handfuls out of the water and drain in the basket of a salad spinner.
5. After all the greens have been rinsed one time, dump the water. Rinse the sink/basin and refill with cold tap water.
6. Repeat the process.
7. Spin your greens dry and store in a dry container. They store much longer when spun dry.
This works because …
– pre-chopping the greens frees soil trapped in the head.
– the large amount of water washes and dilutes away the grit.
– By pulling the greens out of the water, you take advantage of the draining action to pull the grit with it.
– Storing greens dry lessens spoilage.
Veggie List and Veggie Notes
May 20/21, 2021 (Th/Fri sites)
Potatoes, 3.5 lb
Asparagus, ~1/2 lb
Spinach, 2 bunches, ~1.5 lb total
Green leaf lettuce
Arugula, 1 medium bunch
Amara kale, 1 bunch
Salad radishes, 1 bunch
Green garlic, 1 bunch
Next week’s box will probably contain spinach, lettuce, button mushrooms, asparagus, radishes, rhubarb and more.
Potatoes – Please refrigerate these potatoes. They are in great shape now but will sprout within days if stored at room temperature! They’ve been stored all winter and want to grow. Store in a paper bag to protect from light, even in the fridge. We grow everything we send in our CSA boxes except potatoes, mushrooms and some asparagus, all of which we buy from organic growers that we trust. We purchased these potatoes from Jesse & Jonnah Perkins at Vermont Valley Farm. Jesse says the potatoes have a higher sugar content because of starch to sugar conversion during cold storage. That means the potatoes taste a bit sweet, and will blacken slightly when fried. It’s a harmless color change due to the sugar conversion. You will receive either ‘Goldrush’ russets or ‘Red Prairie’ red potatoes.
Spinach – The spinach is abundant, so we’re sending two bunches, totaling about 1.5 lb. Quality is good for either salads or cooking. It looks like a lot but shrinks when cooked.
Amara kale – We’ve grown this variety a few times and grew it this spring to provide variety among our cooking greens. Here’s the seed catalog description: “While technically a mustard, Amara is known by several different names including Ethiopian kale, highland kale, Abyssinian mustard, and Texsel greens. The attractive, dark green leaves are tender, slightly savoyed with a wavy margin, and have an excellent rich flavor. Good in salads or as a cooked green.” This stuff is pretty interesting. It has the texture of kale but the spiciness of mustard. I’d say it’s about half as spicy as mustard greens. The flavor is strong once cooked but quite good.
Use: Use like any kale or mustard green. Eat the leaves and mid veins. Discard the stems and petioles, which are too tough.
Storage: Cover and refrigerate.
Arugula – (bunch of green leaves with pungent scent) – This is a spring treat! Arugula is good mixed with lettuce or spinach in salads, or added to cooked dishes such as lasagne or quiche. I love it on sandwiches. This arugula will not store for long. Eat soon. Cover and refrigerate.
Salad radishes – These are so good right now; tender, crisp and not too spicy. They are great in salads or thinly sliced on sandwiches. A few years ago, I was served open-faced radish and butter sandwiches on toast and was impressed with how tasty they were. Use good quality butter.
Storage: Cover and refrigerate.
Asparagus – Our asparagus grew slowly following frosty nights, then burst into growth in the last few days. Some of the asparagus is from our farm and some is from our friends Tim and April’s Lotfotl Farm. They have a larger asparagus field than they need, so we go and pick it for them once a week.
Prep: Wash your asparagus thoroughly to remove hidden grit. Submerge in water with the tips pointing down, soak briefly, then swish vigorously and pull out of the water. The draining action helps pull the grit out of the asparagus tips. Repeat several times.
Storage: Asparagus is perishable, so eat it as soon as possible. Store in a paper towel, cloth or paper bag, then wrap loosely in a plastic bag. The paper bag protects the asparagus tips from direct contact with the plastic bag. The plastic bag keeps the asparagus from wilting.
Preparation: We snap our asparagus at harvest, rather than cutting. Therefore, there is no need to snap the stalks to remove fibrous ends. For the same reason, it is not necessary to peel the asparagus stalks. It’s OK to trim the cut end a bit.
Cooking: If your asparagus stalks vary greatly in size, you will want to cook the thicker ones longer. Put an empty steamer pot over water, and bring the water to a boil. Add the asparagus. Cover and steam over medium heat until just tender. Use two forks or a spatula to turn the asparagus during cooking, rotating the bottom spears to the top. Drain and serve. Alternatively, you can lay spears flat in the bottom of a broad pan, with ½ inch of water. Also excellent broiled or grilled. Good dressed with vinaigrette, or with lime juice, salt and pepper.
Green garlic (looks like scallions, tastes like garlic) – Last fall, we planted garlic cloves that grew into the stalks we harvested this week. If left to grow until mid-summer, the slim white bulb on this week’s garlic will divide and form the usual cluster of cloves in a garlic bulb. This year’s green garlic is robust.
Preparation: Green garlic is more pungent than scallions, so slice thinly and use sparingly when raw. It mellows when cooked. Chop and add to any cooked dish that would benefit from garlic. Use the white bulbs and pale green stems. Avoid the dark green stems and leaves, as these are fibrous.
RECIPES
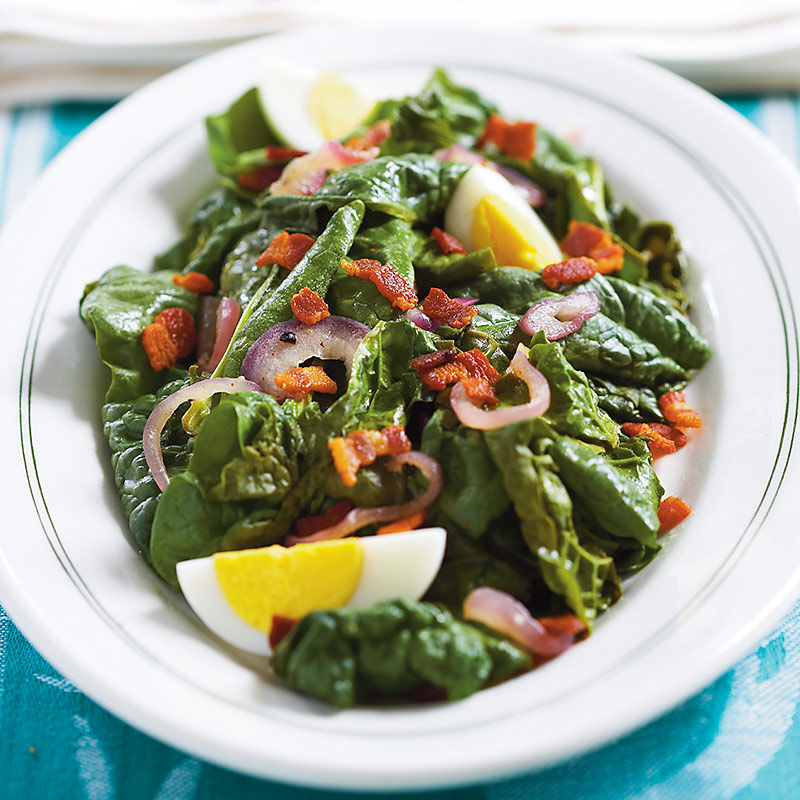
Wilted spinach salad with bacon and asparagus
From DebsLunch
Feeds 4 or more depending on what else is being served.
Takes about 30 minutes.
Approximately 2 pounds spinach, kale, argula, or other greens: lettuce, or cabbage; stemmed if necessary, washed, dried, and cut or torn into bite size pieces (cabbage can be shredded)
8 strips (half a pound) of bacon, sliced into 1-inch pieces
1/4 – 1/3 cup cider vinegar
2 – 4 TBLS brown sugar
1/2 of a red onion, sliced thinly
2 hard boiled eggs
1/2 pound of asparagus, roasted or steamed
lots of freshly ground black pepper
Croutons
Put the greens in a large heat proof (metal or glass) bowl. Cook the bacon until crisp and, using a slotted spoon, remove to paper towel to drain. Pour off all but 4 TBLS of the bacon fat from the pan. Add the vinegar and sugar, and cook until the sugar is dissolved. Boil until a bit syrup-y. Add the onion at the last minute if using. Take the dressing off the heat and pour over the greens. Add the bacon bits and toss. If the greens do not wilt as much as you would like, put the bowl over the warm burner and toss until the salad is more wilted (this works best with a metal bowl). Grind in the pepper and toss again. Top with the asparagus, boiled eggs, and croutons.
.
.
.

Cheater’s many greens Caesar salad
Make enough for about 6 – 8 people
Takes 30 minutes
About 2 pounds of greens – roughly 1/2 the spinach, some of the Amara kale, and Argula from this week’s box
a hunk of old bread, about 2 – 3 slices
1 – 2 TBLS olive oil
2 – 3 whole cloves of garlic
2/3 cups mayonaise
juice of 1/2 a lemon, or a little more to taste
another clove of garlic, minced or put through a press
a few shakes of Worcestershire sauce
1/2 – 1 cup grated Parmesan
coarse salt and freshly ground pepper
Wash and dry the greens, and tear them into bite size pieces. Place in a bowl with room for tossing. Tear the bread into rough cubes. Heat the olive oil in a skillet and fry the bread in it along with the garlic cloves until nicely toasty. Let cool slightly and then dump into the salad bowl. For the dressing, [This is the cheater’s part] whisk together the mayo, lemon juice, crushed garlic, and Worcestershire sauce. Add a handful of Parmesan, and taste – add more lemon, cheese, Worcestershire – what ever you think it needs (I sometimes sneak a pinch of sugar into the dressing). Toss the salad with a liberal amount of dressing, adding more Parmesan, and salt and pepper. Taste for seasoning and when you like it, serve.
.
.
.
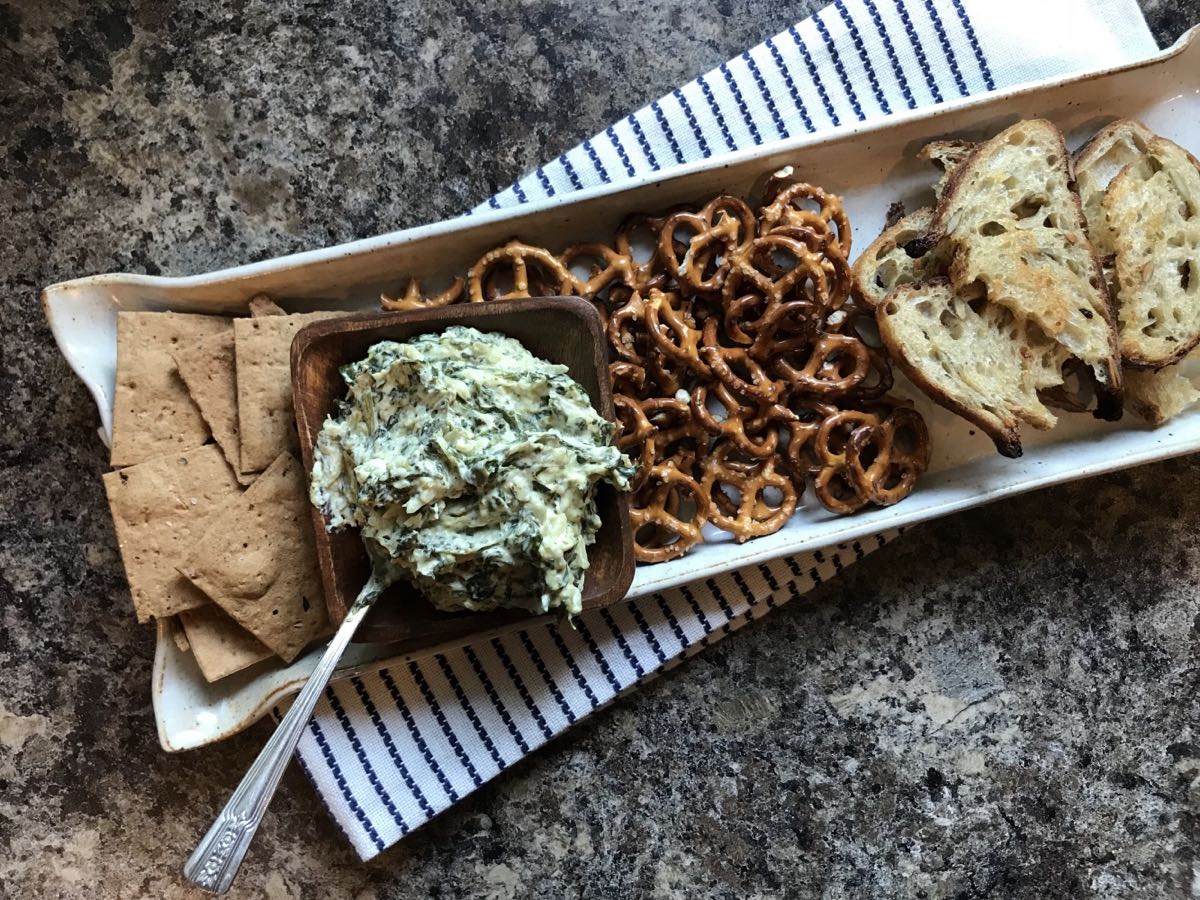
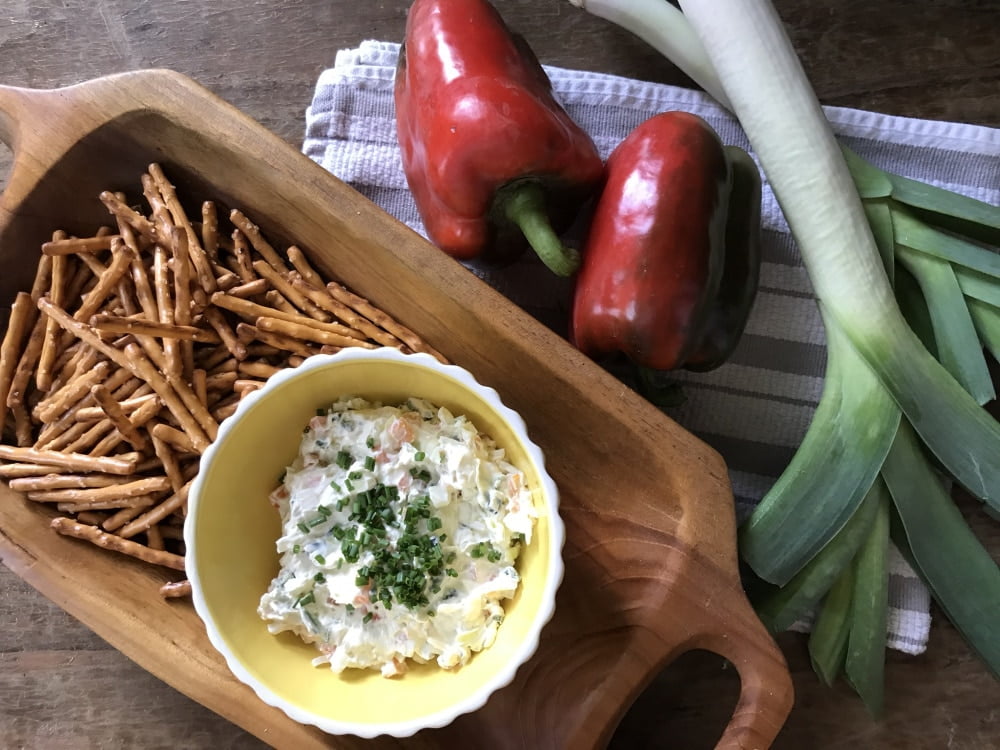
Photo by The Leek & The Carrot
Spinach, Radish & Green Garlic Dip
Adapted from Bon Appetit
Takes 30 minutes.
Serves many.
2 tablespoons butter
2 green garlic, white and pale green parts only, minced
1 bunch radishes, roots shredded and greens, roughly chopped
Spinach, roughly chopped
1 teaspoon Kosher salt
8-ounce cream cheese
2 ounces Parmesan cheese (about 1 cup)
1/2 teaspoon freshly ground black pepper
- Melt butter in a medium saucepan. Add garlic and saute for 1 minutes over medium heat until very fragrant. Add radishes and cook, tossing, until well-coated in butter, 1-2 minutes longer. Add spinach and radish greens along with salt. Cook until wilted and most of the liquid is cooked off., 5-10 minutes. Add cream cheese and cook until melted. Stir in Parmesan and pepper until melted and creamy. Taste and adjust seasonings.
- Serve warm with toast, in a bread bowl or with crackers.
.
.
.

Photo by Smitten Kitchen
Spinach and Cheese Strata
From Smitten Kitchen
smittenkitchen.com/2009/12/spinach-and-cheese-strata/
This filling recipe is good for any meal from breakfast to dinner. From Deb Perelman of Smitten Kitchen “I’m all about hosting brunch, but only if I can make everything in advance. .. This strata — really, a savory bread pudding — is the missing piece because not only can you make it the night before, you are supposed to.”
.
.
.
Creamy Green Garlic Salad Dressing
From Willy Street Co-op
Makes a generous cup of dressing
Tangy and garlicky, this salad dressing is amazing over a simple green salad of crunchy Romaine and blanched vegetables.
.
.
.
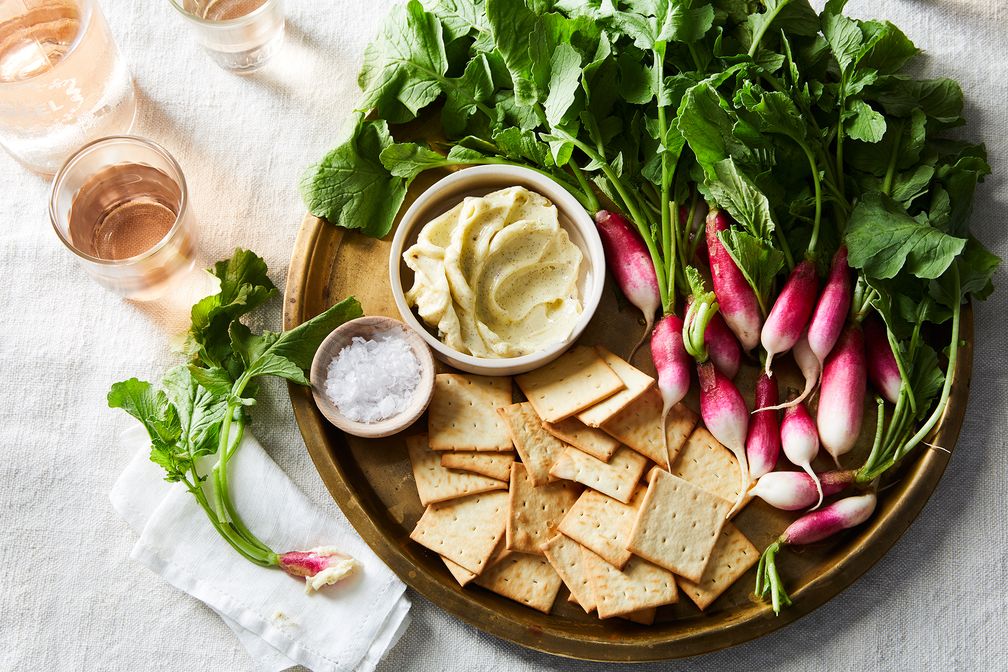
Photo by Food52
Alex Raij’s Radishes with Vanilla Butter & Salt, 2 Ways
Food52 Genius Recipe
“Alex Raij was initially inspired by a snack at Roscioli delicatessen in Rome that combined salty Spanish anchovies with curls of cold vanilla butter. “I was so enchanted with it, I came home and put it on everything now,” Raij said. Her take on Roscioli’s dish, a deliberately plain cracker with a thin tube of vanilla butter and a very good-quality Spanish anchovy, has been on the menu at her NYC restaurant El Quinto Pino ever since, and she riffs on it often for parties, big and small.”
.
.
.

Photo by the Kitchen Girl
Arugula Pesto with Walnuts
From The Kitchen Girl
“Arugula pesto is a 5-minute pesto recipe made with fresh arugula, Parmesan cheese, walnuts, olive oil, and lemon. It’s nutty, zesty, peppery and can be served as a sauce, dip, or spread.”
Storage Share, Nov 19/20, 2020
- On: November 18, 2020
- 0
Farm News
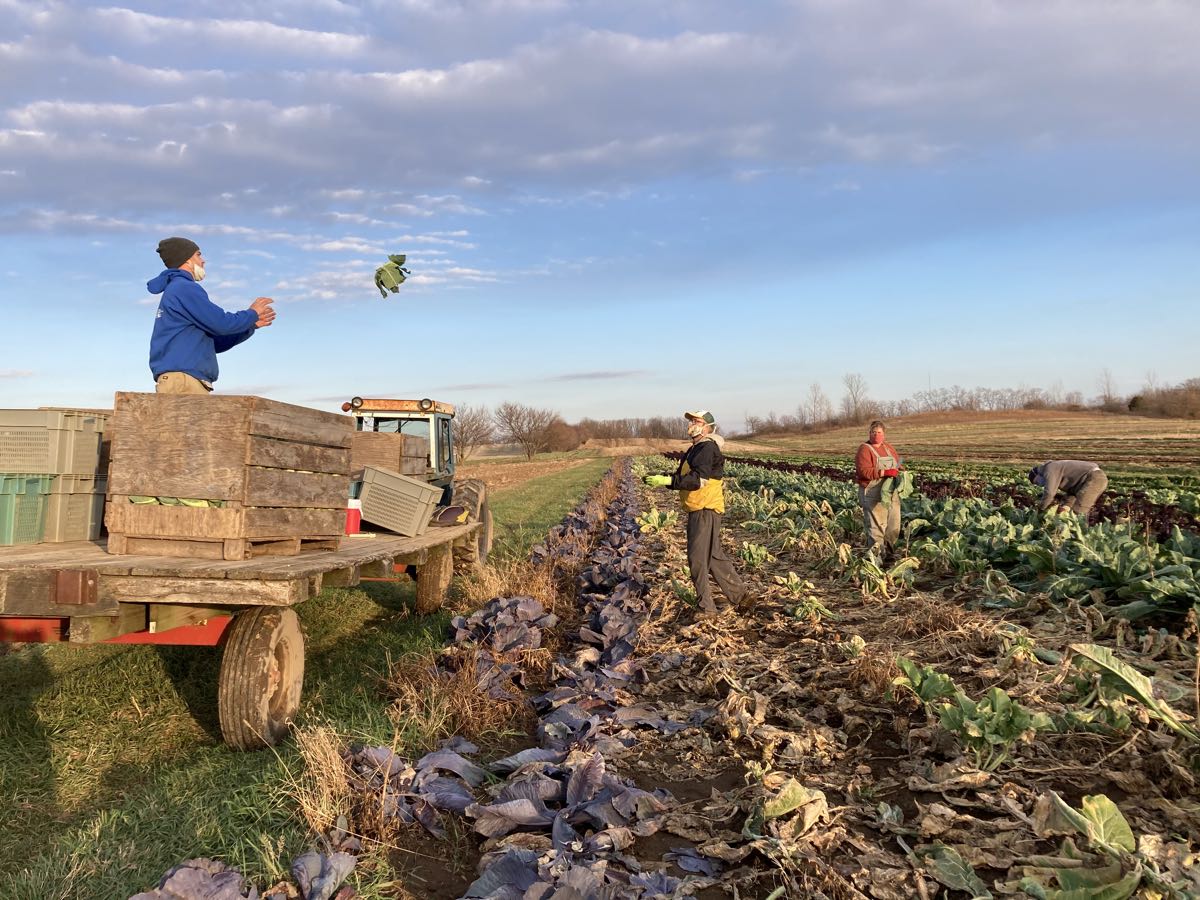
We have enjoyed the mild weather! After frosts in early October, the warm weather has coaxed a few later crops to maturity. We have harvested endless rounds of cabbage, carrots and other roots. Machinery breakdowns have been minimal! That’s the worry at the back of our minds at this time of year.
We harvested your Romanesco cauliflower on a blue-sky day. Ben shows off a beauty.
Next year’s garlic and green garlic are safely in the ground.

Our work days end after dark, but soon our field work will end. There are still modest amounts of cabbage, Brussels sprouts and a bit of reluctant cauliflower to bring in by next week, then field work will be done for the year. We’ll move inside for the winter, to wash and deliver all the carrots, cabbage, parsnips and other roots that we’ve stashed away.
Thank you so much for joining our farm this season. We hope you stay safe and warm this winter, and that this big delivery brightens your winter meals.
Beth and Steve
Storage Share this week
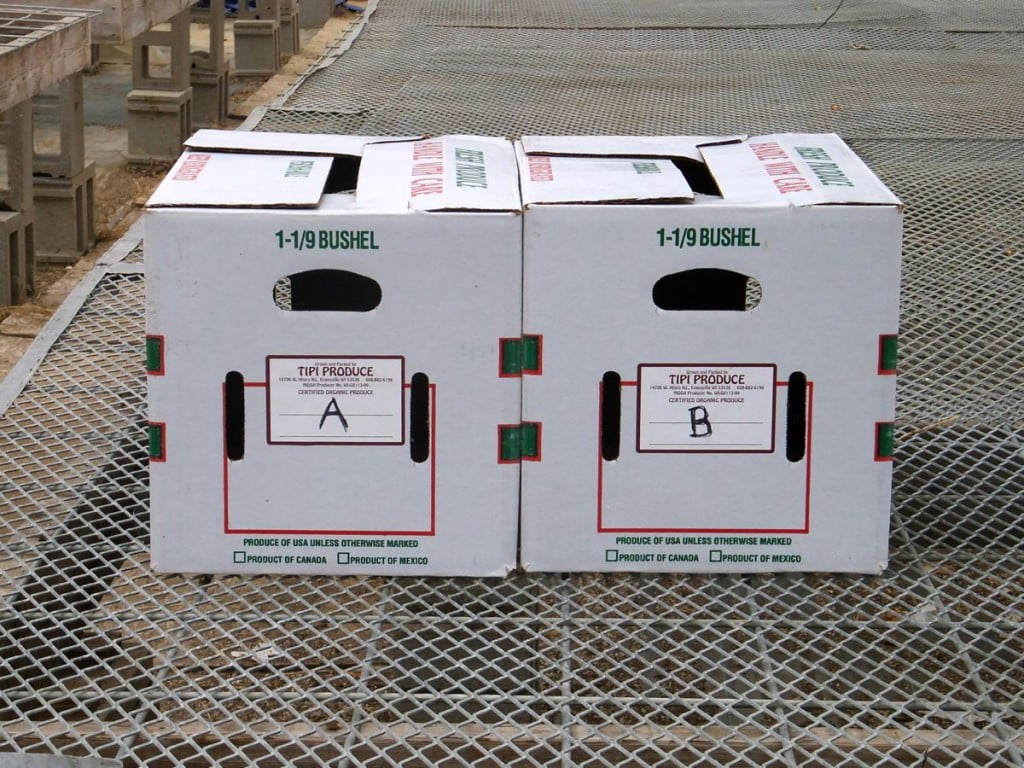
Take one box labelled “A” and one box labelled “B”.
Things you need to know about your winter share
* Your delivery will consist of two different boxes, labeled “A” and “B”. Take one “A” box and one “B” box. The boxes contain different vegetables.
* Please pick up your boxes on the day of delivery, during the normal hours for your site.
* Outpost members, pick up your boxes on Friday. This is the busiest weekend of the year for the Outpost staff, so they WILL NOT hold boxes past Friday, nor can they handle special requests.
* Bring extra bags this time. The boxes will be lined with a plastic bag as usual, but this big share is too much weight for the bag. Leave the boxes at your site, take the produce home in the liner bags plus your own bags/containers.
Veggie List and Storage Info (Storage share, Nov. 19/20, 2020)
We hope you enjoy this shipment of veggies. Strategize to use them well, as some will last longer than others.
* This is the most perishable vegetable: purple broccoli
* These are the next-most perishable: Brussels sprouts, leeks, Romanesco. Keep an eye on your butternut, potatoes and sweet potatoes. The last two are susceptible to drying out. Expect the largest butternuts to last the longest.
* These will last the longest: beets, cabbage, carrots, celeriac, garlic, red & yellow onions, parsnips and shallots.
Box “A”
Everything in this box can be stored cool or at room temperature. See notes below for more detail.
‘Autumn Frost’ pumpkin
Butternut squash
Sweet potatoes, mixed ‘Bayou Belle’ and ‘Covington’
(Combined squash & sweet potatoes weigh about 19 lb.)
Shallots, 1.25 lb
Garlic, 3 bulbs (in shallot bag)
Potatoes, russet, 5 lb
Potatoes, Satina, 5 lb
Box “B”
Refrigerate everything in this box, except the onions.
Beets, 3 lb
Brussels sprouts, 1.5 lb
Carrots, 6 lb total
….. orange ~4 lb
….. yellow & purple ~2 lb
Celeriac, 1
Green cabbage, 1 large
Leeks, ~2.5 lb
Onions, 5 lb total
….. red ‘Blush’
….. yellow
Parsnips, ~2 lb
Purple broccoli, 1 large head
Romanesco, 1 medium head (or maybe a purple cauliflower)
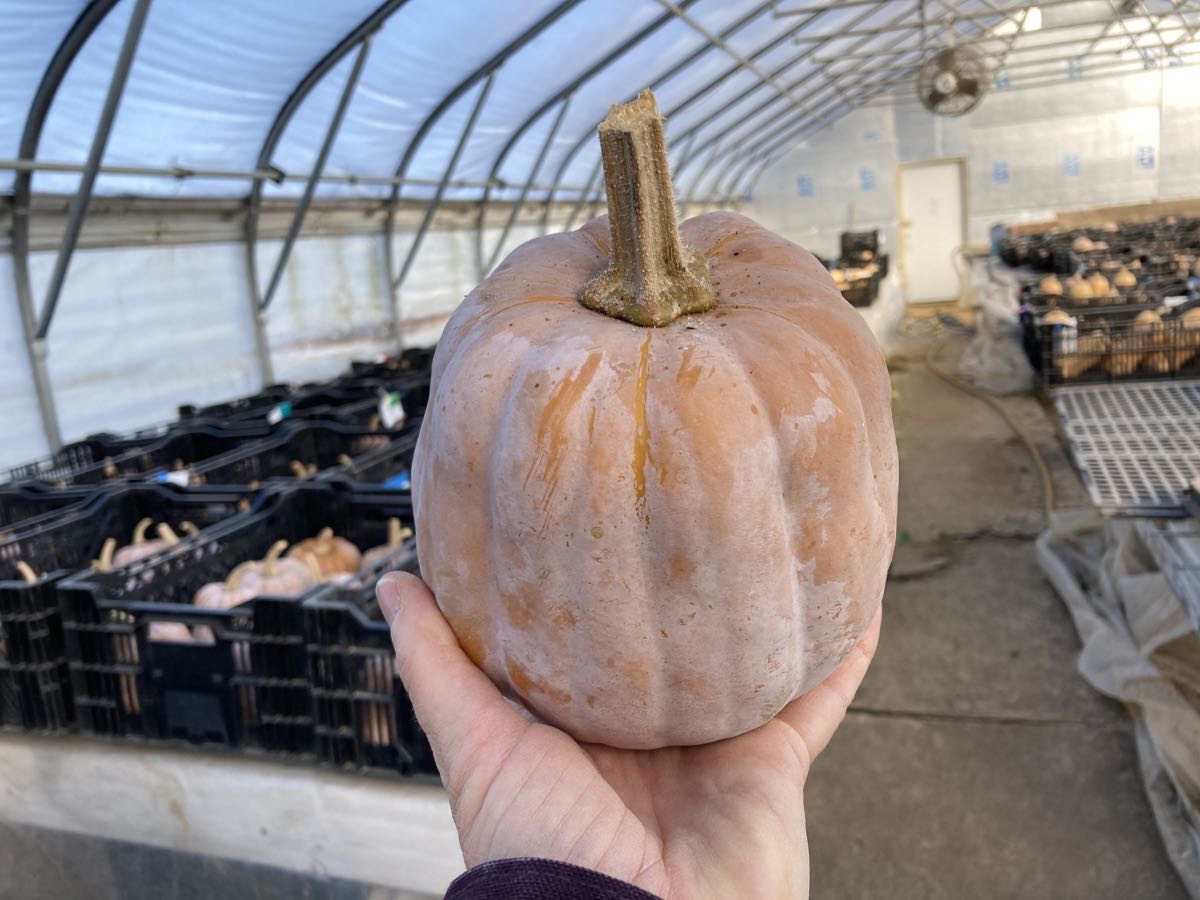
Autumn Frost winter squash

Shallots. Yours are packed in a paper bag, with the garlic.
Top, ‘Blush’ red onion
Bottom, yellow onions
The ‘Blush’ onions are more pink than red, and excellent for long storage.
Autumn Frost winter squash – Store cool and dry. 60 F is ideal.
These beautiful frosted squash have both pumpkin and butternut squash breeding in them. They cook and taste like an unusually good butternut, with rich, smooth texture. They are quite nice. The skin is elible. The seed companies tell us that they store well, but I encourage you to eat your Autumn Frost within a month. These are new for us, so we don’t really know if they store reliably.
Beets – Refrigerate in a bag or container. Beets will store for two months or longer.
Brussels sprouts – Eat within 2 to 3 weeks.
Butternut winter squash – Store your butternut in a cool, dry place. 60 F is ideal. Do not put in a plastic bag. Expect the largest butternuts to store the longest. Inspect your squash frequently and cook promptly if you see any soft spots developing. You can cook, mash and freeze the squash for future use. I find that you can refrigerate cut raw squash for up to one week. This runs counter to the accepted way to store squash, but is useful if you want to cook just half a squash. Some of them are big! Try microwaving your squash for one to two minutes before cutting or peeling. This softens the squash and makes a large butternut easier to handle.
Cabbage – Refrigerate.
Carrots, orange. Refrigerate in a plastic bag. Will keep for several weeks.
Carrots, yellow & purple. These varieties are pretty AND they taste good. Refrigerate in the plastic bag.
Celeriac – Will store for months in your fridge. Cut off chunks as needed. Peel before using. I find it easiest to cut the celeriac into flat slices, then peel.
Garlic – Store at room temperature.
Green cabbage – Refrigerate. These are big. It’s OK to cut off chunks as needed.
Leeks. Refrigerate. In general, leeks are not a long-storage crop. You may need to strip off one or two outer leaves to freshen the leeks before you cook them.
Onions: Refrigerate or store in a cool, dark spot and protect from light. Exposure to light stimulates sprouting.
Parsnips (These look like large white carrots.) – Refrigerate in a plastic bag. Parsnips will store for several months but will darken in color. That is a harmless change.
Potatoes; russets and Satinas – Can be stored at room temperature or in a cool spot, but must be kept in the dark so they do not turn green. A cloth or loose plastic bag draped over the paper bag will slow moisture loss, but do not close the plastic bag. Both types will store longer if kept cool. Around 40 – 50 F is ideal. The potatoes were grown by the Igl family near Antigo.
Russets– We got the big ‘baking’ grade so you have nice bakers for Thanksgiving. Excellent for baked or mashed potatoes.
Satinas– These are good all-purpose potatoes, everything from roasted to potato salad. I really like this variety of yellow potato because they oven-roast so well and because they are less sweet than other yellow varieties such as Yukon Golds.
Purple broccoli – Refrigerate in a plastic bag or a container. You should plan to use this soon, eg within one week.
Romanesco cauliflower (beautiful chartreuse green, spiraled head) or purple cauliflower (dense purple head) – Refrigerate. These should store well, eg for a few weeks.
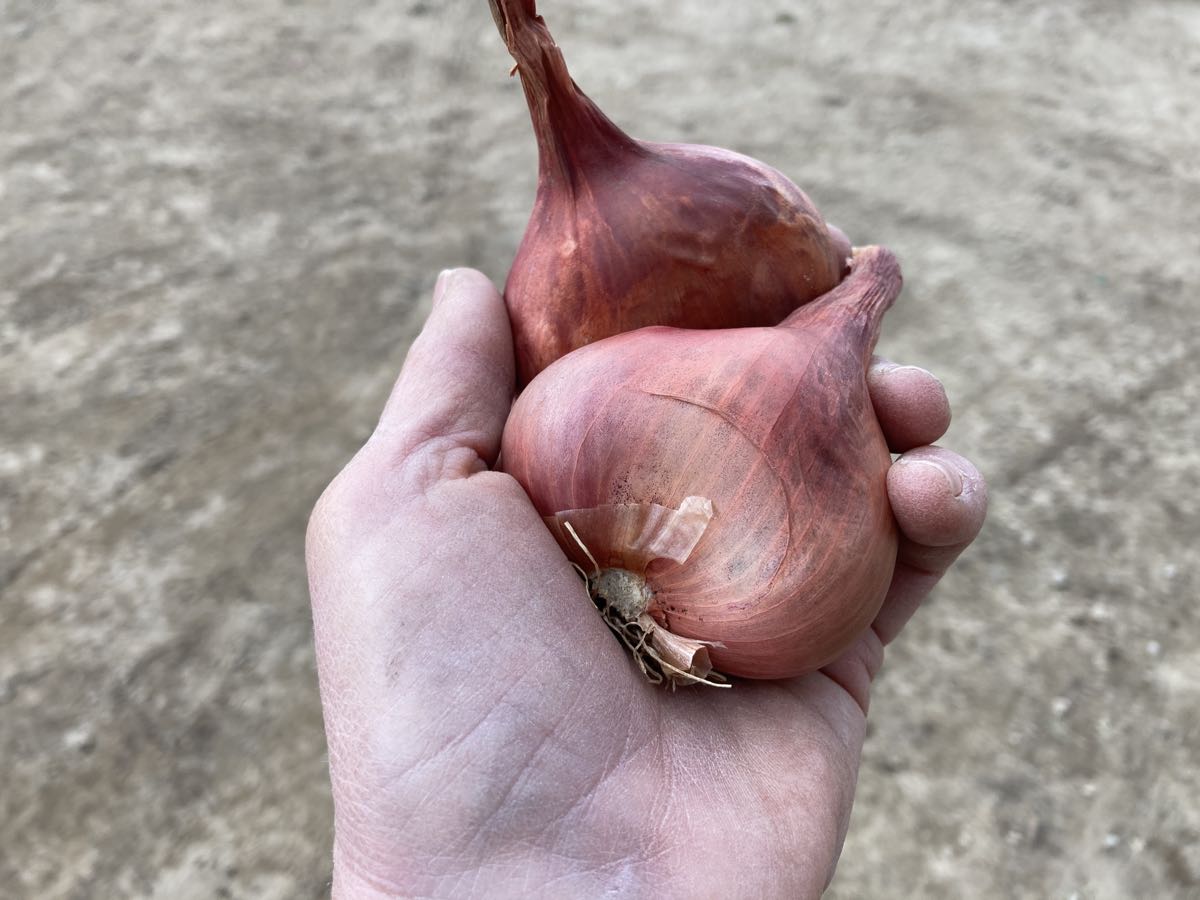
Shallots (look like small red onions) – Good for salad dressing. We’re still learning how to grow shallots and are thrilled to have a small bag for everyone!
Sweet potatoes – We’re sending a mix of two varieties, Covington (orange skins) and ‘Bayou Belle’ (purple skins). Both have excellent flavor and sweetness. Store at room temperature, no lower than 55 F, but 60+ F is better. Keep them on your kitchen counter where it’s easy to keep an eye on them. I like to keep ours in a paper bag so they don’t dehydrate. Cook promptly if they start to soften. The roots come in a wide ranges of sizes and all are good.
Recipe Ideas
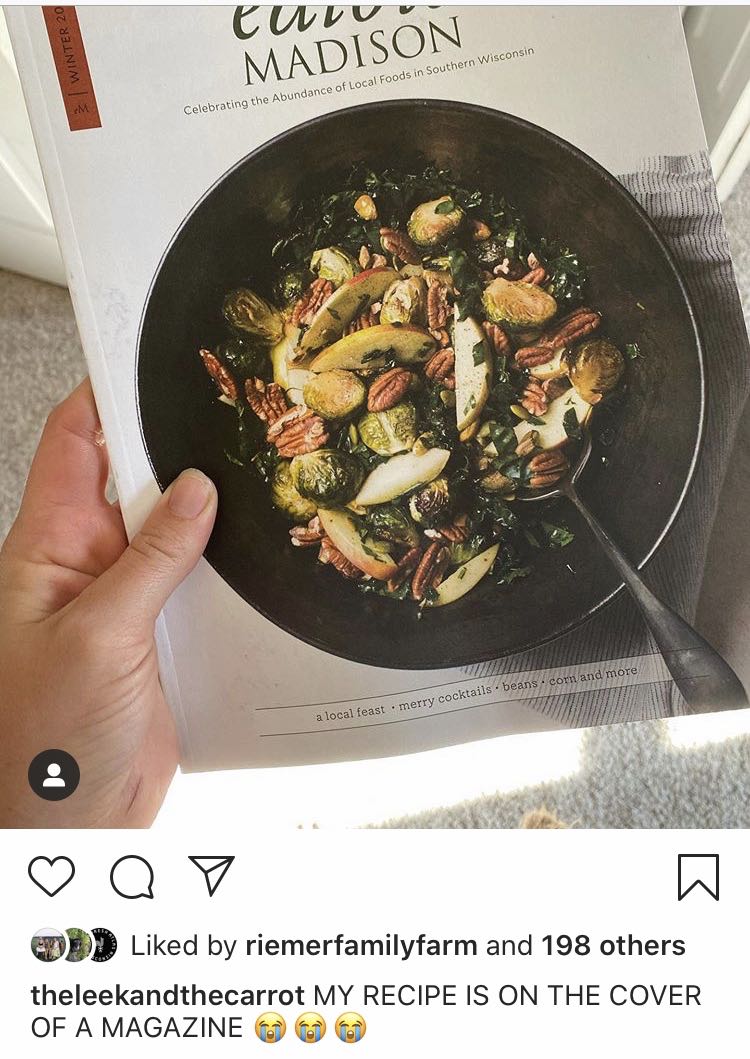
Check out the winter issue of Edible Madison. That’s our own recipe writer Lauren’s recipe on the cover! Recipe is at ediblemadison.com/recipes/winter-kale-salad-with-roasted-brussels-cinnamon-citrus-vinaigrette .
Thanksgiving Menus
For obvious reasons, the Thanksgiving recipes offered online are different this year, scaled back but worth bookmarking for winter meals. Here are some interesting ones.
The Washington Post
The Post staff used the popular “sheet pan dinner” technique to craft whole holiday meals on one sheet pan, fine-tuning when to add each ingredient to the pan. I appreciate that kind of finesse, and will be trying a few of the recipes this winter. I don’t have a good track record with Hasselback potatoes (undercooked potatoes after hours in the oven) so I’m interested in their tricks in the Sheet Pan Chicken With Hasselback Potatoes and Brussels Sprouts recipe.
Smitten Kitchen
I love this cook! She has an extensive list of Thanksgiving recipes from previous years. Her newest Potato and Leek Gratin recipe looks good.
Food52.com
Once again, the lively Food52.com site has outdone itself with an extensive Thanksgiving recipe collection. They’ve named it “AutoMagic Thanksgiving Menu Maker“. It’s organized by type of dish, e.g.
. “Bright and Crunchy” and
. “Roasted to Perfection”, etc.
I’ve extracted a few sauce ideas from the recipes.
– I like the horseradish vinaigrette in the Autumn Salad with Horseradish Vinaigrette recipe, and have been happily spooning it on roasted sweet potatoes.
– The spicy onions in Dan Kluger’s Roasted Butternut Squash with Spicy Onions recipe are very zippy. They are quite strong, and I find they overpower roasted squash but are a good complement for mashed potatoes.
Local Thyme
Finally, remember that we can use Local Thyme recipes all winter. Check them out for Thanksgiving ideas.
Extension Share, Nov. 5/6, 2020
- On: November 04, 2020
- 0
The warm weather this week has been a gift. Sure, it made our farm work easier and enjoyable. More importantly, it protected poll workers and everyone standing in line to vote. Here are a few photos from the week, if you need a distraction from the election.
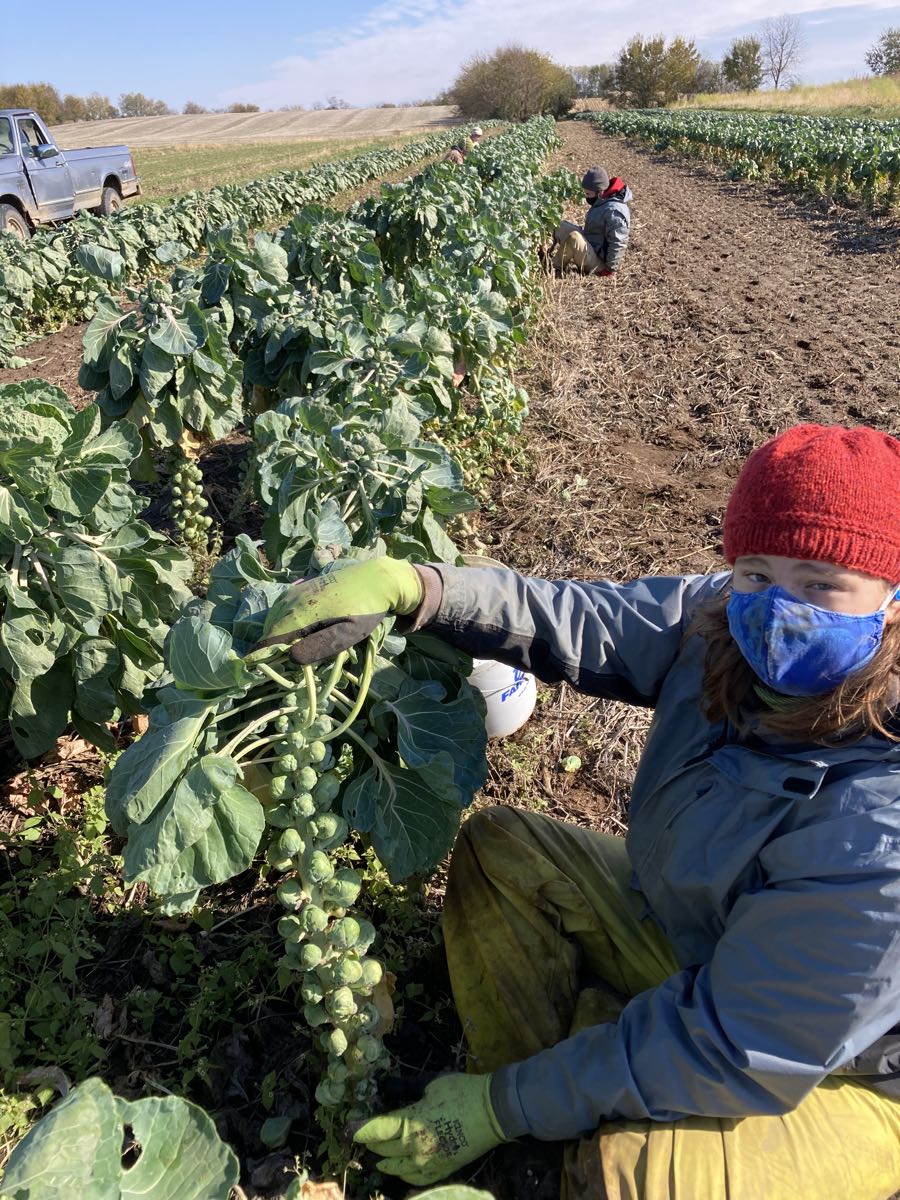
Chance harvests your Brussels sprouts.
Washing sweet potatoes in short sleeves in November! Billy and Kristen washed all our remaining sweets, some for this week’s delivery, some for the Storage shares. It’s fabulous to take care of this in warm weather, and not worry about chilling the delicate sweet potatoes.
Matt weighs your Brussels sprouts.

We will harvest carrots or parsnips every day this week, putting the roots into big wooden bins for winter storage. We’ll continue harvesting roots through the weekend. Next week, it’s time to bring in the rest of the leeks, cabbage, fennel, radishes and turnips. The garlic planting is almost finished. Right now, we are sprinting but should be able to wrap up the outdoor season by the end of next week.
Now you can go back to thinking about the election, if you wish.
Beth
Veggie List & Veggie Notes
Extension Share, Nov. 5/6, 2020
Sweet potatoes, ~3 lb
Savoy or green cabbage
Brussels sprouts, ~1 lb
Carrots, 2 lb
Parsnips, 1 & 2/3 lb
Yellow onion
‘Blush’ red onion
Jalapeno
Everyone gets two types of greens:
Greens #1: collards or green kale or red kale
Greens #2, bok choy or red bok choy or tatsoi or red napa cabbage
Sweet potatoes – Store at room temperature. Sweet potatoes will suffer chilling injury in the fridge. It’s OK to either store in a paper bag, or out on your kitchen counter. Do not store in plastic. Sweet potatoes will store for a long time.
This week, some folks get our ‘Covington’ variety, some get ‘Orleans’. Both are orange-skinned, nicely shaped and with good flavor and sweetness.
– For best flavor, cook your sweet potatoes so they brown and caramelize. We have a simple, favorite way to roast sweet potatoes. We used to prepare sweet potato fries in the oven. Now we just quarter the potatoes, rub with olive oil, dust with salt and place cut-side-down on a cookie sheet. Roast in a 450 F oven without turning until soft. The flavors will caramelize (like sweet potato fries) but preparation is simpler and the cooking time less exacting. Slender sweet potato fries go from undercooked to overcooked in the blink of an eye. Larger slices are less exacting, and therefore are easier. Small sweet potatoes can be cut just in half. Jumbos will need to be chopped into pieces. Otherwise, they take a long time to cook.
– These sweet potatoes will need slightly longer cooking than ones from the supermarket, perhaps because they contain higher moisture so soon after harvest.
– Sweet potatoes are good at any size. We have cooked everything from tiny to jumbo and consistently find that all sizes taste good.
Savoy or green cabbage – Refrigerate. If you plan to eat soon, you can store uncovered in your crisper drawer. If you want to store for longer, cover with a plastic bag or cloth.
The savoy is crinkled, the green cabbage is smooth. They can be used interchangeably in recipes.
Brussels sprouts – Refrigerate in the plastic bag. Eat within two or three weeks. They store well but the outer leaves will turn yellow. Don’t let them get too wet in the fridge.
Carrots – Refrigerate in the plastic bag.
Parsnips (These look like large white carrots) – Those long, white roots are not carrots, they are parsnips. The two vegetables are related. When cooked, parsnips are sweet and starchy. For the best flavor, brown them to caramelize the sugars. Here are a few ideas for parsnip preparation:
– Caramelize the parsnips by roasting them in a vegetable medley.
– Parsnip fries are delicious: cut like French fries, oil lightly, place on a cookie sheet and roast in a hot oven until brown and cooked through.
– Try substituting grated parsnips in a potato pancake recipe. They brown beautifully and are very tasty.
– Steve loves pan-fried parsnips with onions and garlic.
‘Blush’ red onion – Store at room temperature or in the fridge. This onion is more pink than red when cooked or pickled but is very pretty. I really like this variety. They are great cooked and we find they store exceptionally well. That shouldn’t be an issue when you have just one or two!
Jalapeno chile (Hot, maybe) – Eat soon. These were the final harvest from under row covers, so they were exposed to cold nights and will not store long. They’ll be good for about one week.
Greens #1 (collards or red kale or green kale) – All are in beautiful shape, surviving cold nights without trouble.
Greens #2 (bok choy or red bok choy or tatsoi or red napa cabbage) – By now, you know what to do with the various choys we grow. The red napa cabbages are small, not too dense, and keeps its color when cooked.
The red napa makes very pretty kimchi.
RECIPES
Visit our 2020 Recipe Log or our 2019 Recipe Log or join our Facebook discussion group.
LOCAL THYME/ Cooking 101
Roasted Carrots and Parsnips
Honey Lemon Whipped Sweet Potatoes
Polentina Toscana
LOCAL THYME/ Cooking 202
Parsnip and Sweet Potato Bisque
Soy Glazed Sweet Potatoes and Carrots
Lightly Wilted Sweet and Tangy Cole Slaw
LOCAL THYME/ Quick & Easy Meal
Vegetable Biriyani
RECIPES FROM LAUREN

SWEET POTATO & BLACK BEAN TACOS WITH SLAW
Makes 18-24 tacos
Serves 6-8
Takes 1 hour
3 pounds sweet potatoes, peeled and diced
2 tablespoons olive oil
1 tablespoon cumin
1 tablespoon chili powder
1 teaspoon ground coriander
1 teaspoon Kosher salt
1 14-ounce can black beans, drained and rinsed
Corn tortillas, warmed
Sour cream, optional
Red or green salsa, optional
Pickled Blush Onion:
1 blush onion, halved and thinly sliced
3/4 cup white wine vinegar
3/4 cup water
3 tablespoons sugar
1/2 tablespoon salt
Slaw:
1/2 head cabbage, shredded or thinly sliced
2 carrots, shredded or cut into matchsticks
1 jalapeno, halved, seeded and thinly sliced
1 lime, juiced
2 tablespoons olive oil
1/2 teaspoon Kosher salt
1/4 teaspoon freshly ground black pepper
1. Preheat oven to 425 degrees.
2. On a large baking sheet, toss sweet potatoes with olive oil and spices. Roast for 30-40 minutes, turning once during the baking process, until the sweet potatoes are browned on the edges and cooked through.
3. While those roast, prepare your pickled onions, place onions in a small bowl or pint-sized mason jar. Combine other ingredients in a small sauce pan. Bring to a simmer over medium heat then immediately pour over onions. Let sit at least 30 minutes. The onions will turn a more translucent shade of pink when they are ready.
4. Then prepare your slaw by combining all slaw ingredients in a large bowl and tossing together.
5. Serve tacos with roasted squash, black beans, pickled onion, slaw, sour cream and a salsa of your choosing.
.
????
.

PASTA E FAGIOLI WITH BOK CHOY
Adapted from Half Baked Harvest
Serves 6
Takes 50 minutes
3 pieces raw bacon, diced, optional (sub 2 tablespoons olive oil or butter if not using)
1 head bok choy, divided
1 yellow onion, diced
3 carrots, diced
4 garlic cloves, minced
Kosher salt and freshly ground black pepper
4 cups chicken or vegetable broth
15-ounce can or 1 pint crushed tomatoes
1/4 teaspoon thyme
1/4 teaspoon rosemary
1/2 pound pasta of your choice (I love rotini or shells for this)
1 14-ounce can cannellini beans, drained and rinsed
1 teaspoon smoked paprika
Shredded parmesan, optional
Red pepper flakes, optional
1. In a large stock pot, cook bacon (if using) over medium heat until crisp. If not using bacon, warm oil.
2. Prepare bok choy by thoroughly washing and then removing leaves from stems. Roughly chop leaves and set them aside. Thinly sliced stems and add to pot along with onion, carrot, garlic, a pinch of salt and few grinds of fresh pepper. Saute for 10 minutes until veggies are softened.
3. Add in broth, tomatoes, bok choy leaves, thyme and rosemary. Season again with a couple pinches of salt and pepper. Bring to a boil, reduce to a simmer, add in pasta, and cook for 15 minutes until greens are well wilted and pasta is cooked.
4. Stir in beans and paprika.
5. Serve warm with parmesan and a pinch or red pepper flakes.
.
????
.
PARSNIP & BRUSSELS SPROUT HASH
Adapted from a New York Times recipe
Takes 45 minutes
Makes 4 servings
2 tablespoons oil
1 pound Brussels sprouts
1 teaspoon Kosher salt, divided
1/2 teaspoon red pepper flakes, optional
Generous freshly ground black pepper
2 parsnips, peeled and chopped
4 tablespoons butter
1 medium onion, diced
1/2 pound pork sausage, cooked
1 tablespoon dried sage
1. Preheat the oven to 400 degrees.
2. Prep your Brussels sprouts by cutting them in half (quarter especially large ones; leave especially small ones whole). Toss with olive oil, 1/2 teaspoon salt, generous amount of black pepper and red pepper flakes. Place on a baking sheet and bake for 25-30 minutes or until nicely brown and crispy around the edges, turning occasionally for even browning.
3. Put parsnips in large oven-proof skillet. Cover with water. Heat over medium heat until simmering and then cook for 3 minutes. Drain and set aside.
4. Melt butter in same large skillet. Add onion along with remaining 1/2 teaspoons salt and more freshly ground black pepper. Cook for 5 minutes over medium-low heat until soft. Add cooked parsnips, pork sausage and sage. (Feel free to leave out the pork sausage if vegetarian or sub in seitan or tempeh instead).
5. Turn heat to medium-high and cook for 20 minutes, stirring every couple of minutes. The idea here is to brown the parsnips but not burn them. Your pan should be so hot that you can leave it for 2 minutes without stirring and when you come back, things will just be nicely browned on the bottom. If the parsnips or onions burn in 2 minutes, your pan is too hot. Turn it down and keep going– a little char is a-okay.
6. Toss hash with roasted Brussels sprouts before plating and serve with eggs.
.
Week #24, Final weekly & purple & moon; Thank you!
- On: October 28, 2020
- 1
Good-bye … for now.
Tipi CSA members, thank you so much for joining our CSA adventure this season. We greatly appreciate your patience and your support. Your trust in us and messages of support carried us through some very difficult times. It meant so much to us.
In the midst of a complicated year, it was a pretty good growing season. Some things did well, some did poorly (that’s to be expected) but we did not struggle to fill your boxes. I asked our farmhands how they felt about work this year. Here are some of their responses:
“We all learned something about perseverance. The world was scary and sad but we just plodded on and dealt with it every day.”
“Making our COVID systems work was easier than I expected. I am proud of that,” from Karen, our Assistant Food Safety Manager.
“Really good crop year.”
“This was our best crew ever!”
“We are lucky to have a community to work with, in a safe way. I feel bad for people who have to work in isolation at home.”
What we saw was a team of workers who knit themselves together in a way that we have not seen in the past. There have always been strong friendships among our crew but this year people were more patient, more gentle with each other. Our time together became a respite. In the midst of a complicated and tense world, our work remained meaningful and ‘normal.’ As one crew member told me, “the farm rhythms gave me a sense of normalcy in the midst of everything else. Planting, seeding, transplanting – these jobs were the same as any year. It was comforting.”
We are grateful that our farmwork could proceed, that no workers got sick, and that we were able to feed all of you without interruption. We feel great relief as each storage crop is harvested and tucked away for winter. Wow, we are relieved that this season is almost over. Thank you again for your faith in us.
Beth & Steve
2021 CSA registration
We need to complete and analyze the season, then we will be ready to open registration for next season. I expect to do this earlier than other years, probably in November or December. Folks, I will be honest. We expect demand to be very high for CSA shares in 2021. If you want to join us again next year in the Madison to Janesville areas (please do!) then I advise you to register promptly. Our CSA shares sold out early this year, and we are getting unprecedented interest for next season.
1. I will open registration first for all returning members, so you have first dibs. Please watch for emails from us.
2. After one week, we’ll open to our waiting list.
3. After that, I’ll open registration to the public.
Winter sales
As usual, you can find our storage crops for sale through the winter at the Willy Street Coops, Basics Coop, and Outpost Natural Foods. We’ve got nice supplies of carrots, cabbage, parsnips, beets, celeriac, radishes, and rutabaga. We expect deliveries to last through March.
Final harvests
![]()
We are working hard to bring in our final root harvests. Carrots, parsnips, and some cabbages are still in the field. The weather forecast is excellent for the next ten days. We plan to have everything harvested by the end of that ten days. We will have to hustle but will make it happen. Our coolers will be filled to the brim and we will relax for winter.
Veggie List & Veggie Notes
Week #24, October 29/30, 2020
FINAL DELIVERY OF OUR REGULAR CSA SEASON.
– Weekly shares
– EOW/ purple
– Sampler/ moon
Red cabbage
Sweet potatoes, ~2.5 lb
Winter squash (Autumn Frost or a butternut)
Satina yellow potatoes, 3.5 lb
Brussels sprouts, ~1 lb
Celeriac
Japanese daikon radish
Snack peppers or a green bell pepper
Roulette chiles (not-hot habanero), a few
Poblano chiles (low or medium heat), 2
Yellow onion
Shallots, a few
Most sites get a bag of tender Amara kale. One or two sites get cauliflower or broccoli.
Red cabbage – Refrigerate. Stores well. Wonderful for colorful slaws.
Sweet potatoes – Store at room temperature. Sweet potatoes will suffer chilling injury in the fridge. It’s OK to either store in a paper bag, or out on your kitchen counter. Do not store in plastic. Sweet potatoes will store for a long time.
This week, some folks get our ‘Beauregard’ variety, some get ‘Orleans’. Both are orange-skinned.
– For best flavor, cook your sweet potatoes so they brown and caramelize. We have a simple, favorite way to roast sweet potatoes. We used to prepare sweet potato fries in the oven. Now we just quarter the potatoes, rub with olive oil, dust with salt and place cut-side-down on a cookie sheet. Roast in a 450 F oven without turning until soft. The flavors will caramelize (like sweet potato fries) but preparation is simpler and the cooking time less exacting. Slender sweet potato fries go from undercooked to overcooked in the blink of an eye. Larger slices are less exacting, and therefore are easier. Small sweet potatoes can be cut just in half. Jumbos will need to be chopped into pieces. Otherwise, they take a long time to cook.
– This first batch of sweet potatoes will need slightly longer cooking than ones from the supermarket, perhaps because they contain higher moisture so soon after harvest.
– Sweet potatoes are good at any size. We have cooked everything from tiny to jumbo and consistently find that all sizes taste good.
Winter squash – Store at room temperature, or above 55 degrees. Do not cover. You want good air movement to prevent spoilage.
This week, you will receive a small frosted squash (‘Autumn Frost’ or ‘Koginut’) or ‘Nutterbutter’ butternut.
The beautiful frosted squash have both pumpkin and butternut squash breeding in them. They cook and taste like an unusually good butternut. The seed companies tell us that they store very well, but I encourage you to eat them within a few weeks. These are new for us, so we don’t really know how well they will store.
‘Nutterbutter’ is our best-tasting butternut squash at this time of year. These are not intended for long storage. Eat within two weeks.
Satina yellow potatoes – These are from our friends Brad and Brian Igl’s farm near Antigo. Store dry at room temperature, in the paper bag to protect from light. These are good all-purpose potatoes. They roast very nicely.
Brussels sprouts – Refrigerate in the plastic bag. Eat within two or three weeks. They store well but the outer leaves will turn yellow. Don’t let them get too wet in the fridge.
Celeriac (knobby, round, bizarre-looking vegetable which smells like celery) – Refrigerate. Celeriac will store in your refrigerator for months. Cut off chunks as you need them. Peel before using. Flavorful celeriac is good raw or cooked. It is excellent in mixed roasted veggies or in soup. It’s especially good in cream soups, alone or mixed with potatoes. Grated raw celeriac is a great starting point for winter salads.
Japanese daikon radishes (long, white, freckled) – Refrigerate. Slice thinly and add to salads, cook lightly in mixed vegetable medleys or cut into matchsticks and add to pasta salads. Three weeks ago, we packed Korean radishes. While somewhat different, you can largely interchange Japanese and Korean daikon in recipes. Visit the Maangchi website (my favorite!) for many recipes for both Japanese radish and for Korean radish.
Green bell or snack peppers – Refrigerate. Eat soon. These were protected under row cover but exposed to cold nights, which shortens their storage life. Eat within 5 days.
‘Roulette’ chiles (small, orange or red) – This chile has been bred to have the aromatic taste of habanero chiles, with almost no heat. Snack on them to enjoy their flavor, or add them to any dish. To reduce all chances of spiciness, remove the seeds and midveins.
Poblano (dark green or red, shiny, triangular) – Refrigerate. Eat soon. These were protected under row cover but exposed to cold nights, which shortens their storage life. Eat within 10 days. These chiles have mild heat and lots of flavor.
Shallots (look like small red onions) – Store at room temperature. Shallots store for a long time. Excellent minced for salad dressing. They will sweeten considerably when fried.
Fried shallots – Thinly slice shallots. Heat 2 Tbsp peanut oil in a small skillet over medium-low heat. Add shallots and fry gently, mixing occasionally, until golden brown. When done, use the shallots and oil to top any dish, eg turkey salad.
Amara kale (tender, ruffled kale in bag) – Cover and refrigerate. This harvest is quite young and tender. Should be good for one week.
We’ve grown this variety just a few times. Here’s the seed catalog description: “While technically a mustard, Amara is known by several different names including Ethiopian kale, highland kale, Abyssinian mustard, and Texsel greens. The attractive, dark green leaves are tender, slightly savoyed with a wavy margin, and have an excellent rich flavor. Good in salads or as a cooked green.” This stuff is pretty interesting. It has the texture of kale but the spiciness of mustard. I’d say it’s about half as spicy as mustard greens.
‘Autumn Frost’ or ‘Koginut’ squash.
Pepper ID. You will receive some (but not all of these types). Clockwise from left,
Poblano chiles (dark green or red, shiny, triangular) – medium heat
Roulette (small, bright red or orange) – sweet and flavorful
Green bell pepper – sweet
Orano snack peppers (orange, red, yellow or green) – sweet
Shallots
RECIPES
Visit our 2020 Recipe Log or our 2019 Recipe Log or join our Facebook discussion group.
LOCAL THYME/ Cooking 101
Brussels Sprout Red Cabbage Slaw with Honey Poppy Seed Dressing
Irish White Bean and Root Vegetable Stew
Pot Roast over Egg Noodles
LOCAL THYME/ Cooking 202
Braised Red Cabbage With Apples, Bacon and Wine
Dijon Braised Brussels Sprouts
Celeriac Potato Hash Browns with Jalapeño and Cheddar
LOCAL THYME/ Quick & Easy Meal
Fusilli with Brussels Sprouts in Cheese Sauce
RECIPES FROM LAUREN

.
????
.

Takes 40 minutes
.
????
.
.
Week #23; Farm walk, Final EOW/green
- On: October 21, 2020
- 0
Our farm walk worked out quite well, despite the chilly weather. The rain stopped just before members began arriving. Whew. I’d like to share a little of the day, for those who couldn’t attend.
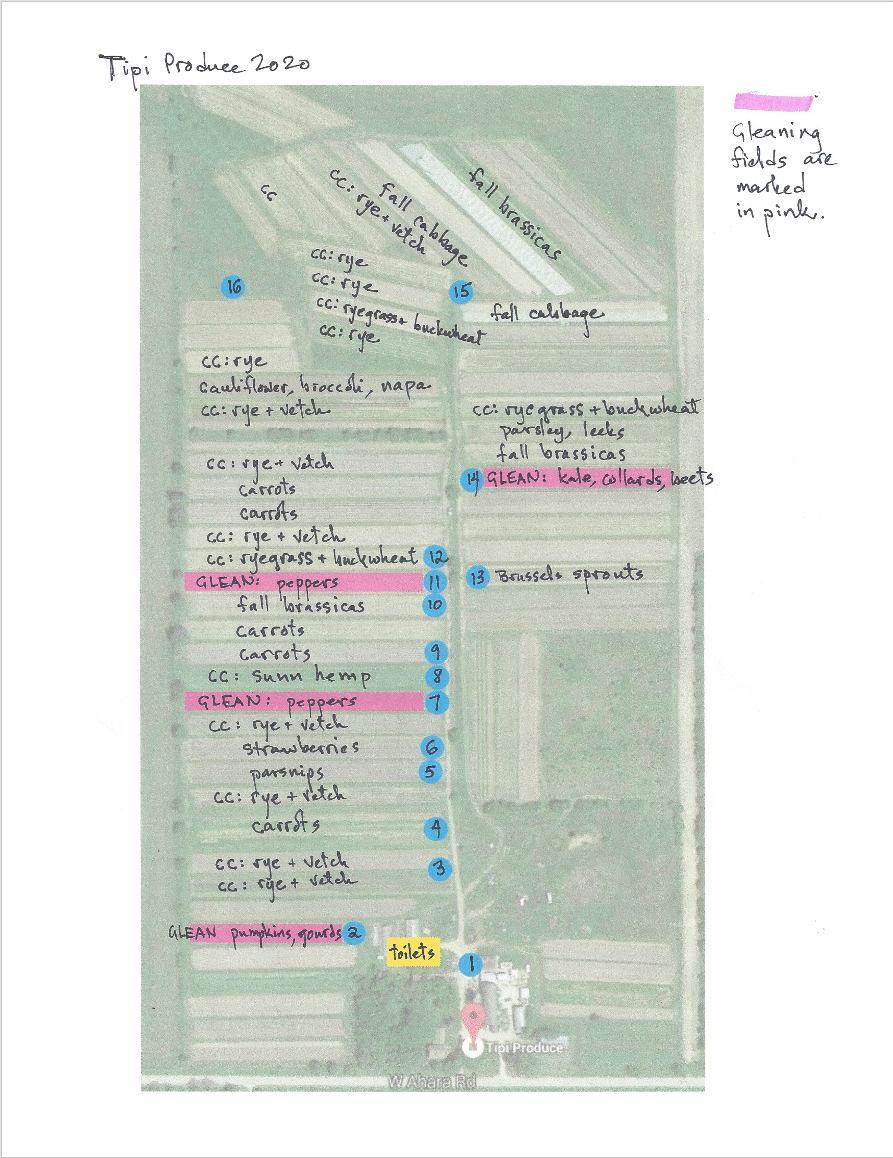
I distributed a map and list of tour stops before the farm walk, so people could print a copy at home, or view it on their phone.
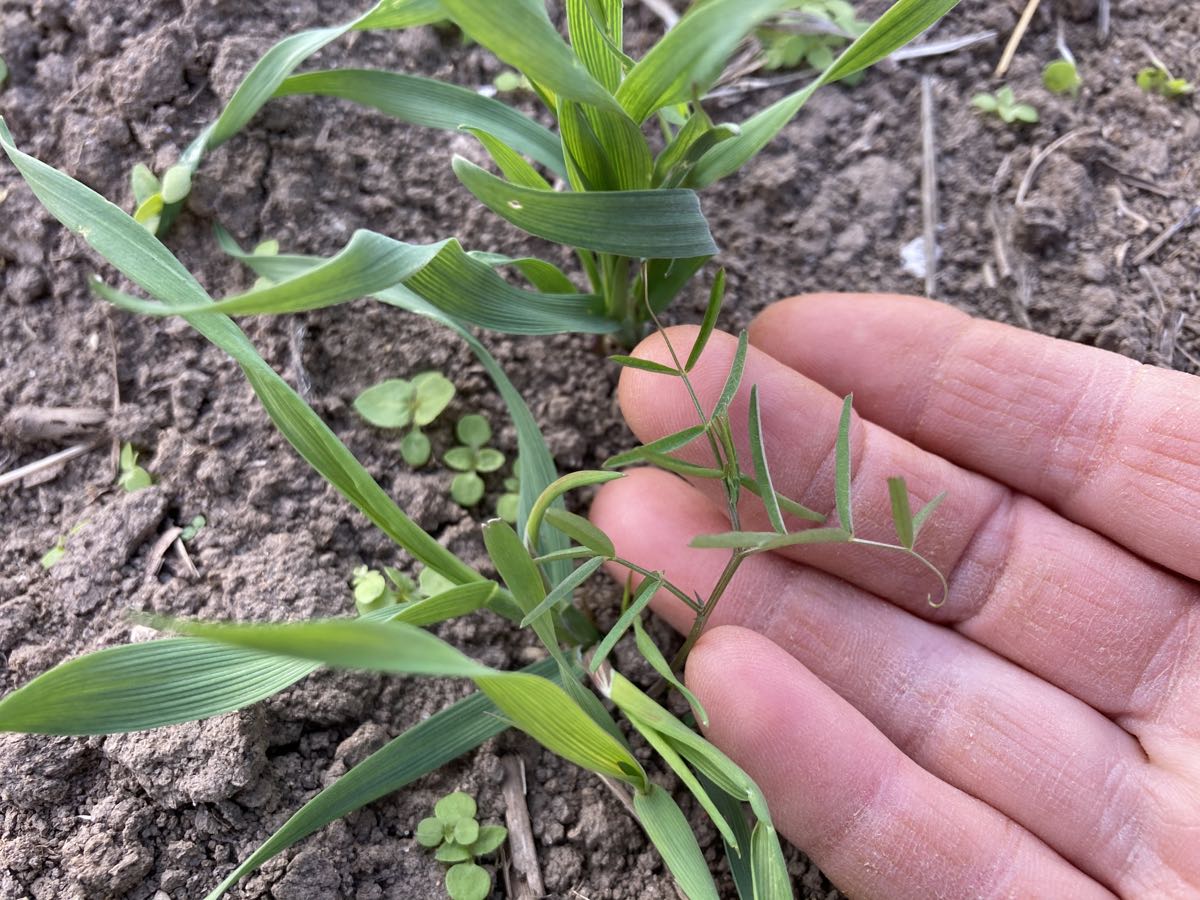
Tour stop #3. During the summer, Steve plants cover crops as we finish harvests from each field. By this time of year, many fields are planted to cover crops. Top; young rye (grass) and hairy vetch (tendrils). These seem fragile but will overwinter and explode into growth in spring. Bottom, a lush field of ryegrass. This cover crop should die over the winter, leaving the field ready for next year’s crop.

Tour stop #4. Our storage carrot fields are looking good. We’ll harvest these from now until early November, sooner if the weather hurries us. Carrots can handle some frost.
Tour stop #7. It’s worth the effort!
Tour stop #8. The golden flowers frosted on Thursday night but new blossoms opened by Sunday morning.
Tour stop #9. The brassica fields look great. These crops shrug off cold weather.
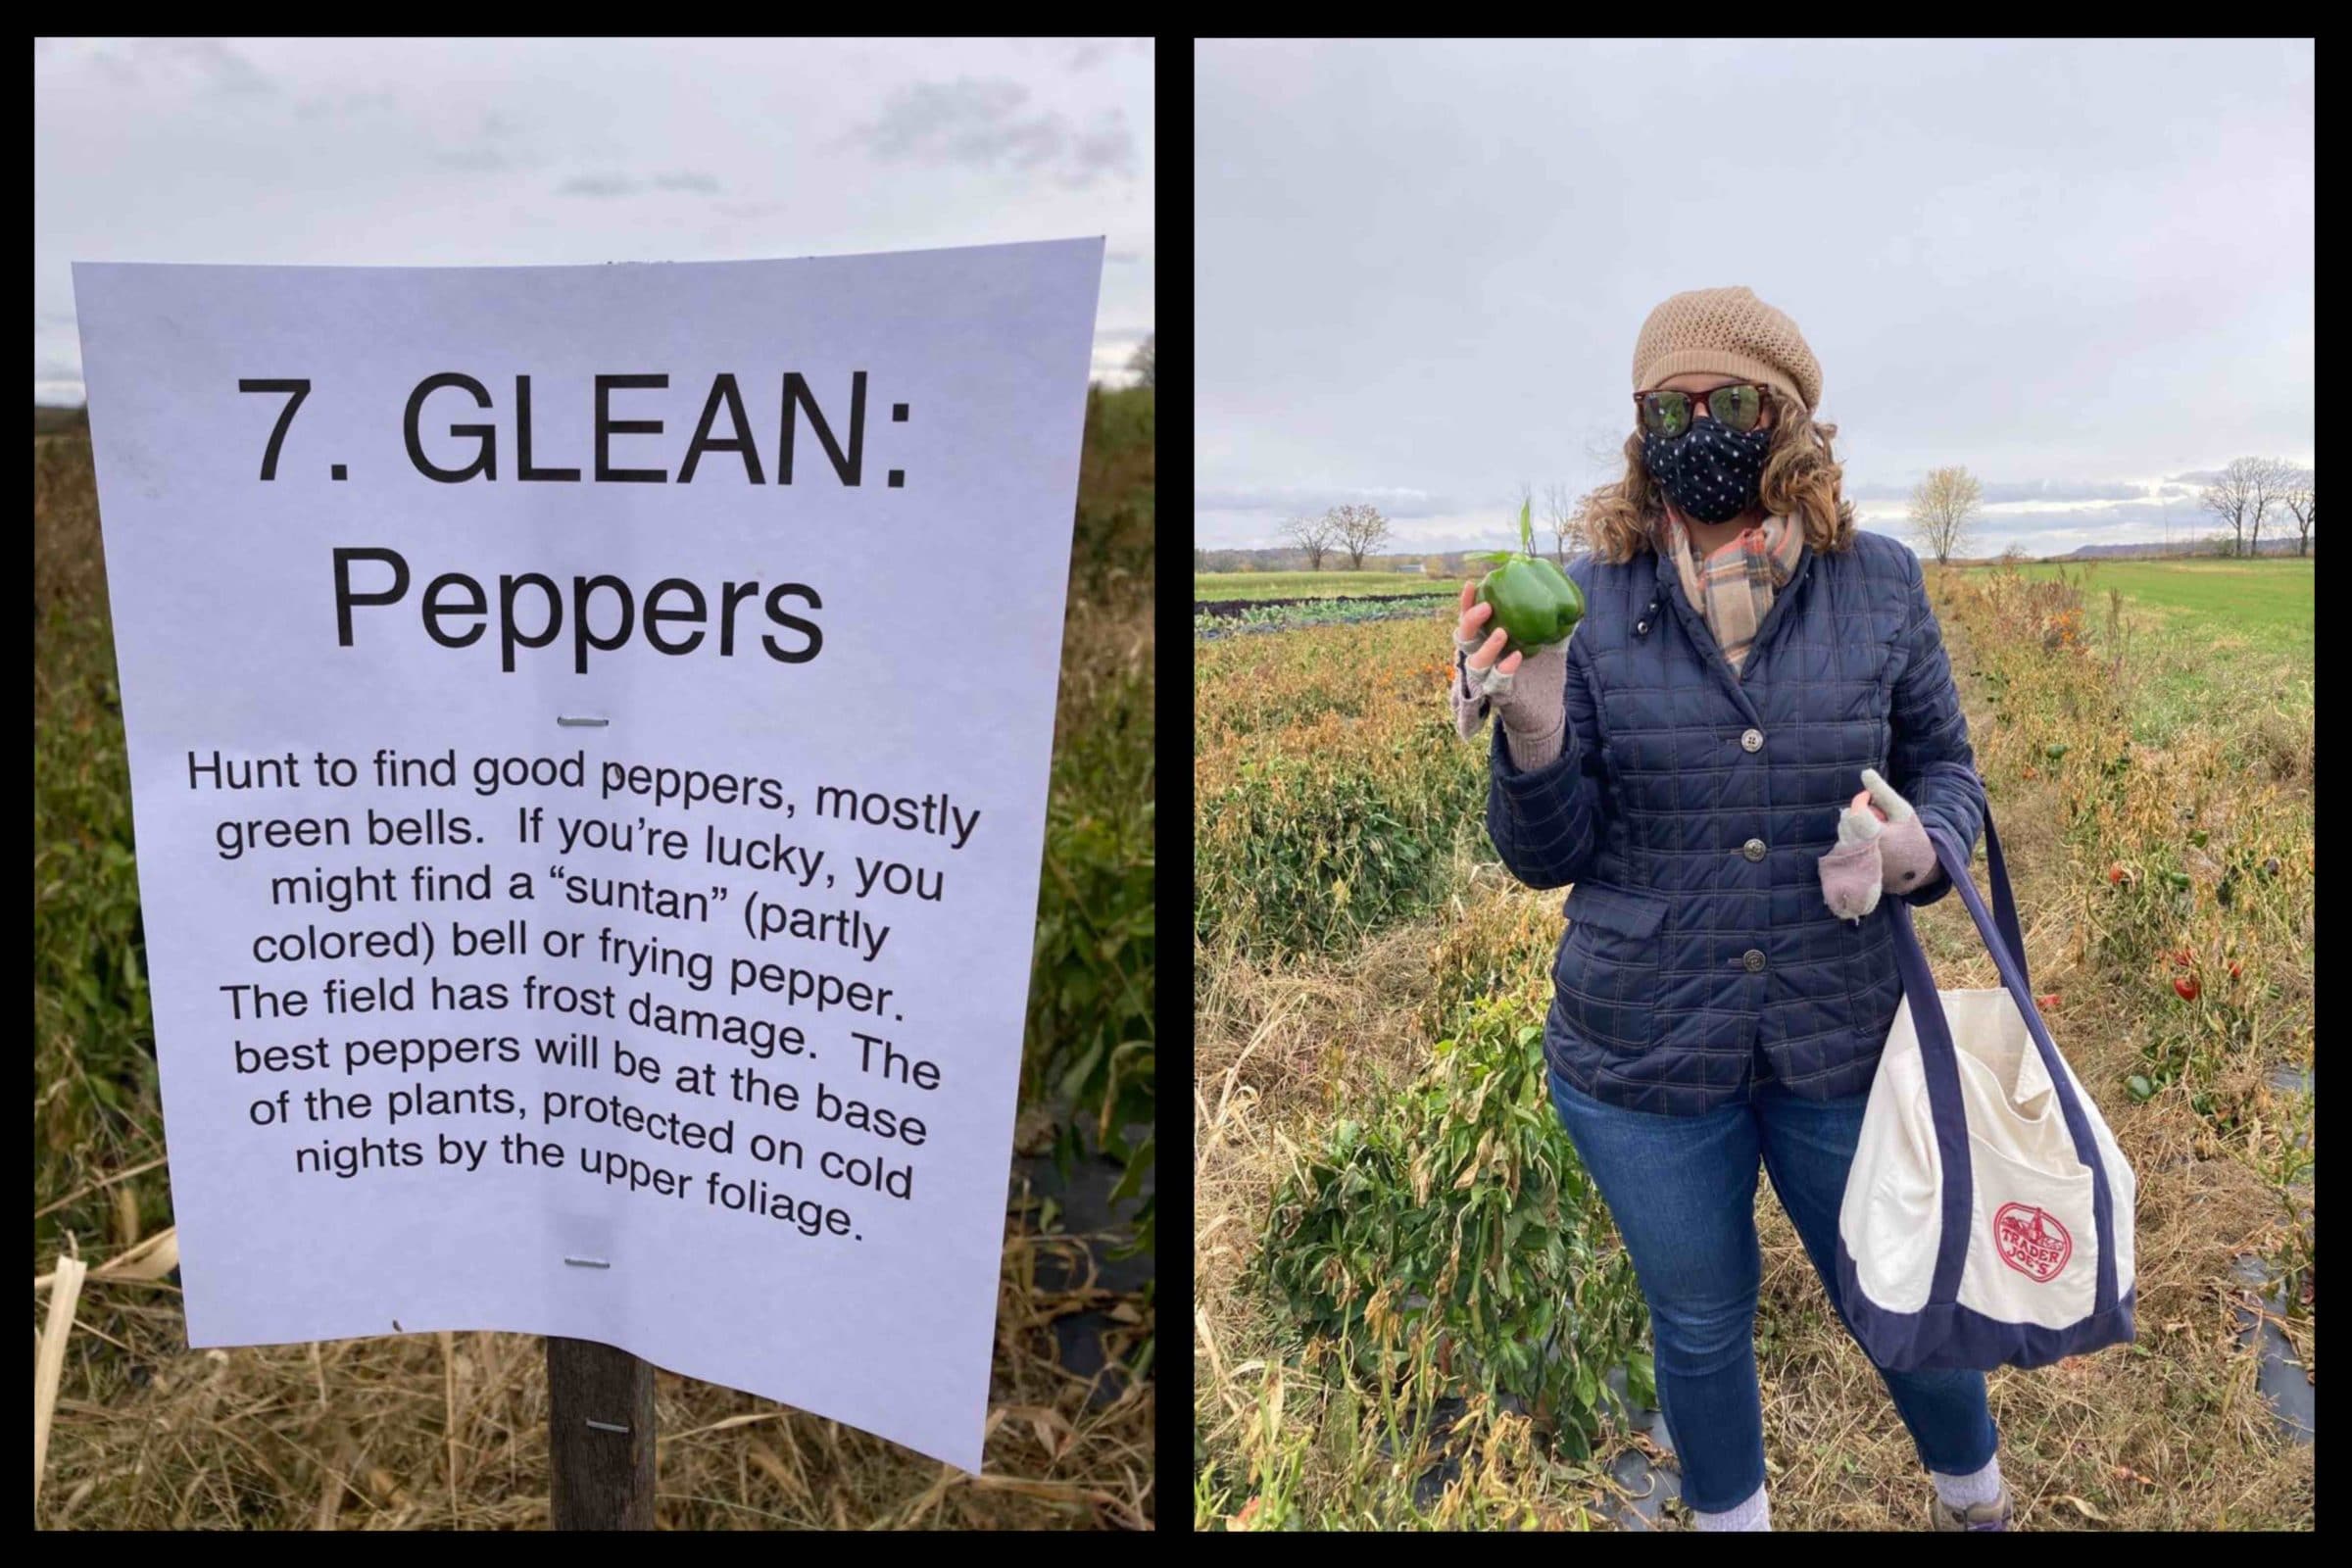
Tour stop #14. We opened our first kale & collards field for gleaning. We stopped harvesting from this field once our second planting was ready. The field is weedy but there’s good greens to be found.
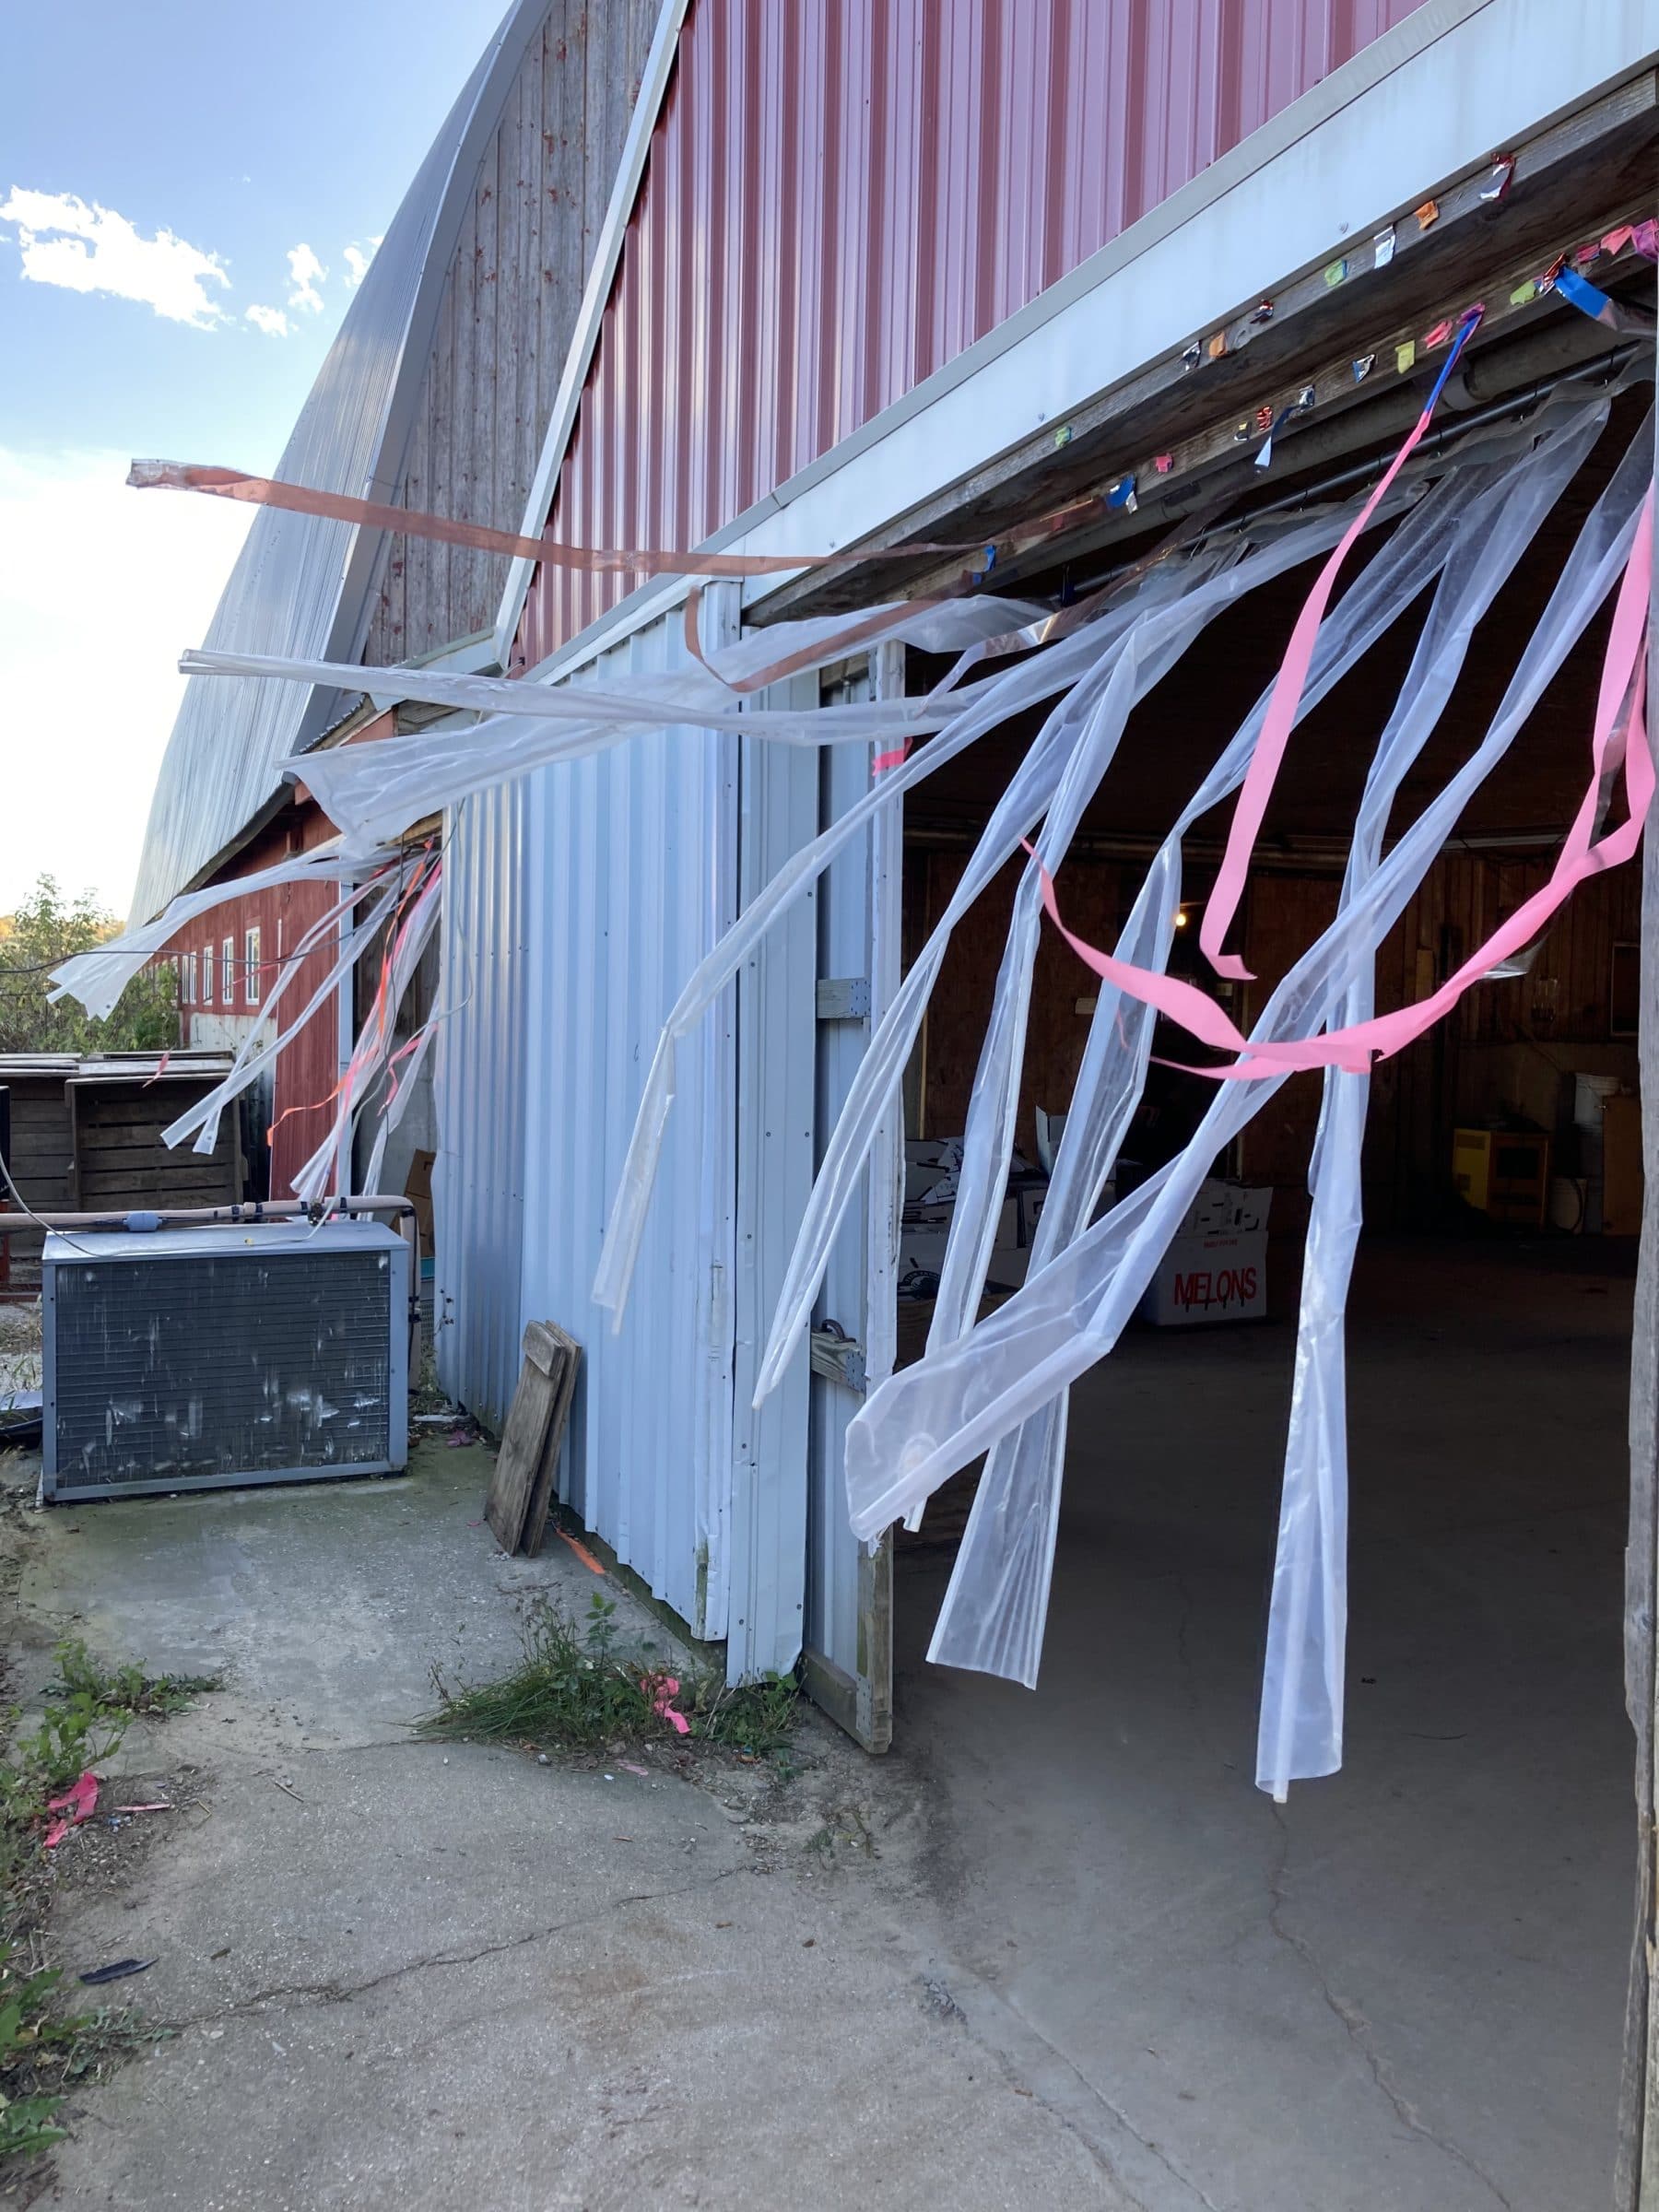
Tour stop #15. We posted the sign at top but then strong winds on Saturday ripped and blew about the row covers. We replaced them on Monday. It’s not unusual for weather to undo our efforts.
That’s it! I hope you enjoyed the tour, whether in person or remotely. Beth
Veggie List & Veggie Notes
Week #23, October 22/23, 2020
– Weekly shares
– EOW/ green
Sweet potatoes, ~2 lb
Brussels sprouts, ~1 lb
Koji greens
Leeks, about 1.25 lb
Carrots, ~2 lb
Parsnips, ~1.5 lb
Green peppers, 1 bell + 1 or 2 frying
Anaheim chiles, 2 (medium heat, in bag with carrots)
Scallions, 1 small bunch
Garlic
– Some sites get broccoli.
– Some sites get cauliflower.
– Some sites get a butternut squash.
Next week’s box will probably contain red cabbage, winter squash, sweet potatoes, yellow potatoes, Brussels sprouts, celeriac, onions, and more.
Sweet potatoes – Store at room temperature. Sweet potatoes will suffer chilling injury in the fridge.
Some folks get our ‘Beauregard’ variety (orange skin). Some get ‘Bayou Belle’ (purple skin, long roots)
– For best flavor, cook your sweet potatoes so they brown and caramelize. We have a simple, favorite way to roast sweet potatoes. We used to prepare sweet potato fries in the oven. Now we just quarter the potatoes, rub with olive oil, dust with salt and place cut-side-down on a cookie sheet. Roast in a 450 F oven without turning until soft. The flavors will caramelize (like sweet potato fries) but preparation is simpler and the cooking time less exacting. Slender sweet potato fries go from undercooked to overcooked in the blink of an eye. Larger slices are less exacting, and therefore are easier. Small sweet potatoes can be cut just in half. Jumbos will need to be chopped into pieces. Otherwise, they take a long time to cook.
– This first batch of sweet potatoes will need slightly longer cooking than ones from the supermarket, perhaps because they contain higher moisture so soon after harvest.
– Sweet potatoes are good at any size. We have cooked everything from tiny to jumbo and consistently find that all sizes taste good.
Brussels sprouts – If you are a new CSA member, please approach Brussels sprouts with an open mind. Many of us grew up eating awful, overcooked Brussels sprouts. These Brussels sprouts are completely different.
Here is our method to cook Brussels sprouts: Wash the sprouts and trim the cut ends. Cut an X in the stem end of large sprouts. Cut a single slit in small or medium sprouts. This does two things. It helps the Brussels sprouts cook evenly, plus it allows them to soak up any marinade or dressing. Place sprouts in a pot with one inch of water in the bottom and steam until tender, 7 to 10 minutes. If the sprouts are uneven in size, then set aside the smallest ones and add to the pot after the larger ones have cooked for a few minutes. Don’t overcook them! You can also oven-roast Brussels sprouts.
Here are a few dressing ideas for cooked sprouts:
– Sherry vinegar/olive oil/Dijon mustard/garlic/white wine/salt and pepper. This is our favorite, especially when you combine the Brussels sprouts with slivered peppers and thinly sliced onions. Delicious warm, cold, or at room temperature.
– Balsamic vinegar/olive oil/garlic/salt and pepper
– Lemon juice and zest/melted brown butter/poppy seeds/white wine/garlic/salt
Koji greens (head of dark green leaves) – Refrigerate.
Koji greens are a lot like Yukina if you know that one; dark green with a nice balance of bitter flavor but not too strong. Like tat soi but with larger, lusher leaves and not so many leaf stalks. Recipes that use mustard greens or bok choy will work with Koji. In a contest for my favorite fall green, Koji runs neck and neck with bok choy.
Leeks (look like big scallions) – These alliums have a milder flavor than onions. Nonetheless, they can be used in recipes that call for onions. To wash, split the leek lengthwise, from the green tops about halfway to the base, leaving the base intact. Rinse well under running water, separating the layers to flush. If necessary, split the leek further if soil has penetrated more than halfway down the leek. Shake dry. Leeks are generally eaten cooked. They can be sauteed, steamed or roasted. Intact leeks will store 2 to 3 weeks if covered loosely and refrigerated. The outer leaves will yellow. Just peel them off and discard. The inner leek layers will be fine.
Carrots – Refrigerate in a plastic bag.
Parsnips (These look like large white carrots) – Those long, white roots are not carrots, they are parsnips. The two vegetables are related. When cooked, parsnips are sweet and starchy. For the best flavor, brown them to caramelize the sugars. Here are a few ideas for parsnip preparation:
– Caramelize the parsnips by roasting them in a vegetable medley.
– Parsnip fries are delicious: cut like French fries, oil lightly, place on a cookie sheet and roast in a hot oven until brown and cooked through.
– Try substituting grated parsnips in a potato pancake recipe. They brown beautifully and are very tasty.
– Steve loves pan-fried parsnips with onions and garlic.
Peppers – Refrigerate. Eat soon. These were protected under row cover but exposed to cold nights, which shortens their storage life.
Anaheim chiles (long, slender, red or green; pack in carrot bag) – Refrigerate. Eat soon. These were protected under row cover but exposed to cold nights. That shortens their storage life.
These flavorful chiles have medium heat, although we find that these late-harvested ones seem to be pretty mild. They look deceptively like frying peppers, so we packed your Anaheims in the carrot bag, to make them easy to recognize.
Scallions – Refrigerate in a plastic bag.
Cauliflower or broccoli – Cover and refrigerate.
Beautiful, beautiful Koji greens
RECIPES
Visit our 2020 Recipe Log or our 2019 Recipe Log or join our Facebook discussion group.
LOCAL THYME/ Cooking 101
Veggie Pot Pie
Brussels Sprout and Sweet Potato Dressing
Koji Greens and Scallions Frittata
LOCAL THYME/ Cooking 202
Moroccan Lamb and Vegetable Tagine
Brussels Sprout Salad with Craisins, Pecans and Creamy Maple Balsamic Dressing
Quinoa, Koji Greens and Egg Breakfast Bake
LOCAL THYME/ Quick & Easy Meal
Rice Noodle Stir Fry with Carrots and Peppers
RECIPES FROM LAUREN
LEEK & PEPPER PRETZEL DIP
Takes 10 minutes
Makes 3 cups
Serves a crowd
8-ounce package cream cheese, softened
1 large leek, quartered and sliced
1 green pepper, seeded and diced very small
2-3 anaheim peppers, seeded and diced very small
2 tablespoons mayonnaise
1/4 teaspoon Kosher salt
In a medium bowl, beat the cream cheese until smooth. Add leek, peppers, mayonnaise and salt. Stir to combine until uniformly mixed. Taste and adjust seasonings as desired.
Serve immediately or chilled with pretzels. Dip lasts about a week.
.
????
.
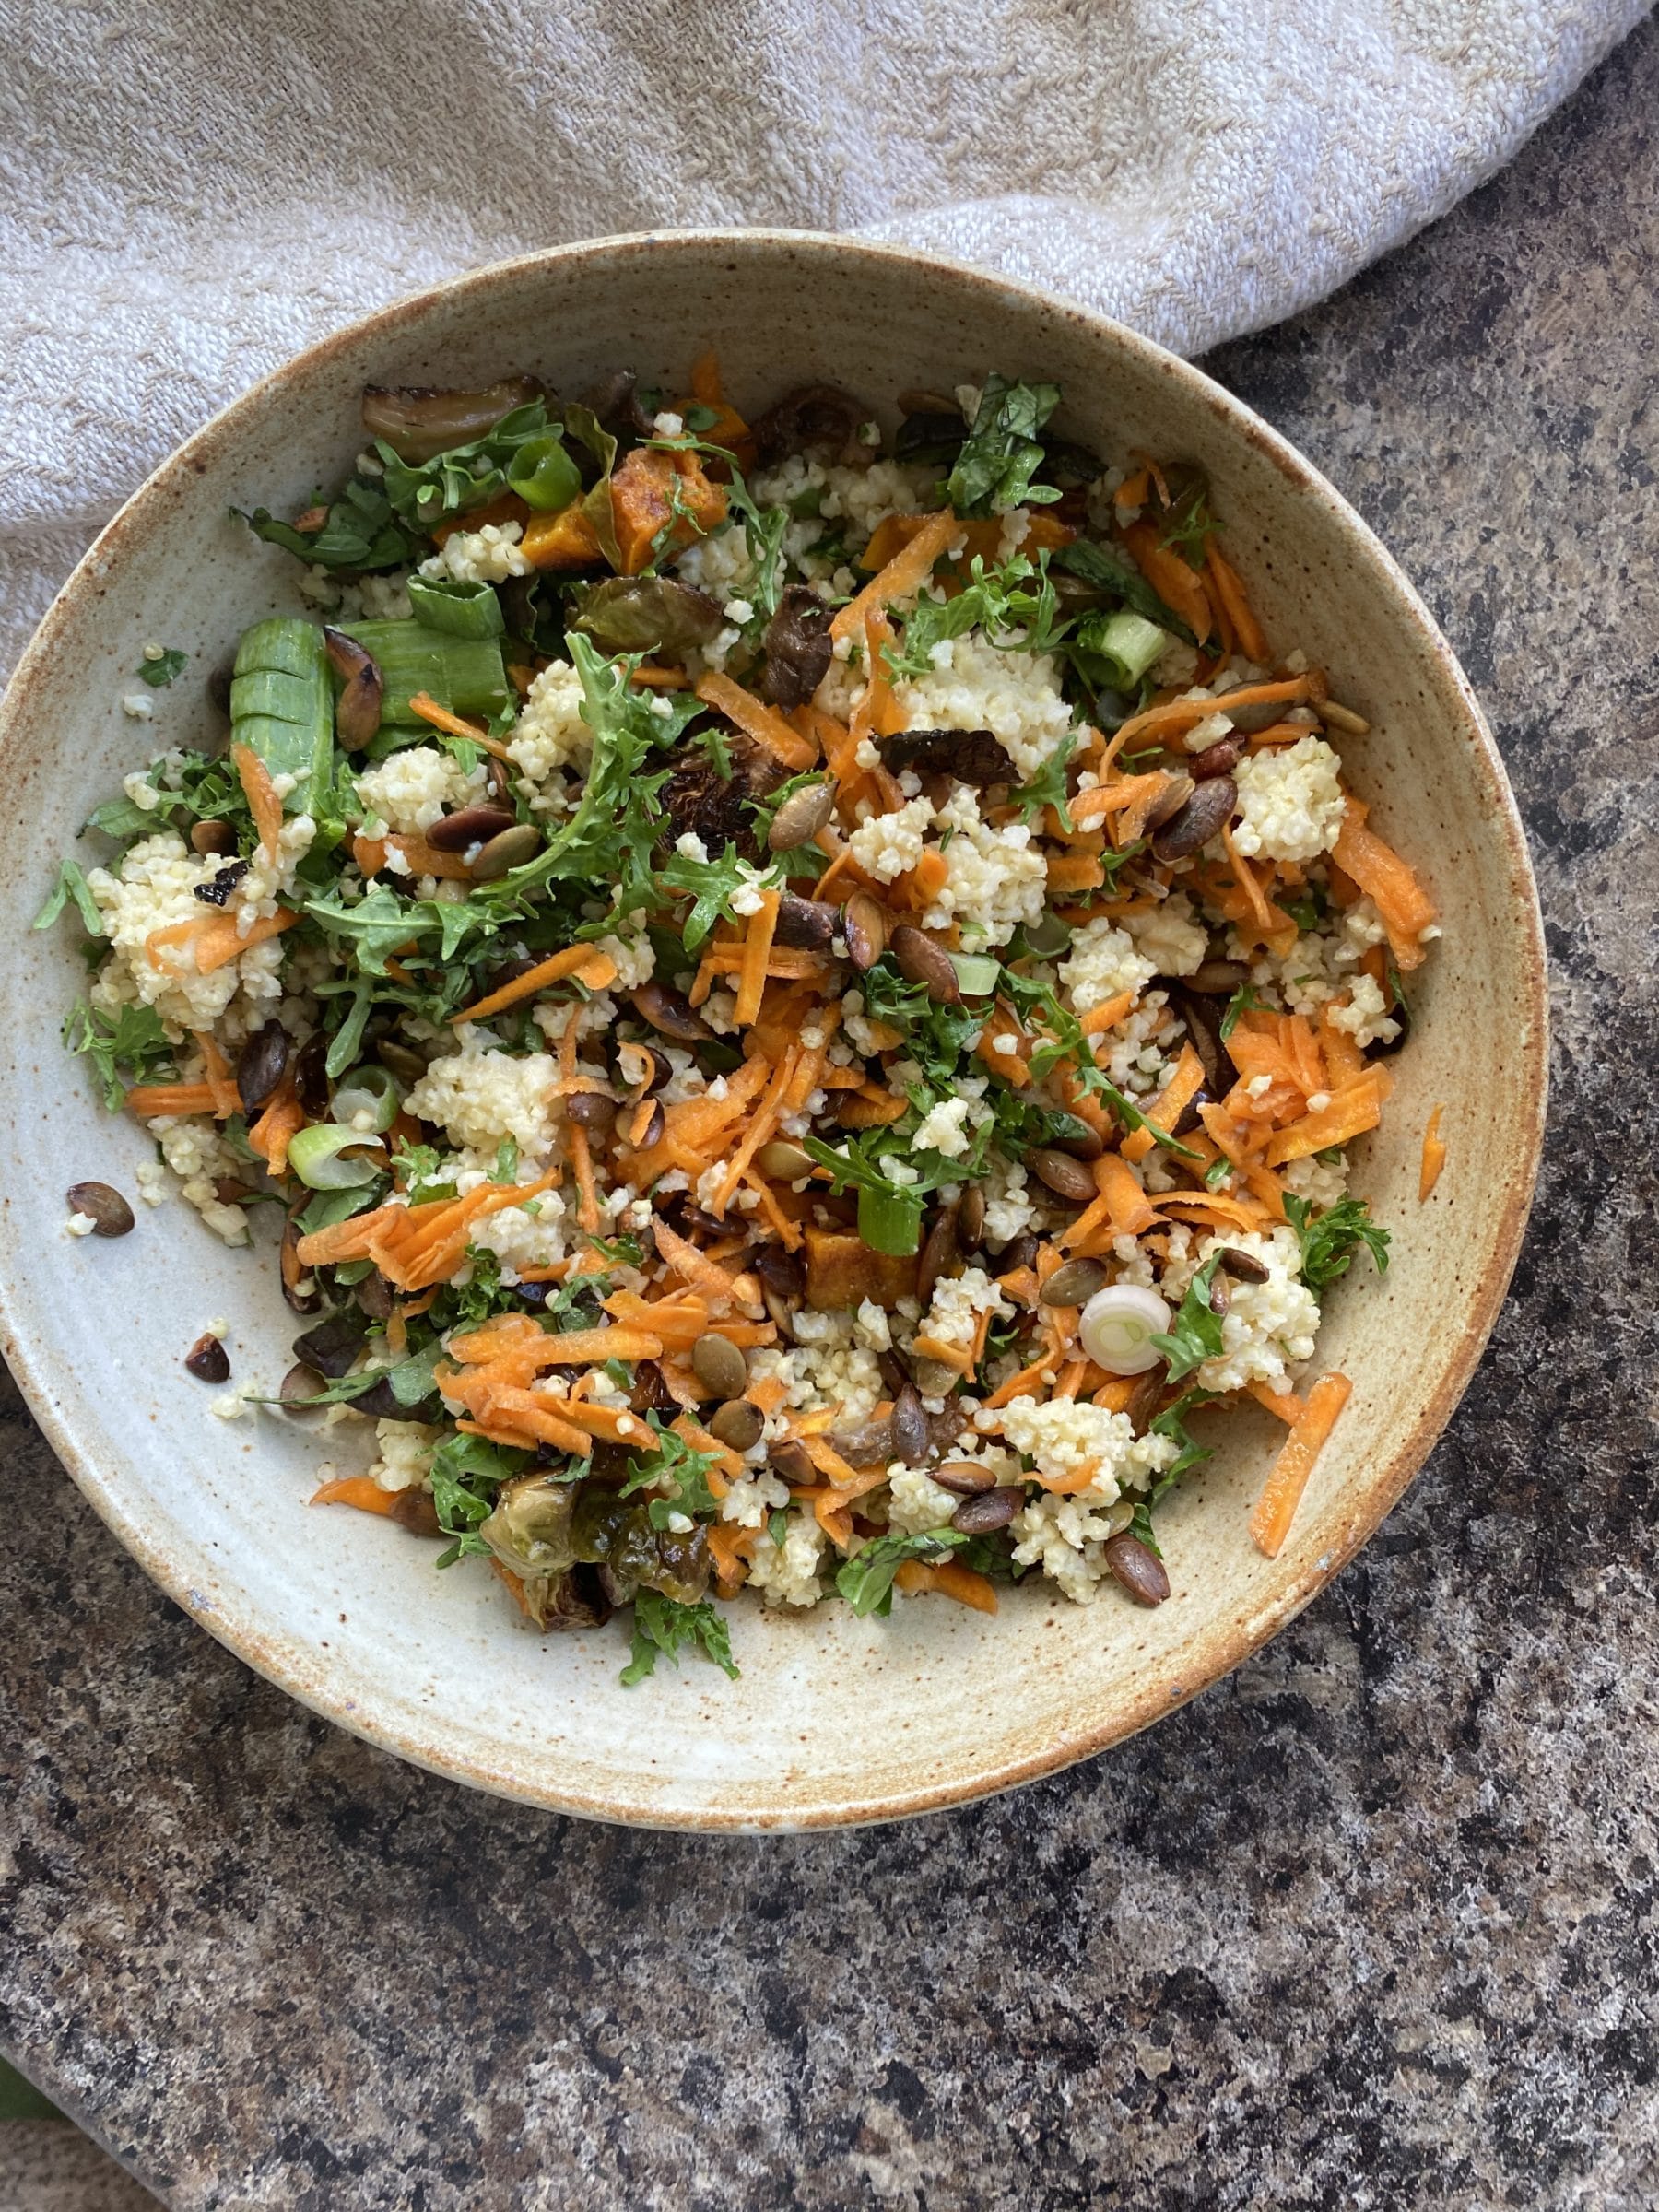
FALL GRAIN BOWL WITH MILLET & MUSHROOMS
Takes 1 hours
Serves 4-6 (as a main dish)
1-2 large carrot, shredded
1/4 cup rice wine vinegar
1 tablespoon sugar
1 pound peeled and cubed sweet potato (about 2 cups)
1 pound Brussels sprouts, trimmed and halved (about 2 cups)
2 tablespoons olive oil
1 teaspoon Kosher salt, divided
1/4 teaspoon freshly ground black pepper, divided
2 tablespoons butter, thinly sliced
1/2 pound cremini, shiitake or oyster mushrooms, sliced
1 cup millet (or other favorite grain)
2 cups water
1 tablespoon chicken (or vegetable) bouillon
1 bunch Koji greens, stems removed and leaves finely chopped
1 bunch scallions, sliced
1/2 cup toasted pepitas (or other favorite seed or nut)
Lime Maple Dressing:
1/4 cup walnut or hazelnut oil (or other neutral oil)
1 tablespoon toasted sesame oil
1/2 fresh lime, juiced
2 tablespoons rice wine vinegar
1 tablespoon maple syrup
1 teaspoon Dijon mustard
3 garlic cloves, minced
1/2 teaspoon Kosher salt
1/4 teaspoon freshly ground black pepper
1. Preheat oven to 425 degrees.
2. In a small bowl, combine carrots with vinegar and sugar. Toss to combine and let sit while you prepare the rest of your meal.
3. On a large rimmed baking sheet, combine sweet potatoes and brussels sprouts with oil, 3/4 teaspoon salt, and 1/8 teaspoon pepper. Place in oven and roast for 30-35 minutes, until Brussels are crisp and sweet potatoes are tender. Rotate pan at least once while cooking.
4. On a second large rimmed baking sheet, scatter butter slices across. Sprinkle mushrooms across the pan and finish with the remaining salt and pepper. Roast for 15 minutes until mushrooms are softened (but not dried out) and butter is browned.
5. While the veggies and mushrooms roast, prepare your millet. Toast dry grains in a medium saucepan for 5 minutes over medium heat, being careful not to burn. Add water and stock, and give it a good stir. Bring the mixture to a boil over high heat, cover and reduce to low. Cook for 15 minutes then turn off the burner, but leave the millet covered for 5 minutes to finish absorbing the liquid.
6. In a small bowl, prepare your dressing by whisking all ingredients together until smooth.
7. To serve, top millet with roasted vegetables and mushrooms. Add grains, scallions, and dressing and toss to combine. Serve warm or at room temperature. Add pepitas right before eating.
.
????
.
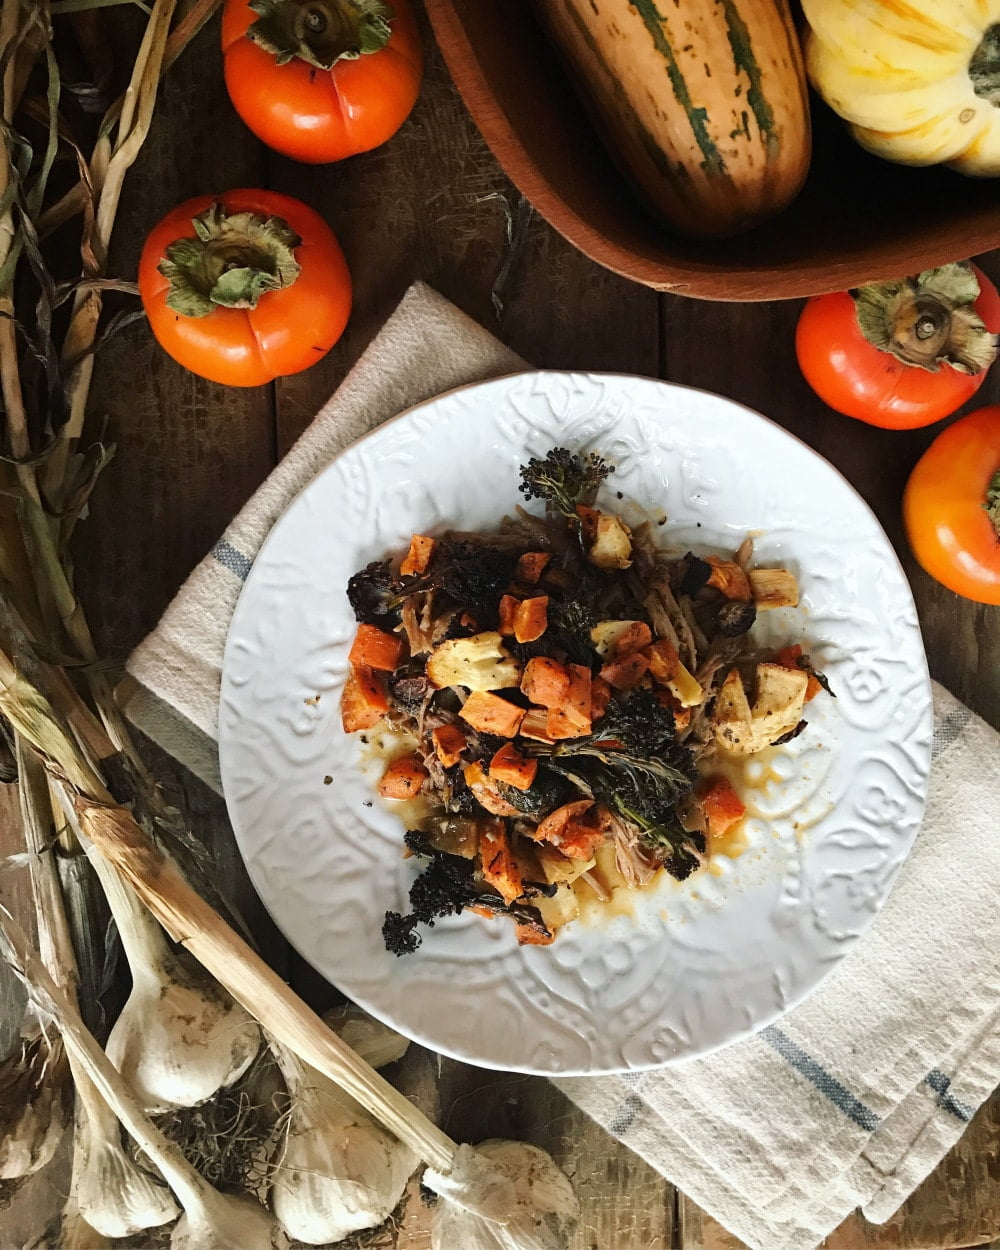
PORK CARNITAS WITH ROASTED VEGGIES
Serves 6-8
Takes 8 hours inactive time, 30 minutes active time
3 to 4 pound pork shoulder
2 teaspoons kosher salt
1/2 teaspoon freshly ground black peppers
1/3 cup salsa
1/4 cup Worcestershire
1/4 cup brown sugar
2 shallots, diced
3/4 cup water
2 teaspoons smoked paprika
2 teaspoon dried oregano
1/2 teaspoon Rosemary
Roasted Veggies:
4 cups cubed sweet potato
1-2 large carrots, peeled and cubed
1-2 large parsnips, peeled and cubed
1 large head broccoli or cauliflower (about 2 cups), cut into florets, optional
4 tablespoons olive oil
1 teaspoon kosher salt
1/2 teaspoon pepper
1/2 teaspoon thyme
1. In the morning before you head to work*, place pork shoulder roast on a cutting board and generously pat with salt and pepper. Turning and pressing onto any excess that falls onto the cutting board.
2. Place roast in crock pot. Add salsa, Worcestershire, brown sugar, and shallots all around the edges of the pork. Pour water over this mixture. Sprinkle pork with spices, cover and cook on low for 6-8 hours.
3. When you get home (or on Sunday when you have plenty of time), flip the pork over and turn your crock pot to keep warm then preheat the oven to 400 degrees.
4. In a very large bowl, combine sweet potatoes, carrot, parsnip, and broccoli or cauliflower with oil, salt, pepper and thyme. Stir until everything is evenly coated with oil and spices. Pour out onto two baking sheets or roasting pans. If you don’t have a very large bowl, just combine all ingredients on baking sheets as evenly as you can.
5. Roast for 40-50 minutes until veggies are tender and browned in places being sure to rotate pans at least once during baking for even cooking.
6. While the veggies roast, shred your pork with two forks and let soak in the delicious juices.
7. Serve pork with roasted veggies and a generous amount of that sauce remaining in the bottom of the crockpot.
*I also like to do the legwork of a crockpot overnight from time to time since I know I’ll be around in 6-8 hours whereas sometimes my work day can be longer than that. This means prepping the pork the night before and then just throwing it in a tupperware or pyrex and into your fridge in the morning.
Week #22; Our favorite COVID innovation
- On: October 14, 2020
- 0
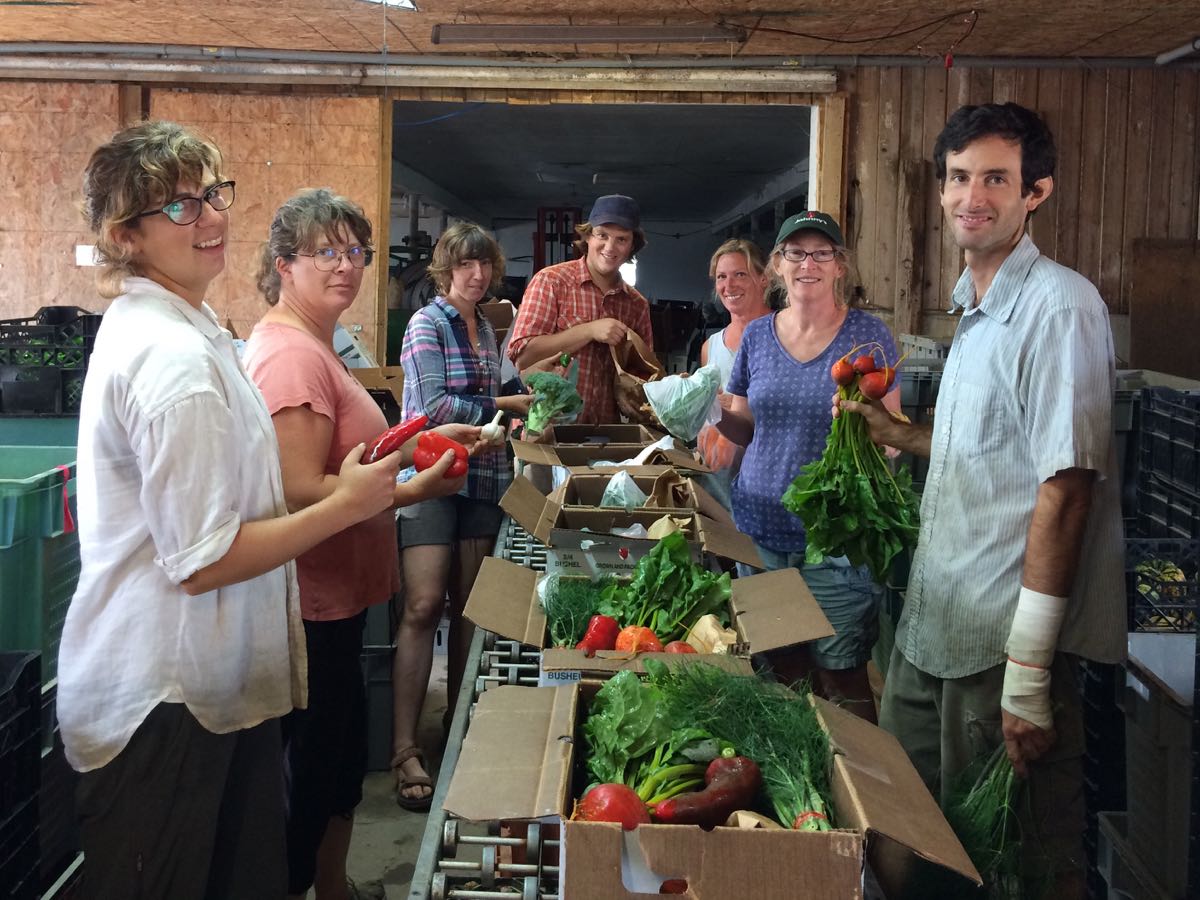
2017 CSA pack, prepandemic. From left, Kelsie, Kristin, Kerry, Jory, Rebecca, me, and John gather to fill CSA boxes. We can’t work in close quarters like this any more.
Back in April, Steve and I brainstormed how to safely pack CSA boxes during the pandemic. We thought “We’ll wear masks and hang sneeze guards and barrier curtains” to separate the team of people. One night, I realized that was not good enough. COVID-19 outbreaks were spreading in meat packing and vegetable processing facilities. Our scale is much smaller but the similarities are strong; we work inside, in a large team, and at close proximity. It was like a bolt of lightning once I recognized the risk, and the challenge of changing our system.
It was late at night and suddenly I couldn’t sleep. I put on my boots and went out to the barn to look at the situation with fresh eyes. Here’s what I figured out and Steve’s reaction the next morning.
Me: “We need to cut a hole in the pack shed wall.”
Steve: “Wait, what??”
Me: “We need to cut a hole in the wall. Then we can work in two rooms and pass boxes through the wall.”
Steve: “Wait, what???”
Me: “A hole in the wall, darn it.”
Steve, after a long pause, “Ahh.” I watched the light bulb go on.
Fortunately, there was an old, never-used door in just the right place. Blocked from opening by an essential post, it was unusable. We took the door off its hinges, shimmied it out from behind the post, and re-attached it on the other side of the wall. Voila, a new doorway.
In past years, we packed your CSA boxes along a ten-foot length of roller track. See the photo above. I rummaged in the barn loft and found an extra 40 feet of roller track. (We have a lot of useful stuff laying around the farm, mostly accumulated by Steve at farm auctions.) Now we pack your boxes along 50 feet of track, allowing us to spread out and maintain social distancing. The rooms we work in are well-ventilated with large doors open to the east and west, so we set up strong fans to keep the air moving along with the prevailing wind.
We can only talk to our nearest neighbors so now I’m a social director too. When possible, I try to cluster the high school and college-age workers in one room. In the adjacent room, all we can hear are shouts of “Tame Impala” or “Beach House!” Apparently they have raging debates about music.
The change has been unexpectedly helpful in other ways. Now we place our stacks of produce next to us. Space was so limited in the old system that the stacks had to be behind us, meaning you had to spin a full 180 degrees to pick up the produce. Midway through each pack, I’d remind everyone to reverse their spin direction. Otherwise, you get very, very dizzy. Between that and the lowered noise levels, we all feel better at the end of the job.
We’ve had to make numerous changes because of the pandemic but this one feels like a success: simple, effective and very inexpensive.
Beth

Starting at right, Mike puts a liner bag in each box, then sends it down the line to Janson and Chris (red shirt).
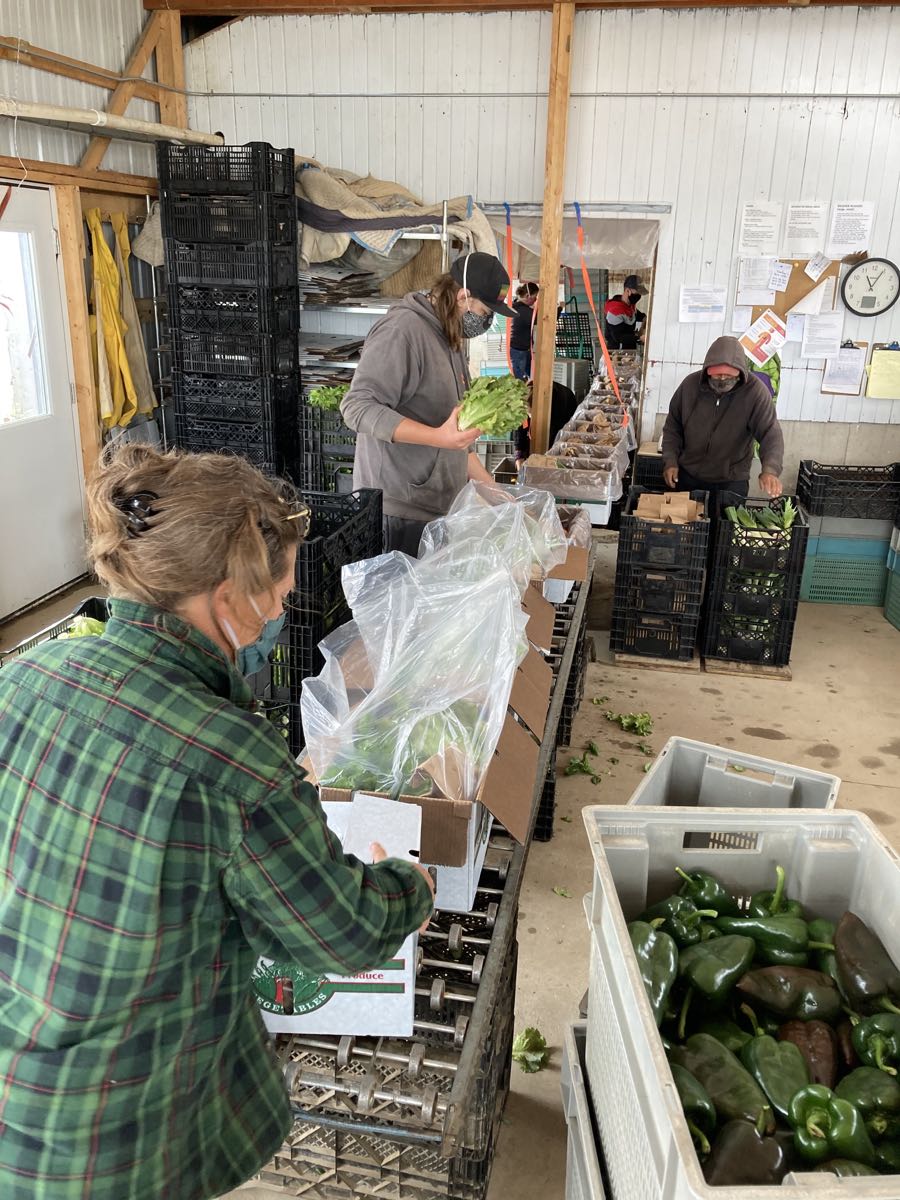
From the adjacent room, you can see Chris (red shirt) in the distance, as well as the new doorway to accommodate the extended roller track. Kristin, Chance and Raul complete the boxes.
Open all the doors, work with the prevailing winds, …

… and use powerful fans.
This week/ Napa harvest
Maggie harvests the perfect napa cabbage while John photobombs to show off his guns. Note the rolled up sleeve.

Incoming! Maggie tosses to Mike who packs the napa into bins.
Veggie List & Veggie Notes
Week #22, October 15/16, 2020
– Weekly shares
– EOW/ purple
– Sampler/ sun
Napa cabbage (purple or green)
Butternut squash
Beets, ~2 lb
Carrots, ~2 lb
Peppers, 4 or 5 small green frying peppers
Poblano chiles (medium heat, in bag with beets), 3
Yellow or red or white onion
Cilantro
Scallions
– Most sites get broccoli.
– Some sites get cauliflower.
Next week’s box will probably contain Brussels sprouts, winter squash or sweet potatoes, carrots, celeriac, broccoli or cauliflower, some kind of greens and more.
Napa cabbage (large, pale green cabbage with crinkled leaves) – Storage: Napa stores very well. When refrigerated, it will keep for several weeks. Peel off the outer layer and it will be ready to use.
Napa cabbage is an interesting vegetable, useful for both fresh, raw salads and for cooking. Its most famous use is fermented kimchi. I like to prepare a fresh, unfermented kimchi. Same seasonings, but it’s ready to eat right away. You will be amazed at how much shredded napa cabbage shrinks when prepared this way. See here for an example, but cut the salt in half (or even less): Grilled Flank Steak with Kimchi-style Coleslaw.
Here are a few preparation ideas from the ‘Asparagus to Zucchini’ cookbook.
– Chop raw napa into green salads.
– Substitute napa in traditional coleslaw.
– Chinese cabbage cooks quickly. Steam 3-5 minutes, or until leaves are wilted down but remain slightly crisp.
– Substitute napa cabbage for common cabbage in recipes, but reduce the cooking time by 2 minutes.
– Napa cabbage is the main ingredient in egg rolls. Try making an egg roll mixture to eat as a cooked side dish instead of preparing time-consuming egg rolls.
Butternut squash – Storage: Winter squash store best at room temperature with good air circulation. No cooler than 50 degrees. On your kitchen counter works well. Keep an eye on your squash and cook promptly if any flaws develop. This batch of butternuts should be good for at least one month.
Hint: To make squash easier to cut, microwave on high for 30 to 60 seconds, depending on size of the squash. This will soften the rind and flesh, making it much easier to cut.
Beets – Storage: Cover and refrigerate. Beet roots will store for months. Wash well to remove leaf fragments. For all the cooking methods below, wash and scrub the beets but do not peel. The skins slip off easily once the beets are cooked and cooled.
Cooking beet roots on the stovetop: Slice or quarter, cover with water in a pot, and simmer until tender. This will take from 25 to 45 minutes depending on how large the beet pieces are. Drain.
Roasting beets in oven: Wash beets, but do not peel. On a sheet of aluminum foil, put beets (halved or quartered if large), salt, pepper and a few sprinklings of water. Seal the foil packet, and roast at 400 oF until tender, about 45 minutes to 1 hour. Slip off skins once cool.
Microwave: Slice beets in half and place in a large microwave-proof bowl. Add ¾ inch water and cover with a plate. Microwave on high until tender, about 9-20 minutes, depending on your microwave’s power. Drain and slip off skins.
Uses: Use cooked beets in cold salads, or dress simply with vinaigrette, onions, salt and pepper. Beets are also good tossed with sour cream, minced onion, fresh herbs and walnuts.
Carrots – Refrigerate in a plastic bag.
Peppers – Refrigerate. Eat soon. These were protected under row cover but exposed to cold nights. That shortens their storage life.
Poblano chiles (green or red, in bag with the beets) – Refrigerate. These should have medium heat but have been quite mild this year.
Red or white or yellow onion – Refrigerate the red or white onions. Yellow can be stored at room temperature.
Cilantro – Refrigerate in a sealed container. It wilts easily.
Scallions – Refrigerate in a bag or other container.
Broccoli or cauiflower – Refrigerate. The broccoli should be fine for one week. Cauliflower stores longer and these heads should remain good for two weeks. Wrap or cover in some way so they don’t wilt in your fridge.
RECIPES
Visit our 2020 Recipe Log or our 2019 Recipe Log or join our Facebook discussion group.
LOCAL THYME/ Cooking 101
Napa Cabbage and Chicken Salad with Carrot Ginger Dressing
Butternut, Beef and Wild Rice Soup
Mom’s Pickled Beets
LOCAL THYME/ Cooking 202
Chicken, Brassica, Pepper and Carrot Stir Fry
Roasted Butternut Squash and Onion with Tahini and Za’atar
Beet and Carrot Crisps
LOCAL THYME/ Quick & Easy Meal
Black Bean and Veggie Burritos
RECIPES FROM LAUREN

SLOW COOKER BUTTERNUT CHILI
Takes 20 minutes (active time) + 4-8 hours (in slow cooker)
Serves 8-12
1/4 cup olive oil
1 onion (any color), diced
2 garlic cloves, minced
2 poblanos, diced
2 green peppers, diced
4 cups water
2 28-ounce cans diced tomatoes
5 cups chopped butternut squash
1 can (15-ounce) spicy chili beans
1 can (15-ounce) black beans, rinsed
1/4 cup brown sugar
1/4 cup chili powder
2 tablespoons Kosher salt
2 tablespoons cumin
1/2 teaspoon cayenne powder
Pinch cinnamon
1. Add olive oil to crock pot or slow cooker along with onion, garlic and peppers. Turn crock pot up to high and let cook on it’s own with the lid off for 10-15 minutes while you peel and dice your squash and get the rest of your ingredients assembled.
2. Add remaining ingredients to the crock pot. It will be a tight fit even in a standard 8-quart crock pot. Place lid on crock pot and cook for at least four hours on high heat. If you are making it and leaving for the day, eight hours on low heat will work just as well.
3. Enjoy with cheese, diced raw onion, Greek yogurt and some roughly chopped cilantro. Store whatever remains in your fridge to eat throughout the weekend/week.
.
????
.
NAPA CABBAGE NOODLE SALAD
Adapted from Bon Appetit
Serves 4
Takes 30 minutes
3 tablespoons toasted sesame oil, divided
1 bell pepper, any color, seeded and diced
3 garlic cloves, minced
1/2 teaspoon red pepper flakes
Kosher salt
6 tablespoons fresh squeeze lime juice
3 tablespoons fish sauce
3 tablespoons honey
1 pound sirloin steak, bone removed and thinly sliced
6 ounces wide rice noodles
1/2 head Napa cabbage, stems removed and shredded (about 4 cups)
4-5 scallions (whites and greens), sliced
1 cup roasted peanuts, roughly chopped
1/2 bunch cilantro, diced
1. In a large skillet (preferably cast iron if you’ve got one), heat one tablespoon toasted sesame oil over medium heat. Add the bell pepper, garlic, red pepper flakes and a pinch of salt. Saute for 2-3 minutes. Pour into a large bowl followed by lime juice, fish sauce, honey, one tablespoon toasted sesame oil and 1/2 teaspoon Kosher salt. Whisk to combine.
2. Remove 1/4 cup of sauce and set aside to use later as dressing. Add steak to large bowl and toss to coat. Let marinate for up to 45 minutes (or as much time as you have; the flavors will be fine after 15 minutes if you are in a crunch) while you chop your vegetables. Stir every once and while to ensure all steak pieces are marinating.
3. Bring a large pot of salted water to a boil. Cook rice noodles according to package directions and drain once finished. Let cool for 5-10 minutes.
4. Make sure the cabbage and scallions are well-drained (if you rinsed right before preparing) and then toss with the 1/4 cup sauce you set to the side. Add another couple pinches of salt and toss to combine.
5. Pour the last tablespoon of sesame oil into your skillet (the same one you used before; you don’t need to wash it out) and get it nice and hot over medium high heat. Use tongs to transfer the steak (but not the marinade) into the skillet. Cook for 2-3 minutes until cooked through and then let rest for 5 minutes. Add steak and noodles to large bowl of cabbage mixture. Toss to combine (add herbs here if you are using) and serve warm with peanuts and cilantro on top.
.
????
.
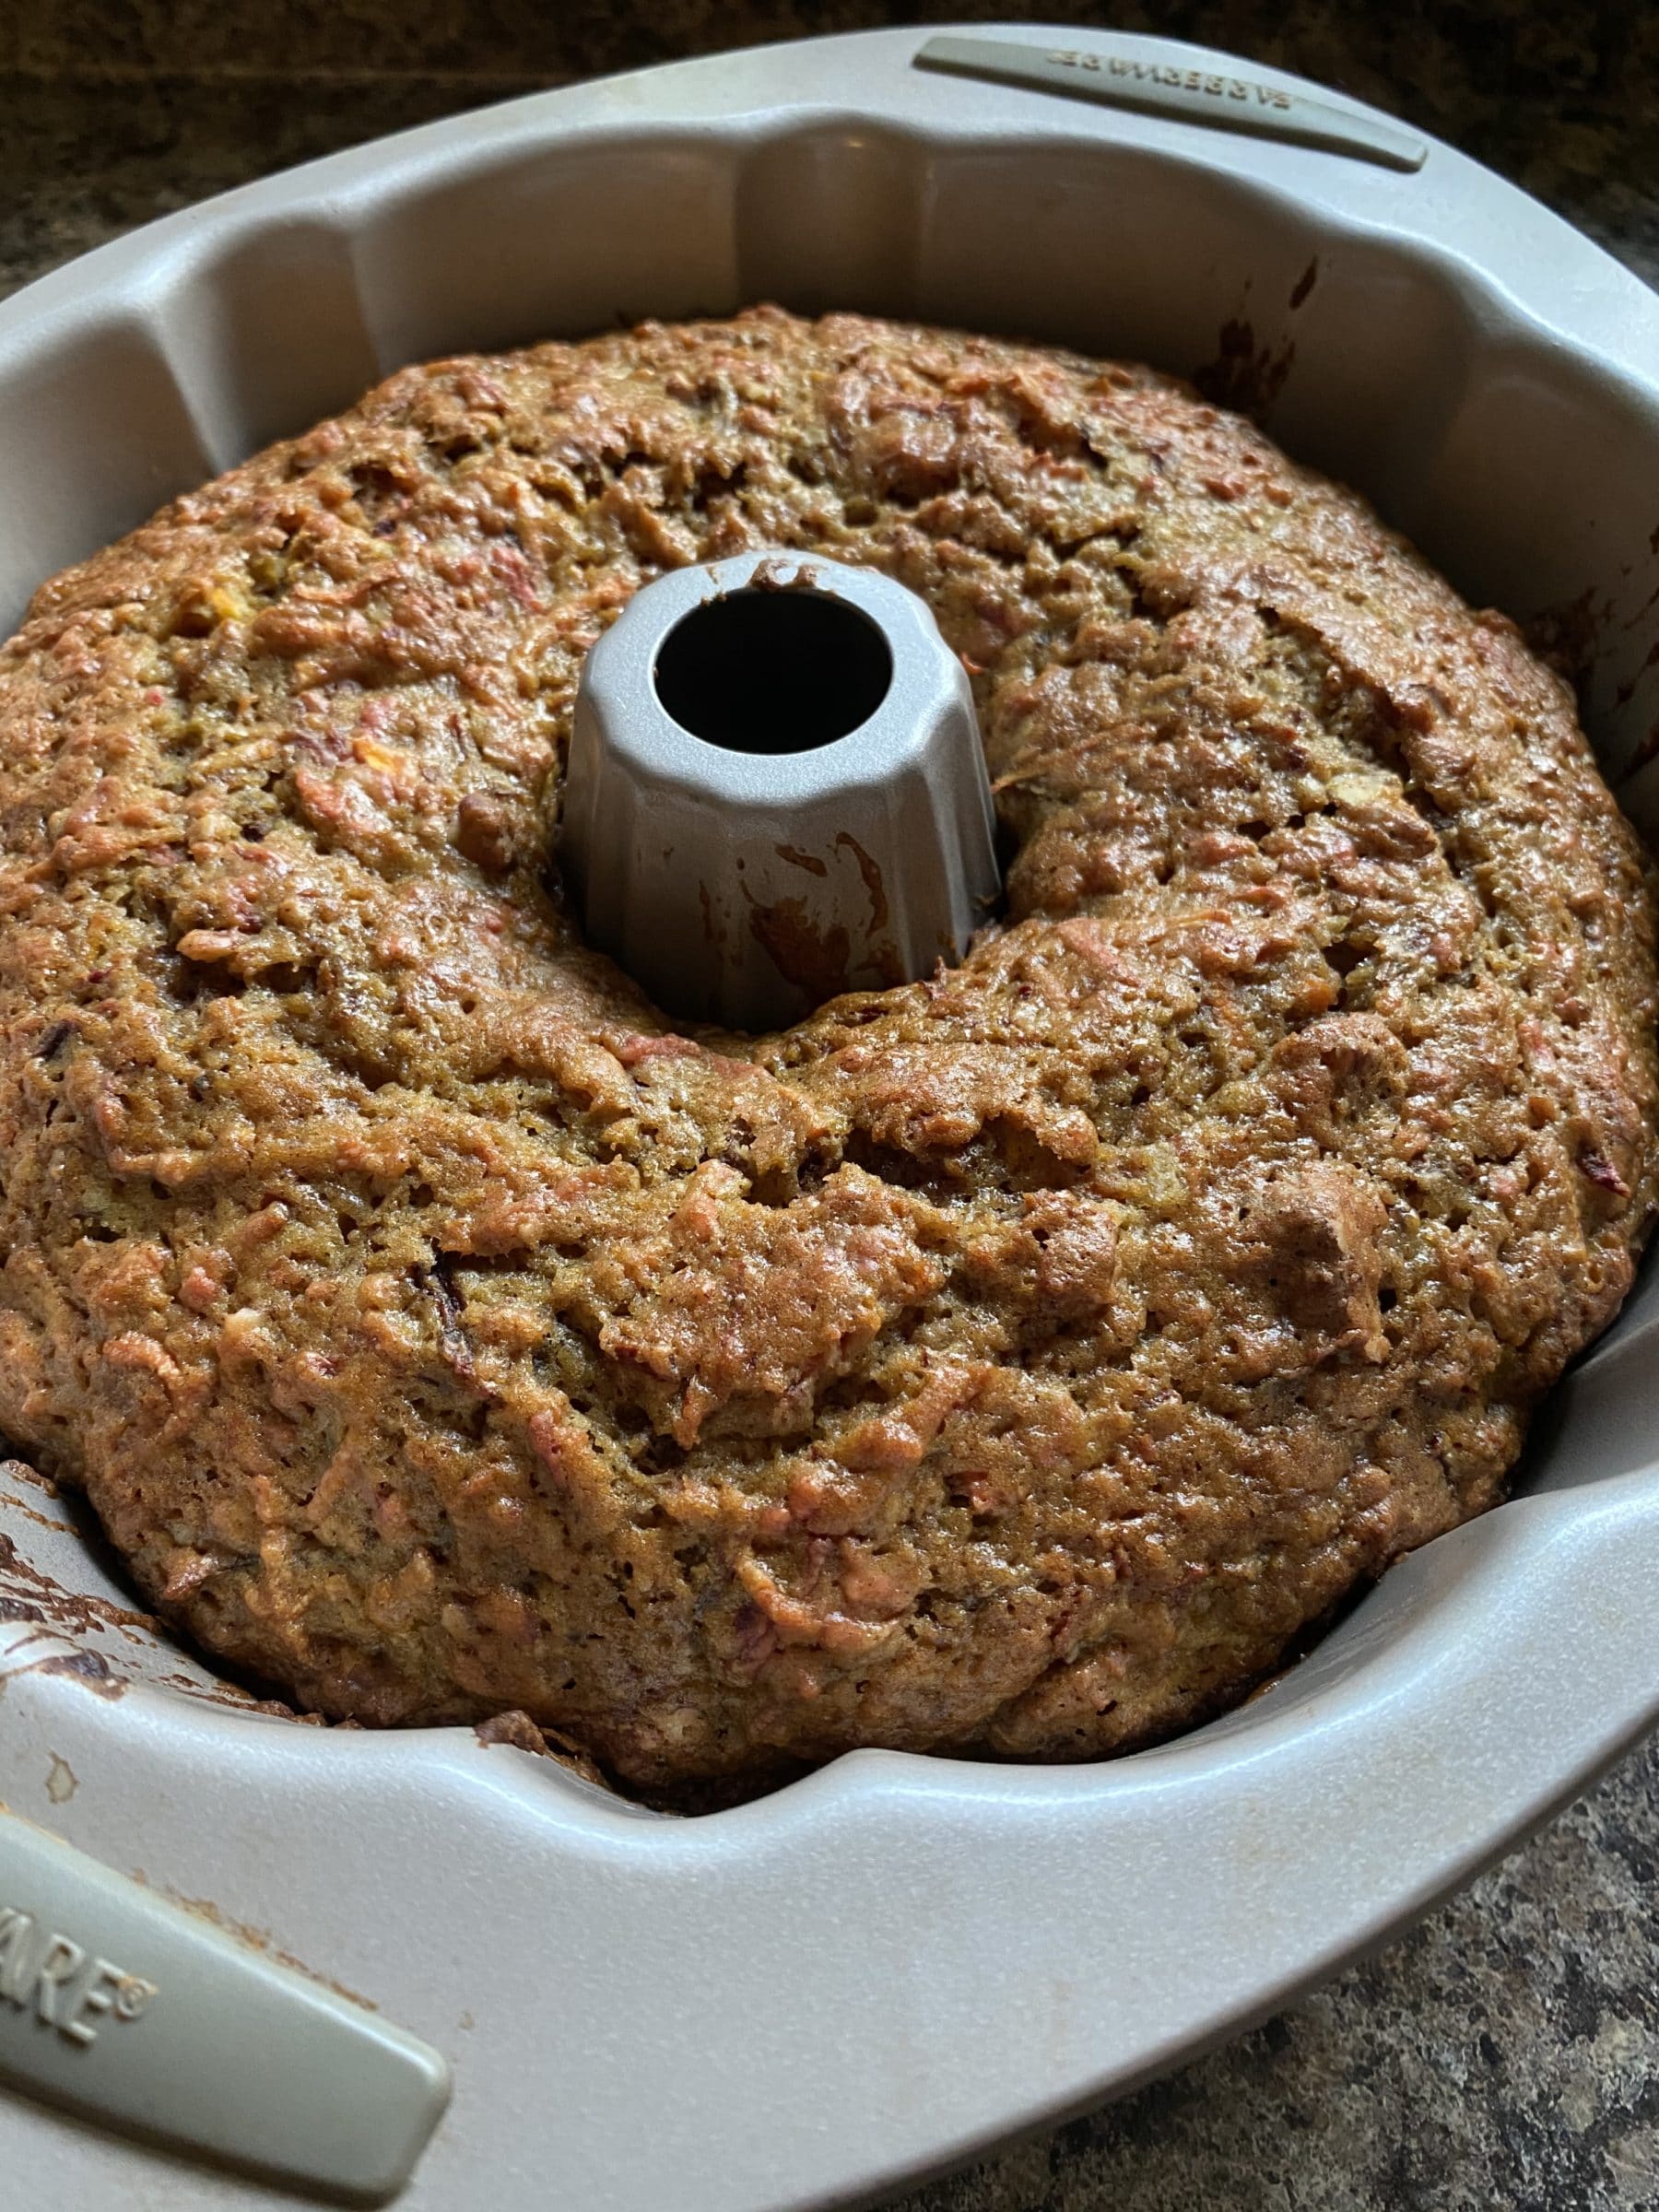

CARROT, BEET & APPLE CAKE
2 cups shredded carrots
2 cups shredded beets
1 cup shredded apples
3 eggs, well beaten
2/3 cup oil
1 teaspoon vanilla
2-1/4 cup flour
2 teaspoons baking powder
1 teaspoon baking soda
1/2 teaspoon Kosher salt
1 cup sugar
1 teaspoon cinnamon
1 heaping cup diced pecans
1. Preheat oven to 350 degrees and grease a bundt pan (or two bread loaf pans).
2. In a large bowl, combine shredded carrots, beets and apple. Add eggs, oil and vanilla and stir until well combined.
3. In a small bowl, combine all dry ingredients other than pecans. Mix well and then add into the wet mixture. Mix until no flour is visible then gently fold in pecans.
4. Bake for 40-45 minutes until a toothpick inserted into the middle comes out clean. Allow to cool for 15 minutes before serving (to avoid the accident I had).
.
????
Week #21, EOW/green
- On: October 07, 2020
- 0
Kristin and Karen prepare winter squash for this week’s delivery.
Most years, we clean your winter squash by running it through a brusher washer. This year, we’ve decided to simply wipe the squash unless it’s too muddy. We moved the job from the pack shed to our lovely greenhouse to allow more social distancing and good air flow. With the top vent open (look to the left of the peak) and the side open (at right), there’s a stream of fresh air flowing past each person.
It’s been a good move! The light is better so it’s easier to judge the squash quality. Just as important, it makes this job more pleasant. Our greenhouse is a favorite place on a sunny day. With the good air flow, we can work close enough together to talk. Honestly, if I can give our crew any simple pleasure during this crazy year, I’ll do it.
Please wash your winter squash to remove any bits of soil.

Fennel harvest
I hope you’ve all gotten outside during this beautiful Indian summer. It’s certainly made our lives easier. Look at the amazing, vibrant color of the fennel.

Fennel, our most elegant, aromatic vegetable
Box logic
We’re happy to be able to send a few favorite combinations. We’re packing ginger and cilantro together because they pair naturally with bok choy or daikon. Add the onion and jalapeño and you’ve got a great flavor package for any stir fry. We’re sending a small winter squash so you have an extra vegetable to roast alongside the sweet potatoes.
Veggie List & Veggie Notes
Week #21, October 8/9, 2020
– Weekly shares
– EOW/ green
Bok choy
Fennel, 1 bulb with fronds
Sweet potatoes, 1.75 – 2 lb
Small winter squash (acorn or small butternut)
Small green peppers, 3 – 5, mostly green
Daikon radish, 1 purple + 1 white
Yellow onion
Jalapeno chile
Cilantro, 1 bunch
Baby ginger, 1 small piece
– Some sites get broccoli.
– Some sites get cauliflower.
Next week’s box will probably contain winter squash, broccoli OR cauliflower, napa cabbage, scallions, and more.
Bok choy (large rosette with thick white stems and green leaves) – Refrigerate in a plastic bag or other container.
This Asian green is good for stir-frying or sautéing or in soup. You can think of the stems and leaves as two separate vegetables. The stems require longer cooking. The leaves will cook almost as quickly as spinach. Bok choy stores well, so feel free to pull off leaves as you need them, or use the whole head at once.
Fennel (bulbs and lacy fronds) – Refrigerate. If not using within a few days, separate the fronds and the bulb and store separately.
Fennel is a ‘swing vegetable’; it can be used raw or cooked. Clean well and slice as thinly as possible for use in raw salads. It is good simply prepared with olive oil, lime or lemon juice, salt and shaved parmesan cheese. Cooking softens and sweetens fennel, and mellows its anise flavor. Both the bulb and leaves are edible. Here are ideas from Alice Water of Chez Panisse about how to use fennel: ‘It’s strong anise characteristic seems to suit fish particularly well. … We use fennel all the time. We add the feathery leaves to marinades for fish and to numerous salads, sauces and soups and we use them as a garnish, too. … The bulbs are sliced and served raw in salads in various combinations with other vegetables, parboiled for pastas; caramelized and served as a side dish; braised whole; or cooked in vegetable broths & fish stocks.”
‘Beauregard’ sweet potatoes – Store your sweet potatoes at room temperature. They suffer chilling injury below 50 F.
Here are a few things we’ve learned about sweet potatoes:
– For best flavor, cook your sweet potatoes so they brown and caramelize. We have a simple, favorite way to roast sweet potatoes. We used to prepare sweet potato fries in the oven. Now we just quarter the potatoes, rub with olive oil, dust with salt and place cut-side-down on a cookie sheet. Roast in a 450 F oven without turning until soft. The flavors will caramelize (like sweet potato fries) but preparation is simpler and the cooking time less exacting. Slender sweet potato fries go from undercooked to overcooked in the blink of an eye. Larger slices are less exacting, and therefore are easier. Small sweet potatoes can be cut just in half. Jumbos will need to be chopped into pieces. Otherwise, they take a long time to cook.
– This first batch of sweet potatoes will need slightly longer cooking than ones from the supermarket, perhaps because they contain higher moisture so soon after harvest.
– Sweet potatoes are good at any size. We have cooked everything from tiny to jumbo and consistently find that all sizes taste good.
Korean daikon radishes (oblong, white & purple) – Refrigerate. The interior color of the purple ones is lovely. Slice thinly and add to salads, cook lightly in mixed vegetable medleys or cut into matchsticks and add to pasta salads. For many Korean radish recipes, visit the Maanchi website, www.maangchi.com/ingredient/korean-radish
Yellow onion – Store at room temperature in your kitchen if you plan to eat soon. For longer storage, keep in a cool, dark place.
Jalapeno chile (HOT) – Refrigerate.
Peppers – Refrigerate, if possible in the warmer part of your fridge. If not, they’ll still be fine in the fridge.
Cilantro – Refrigerate in a tight container. It wilts easily.
Baby ginger – Eat soon; baby ginger is perishable. Wrap in a damp cloth or paper towel, and keep in the refrigerator in a plastic bag. You can also freeze your ginger, then grate as much as you need from the frozen knob.
This is baby ginger, bright white and pink because it hasn’t grown a brown epidermis yet. The ginger sold in stores grows for a long season in warm places like Hawaii. Baby ginger is special because it has the full ginger flavor and spiciness but almost no fibers. That’s why it’s used to make the pickled ginger served with sushi. I asked the crew to wash it lightly to avoid bruising. Expect to do a final wash before using it.
Korean radish

Baby ginger
RECIPES
Visit our 2020 Recipe Log or our 2019 Recipe Log or join our Facebook discussion group.
LOCAL THYME/ Cooking 101
Simple Cioppino
Chilled Chinese Noodles
Soy Glazed Sweet Potatoes
LOCAL THYME/ Cooking 202
Bok Choy Fennel Salad
Breakfast Bahn Mi Sandwich with Daikon Pickles
Chicken and Veggie Enchiladas
LOCAL THYME/ Quick & Easy Meal
Salmon with Bok Choy, Ginger and Sesame
RECIPES FROM LAUREN
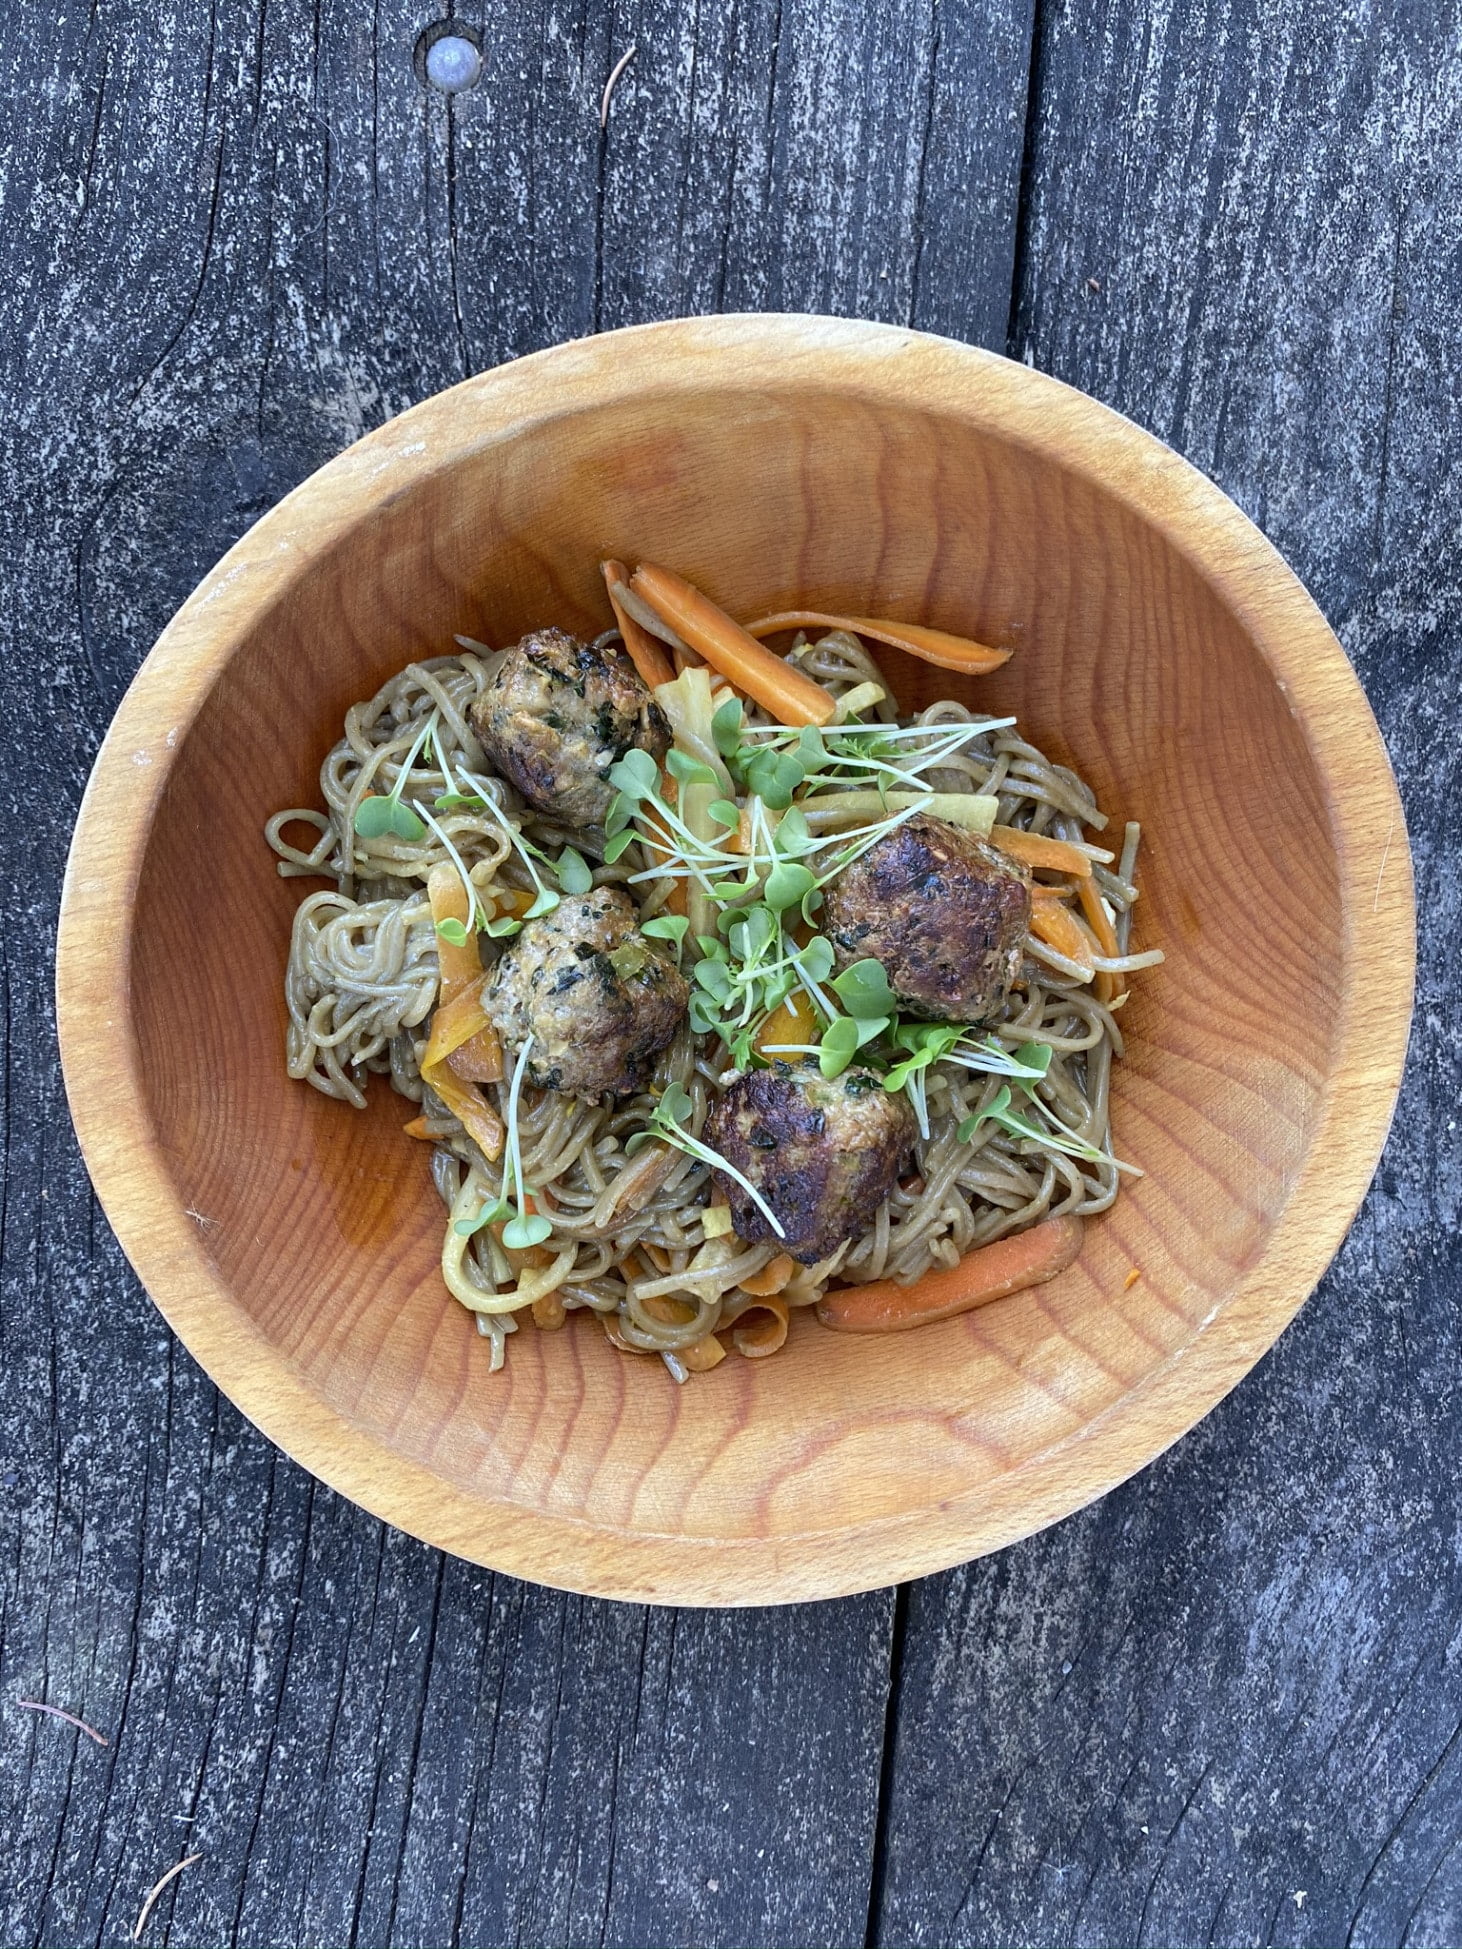
SOBA NOODLE BOWL WITH PORK MEATBALLS
Adapted from Dishing Up the Dirt
Serves 4
Takes 55 minutes
½ yellow onion, roughly chopped
7 garlic cloves, divided
1/2 cup raw bok choy leaves
2 tablespoons fish sauce
1 tablespoon sriracha
1 pound ground pork
1-2 daikon radishes, peeled and shaved or cut into matchsticks (about 4 cups)
2 tablespoons Canola oil
1/2 pound Soba noodles
1/4 cup maple syrup
1/4 cup tamari or soy sauce
2 tablespoons rice wine vinegar
1 tablespoon toasted sesame oil
1-inch fresh ginger, peeled and minced
¼ cup cilantro leaves, diced
- If using a food processor, combine onion, 4 of the peeled, whole garlic cloves, and raw greens. Process until everything is finely chopped. You may need to scrape down the sides with a spatula once or twice since there isn’t a ton in there. Add the fish sauce, sriracha and ground pork. Process until everything is well combined. If not using a food processor, mince the onions, 4 peeled garlic cloves and raw greens, and toss into a large bowl. Add the fish sauce, sriracha and ground pork and mix until smooth.
- Line a baking sheet with parchment paper. Shape pork mixture into 20-24 meatballs (a little smaller than golf-ball size) and place on parchment. Chill in the fridge or freezer (wherever you have room) for 15 minutes while you matchstick all your carrots and daikon.
- Heat canola oil in a large heavy skillet (cast-iron works great here) over medium high heat. When it is just about smoking, add half of the chilled meatballs and reduce heat to medium. Cook, turning occasionally for about 10 minutes until well-browned on all sides. The oil may spit and splatter. This is a great time to use a grease guard or splatter screen if you have one. Repeat with second half of meatballs. You shouldn’t need to add any more oil for the second batch. When these are finished cooking, add already cooked meatballs to pan (it will be crowded) and place hot pan in oven to stay warm.
- Bring salted water to a boil over high heat. Add soba noodles and cook according to package directions.
- While the noodles are cooking, prepare your sauce by mincing your remaining 3 garlic cloves and then adding maple syrup, tamari, rice wine vinegar, sesame oil, and ginger to a large bowl. Add cooked noodles and daikon. Toss with tongs to combine.
- Serve immediately with warm meatballs on top! Garnish with cilantro.
.
????
.

CURRIED SWEET POTATO SOUP
Adapted from Bon Appetit
Feel free to substitute you peeled and diced winter squash for up to half of the sweet potatoes if you’d like some sweet potatoes for other things.
Takes 1 hour, 20 minutes
Makes 6 cups
2 tablespoons butter
2 tablespoons olive oil
4 garlic cloves, minced
Kosher salt
Freshly ground black pepper
2 pounds sweet potatoes, peeled and roughly chopped
1 tablespoon curry powder
1 teaspoon siracha hot sauce
13.5-ounce can coconut milk
4 cups chicken (or vegetable) stock
- Add butter and oil to a large stock pot. Melt butter over medium-low heat. Add the garlic as well as a sprinkling of salt and pepper. Cook until garlic is fragrant, about 5 minutes.
- Add the sweet potatoes, spices and hot sauce and turn the heat up to medium. Cook for 20 minutes, stirring occasionally. Add the coconut milk and stock. Bring to a boil, reduce to a simmer and cook for 30 minutes until sweet potatoes are tender and liquid is nicely reduced.
- Let cool and puree with an immersion blender. We don’t puree until completely smooth. We like some small chunks of sweet potato in there, but that is up to you. Taste and adjust seasoning. Top with chickpeas if you are feeling extra fun!
Cumin Roasted Chickpeas
15-ounce can chickpeas, drained and rinsed
2 tablespoons olive oil
2 teaspoons ground cumin
1-2 teaspoons Kosher salt
Freshly ground black pepper
Preheat oven to 400 degrees. Toss chickpeas with oil, cumin, salt and pepper. I use 1 teaspoon of salt if I’m making these chickpeas for my sweet potato soup (because it’s already a little salty) and 2 teaspoons of salt if I’m making these chickpeas as a non-soup-addition, generally-delicious snack. Roast for 20 minutes or until crunchy. Take out the pan and shake it occasionally for more even crisping.
.
????
.
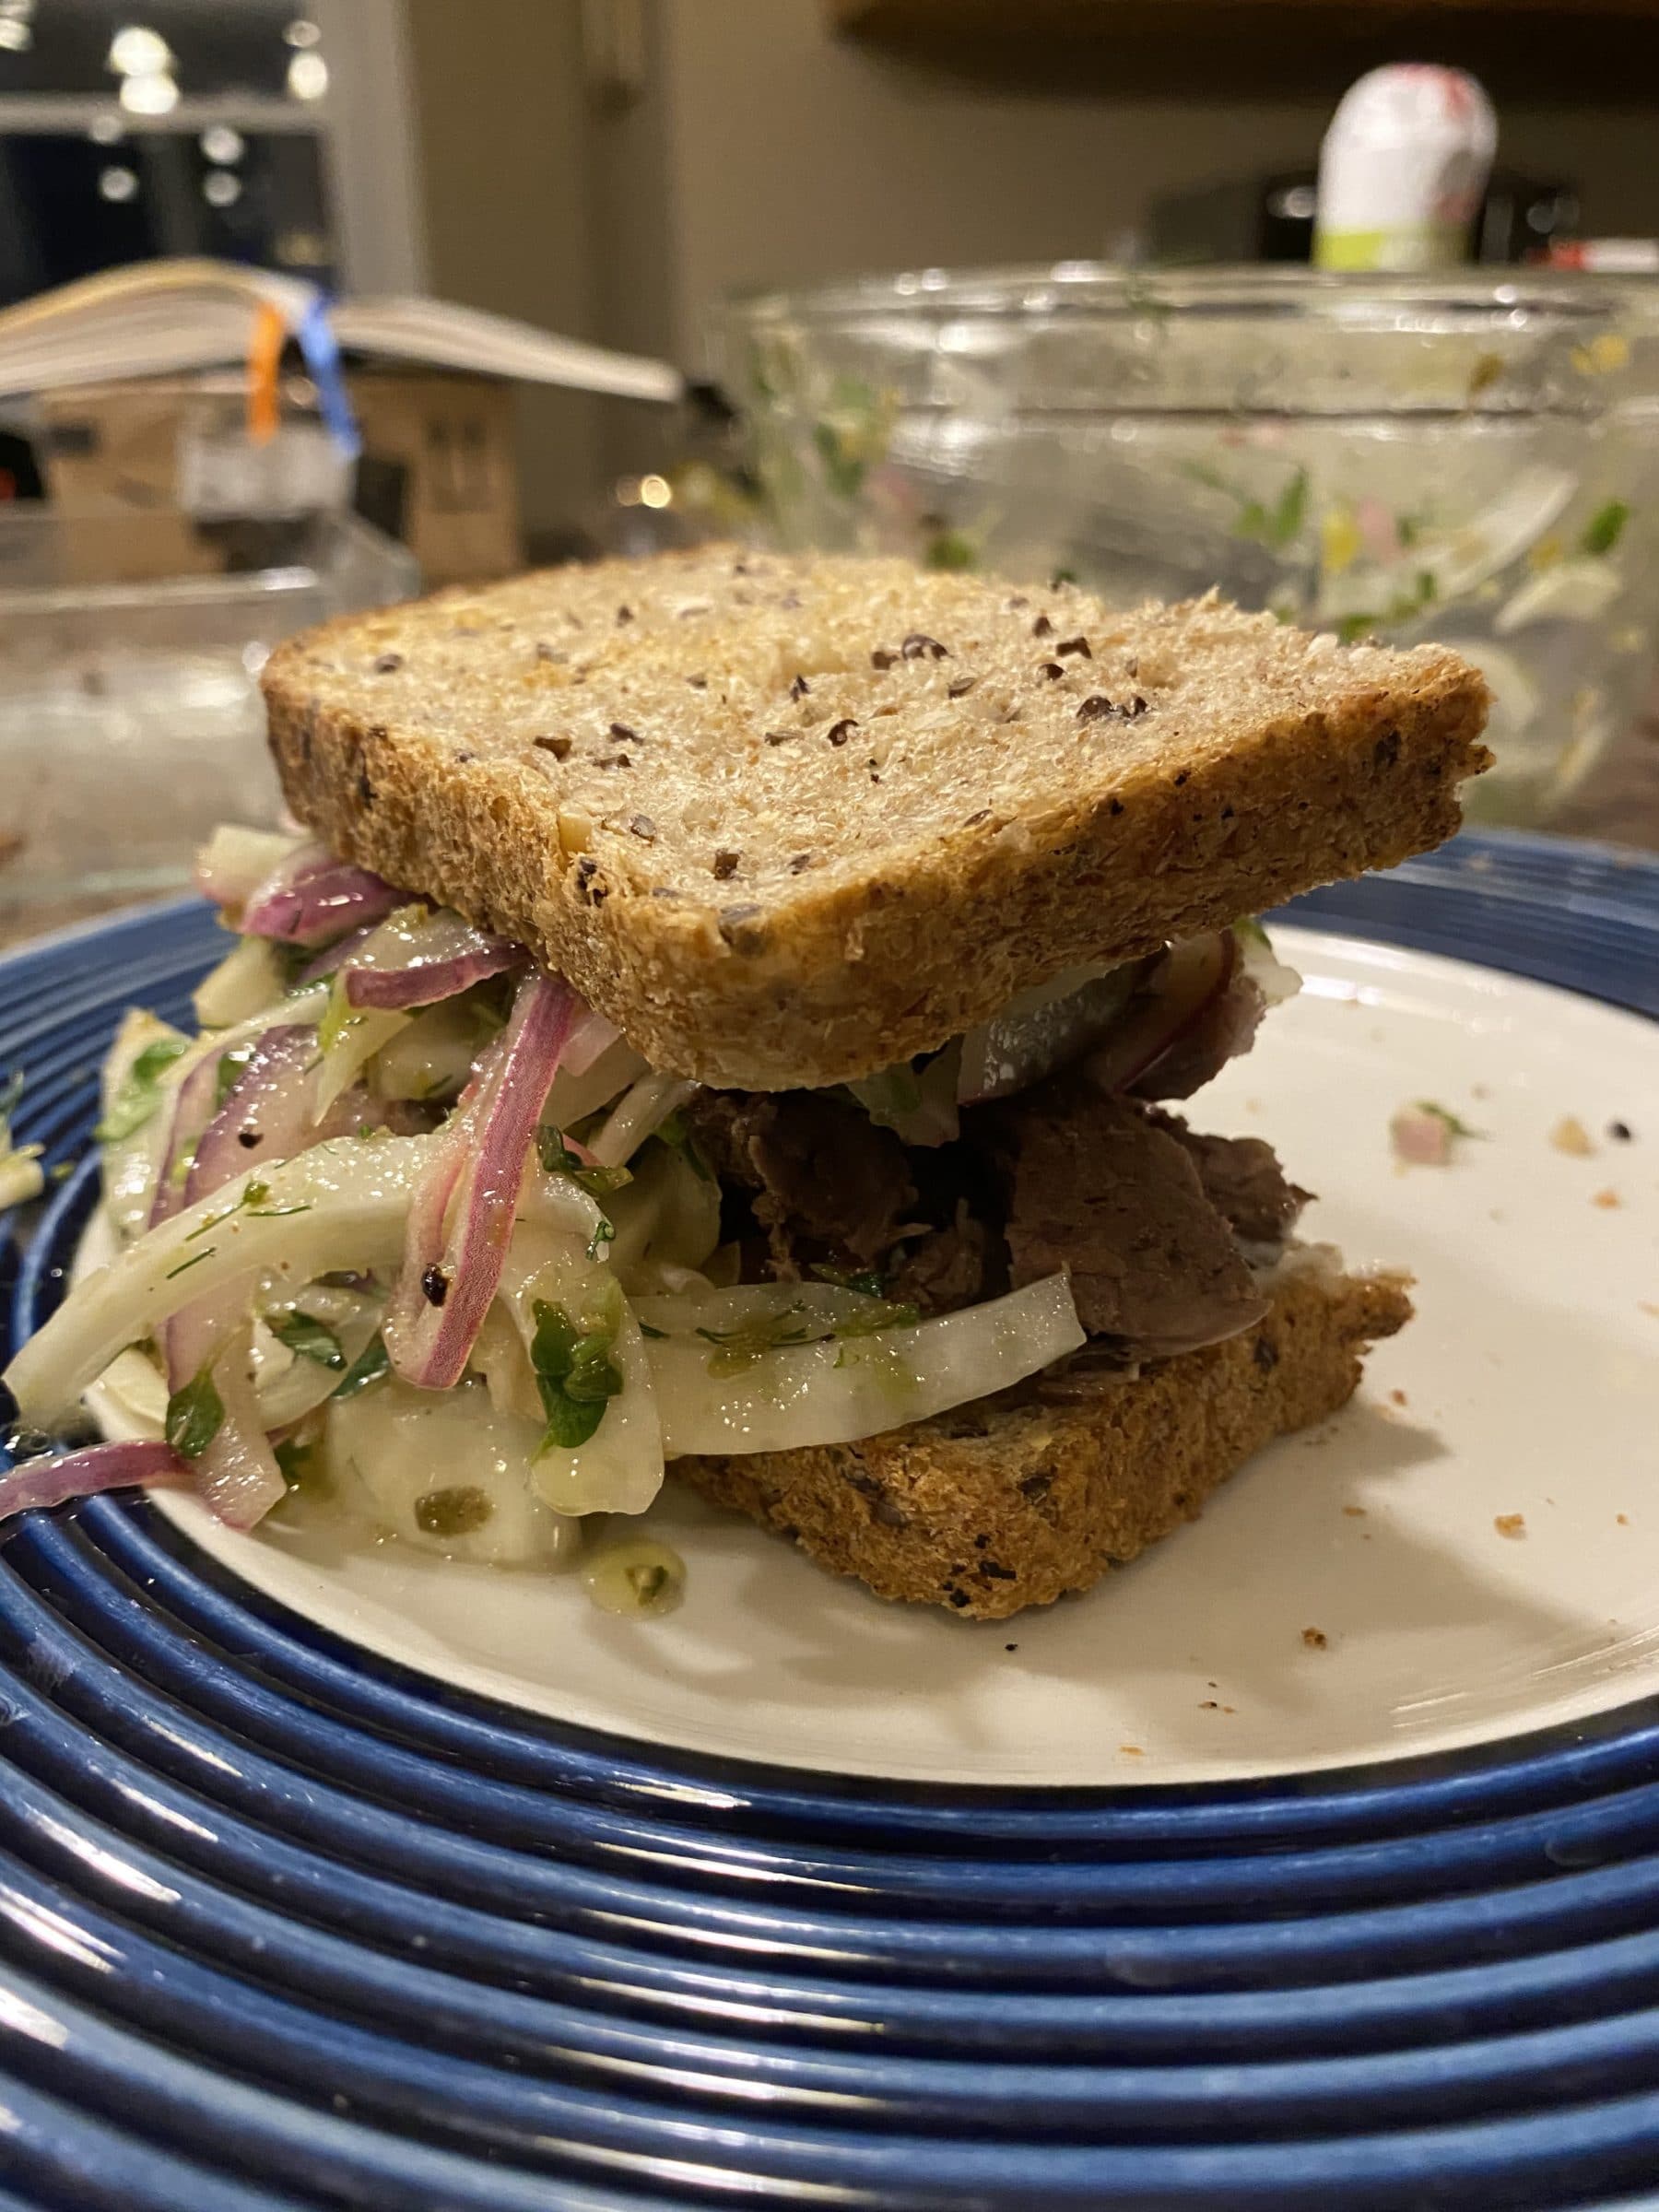
STEAK SANDWICH WITH FENNEL CILANTRO SLAW
Adapted from Bon Appetit
Takes 1 hour, 20 minutes
Makes 6 cups
½ yellow onion, divided
¼ cup fresh lime juice
½ teaspoon Kosher salt, plus more for seasoning
1-2 sirloin steaks, about 12 ounces each
Freshly ground black pepper
1 tablespoon vegetable oil
2 tablespoons capers, coarsely chopped
1 jalapeno, finely chopped
1 fennel bulb, cored and thinly sliced
1 cup finely chopped cilantro
2 tablespoons finely chopped fennel fronds
1/3 cup mayonnaise
8 slices sourdough bread, toasted
- Thinly slice your onion. Set half to the side for later use and dice the other half. Place the diced onion in a small bowl. Add lime juice and let rest while you prepare your steak.
- Season steaks with salt and pepper. Heat heavy skillet (preferably cast-iron) over medium high heat. Add vegetable oil, allow to heat for a minute and then add steaks to pan. Cook, undisturbed until well-browned, about 5 minutes. Flip and cook until second side is also well-browned, about 3 minutes. Remove steaks and let rest while you finish your slaw.
- Add capers, jalapeno, fennel and reserved sliced onion to diced onion. Toss until well combined. Add cilantro and fennel fronds and toss again. Taste and adjust seasoning as you desire.
- Thinly slice steak.
- To serve, spread mayo evenly on 4 slices of bread. Top with steak followed by slaw. Finish with remaining slices of bread. Devour immediately!
Week #20, Beth’s dad, purple + moon
- On: September 30, 2020
- 0

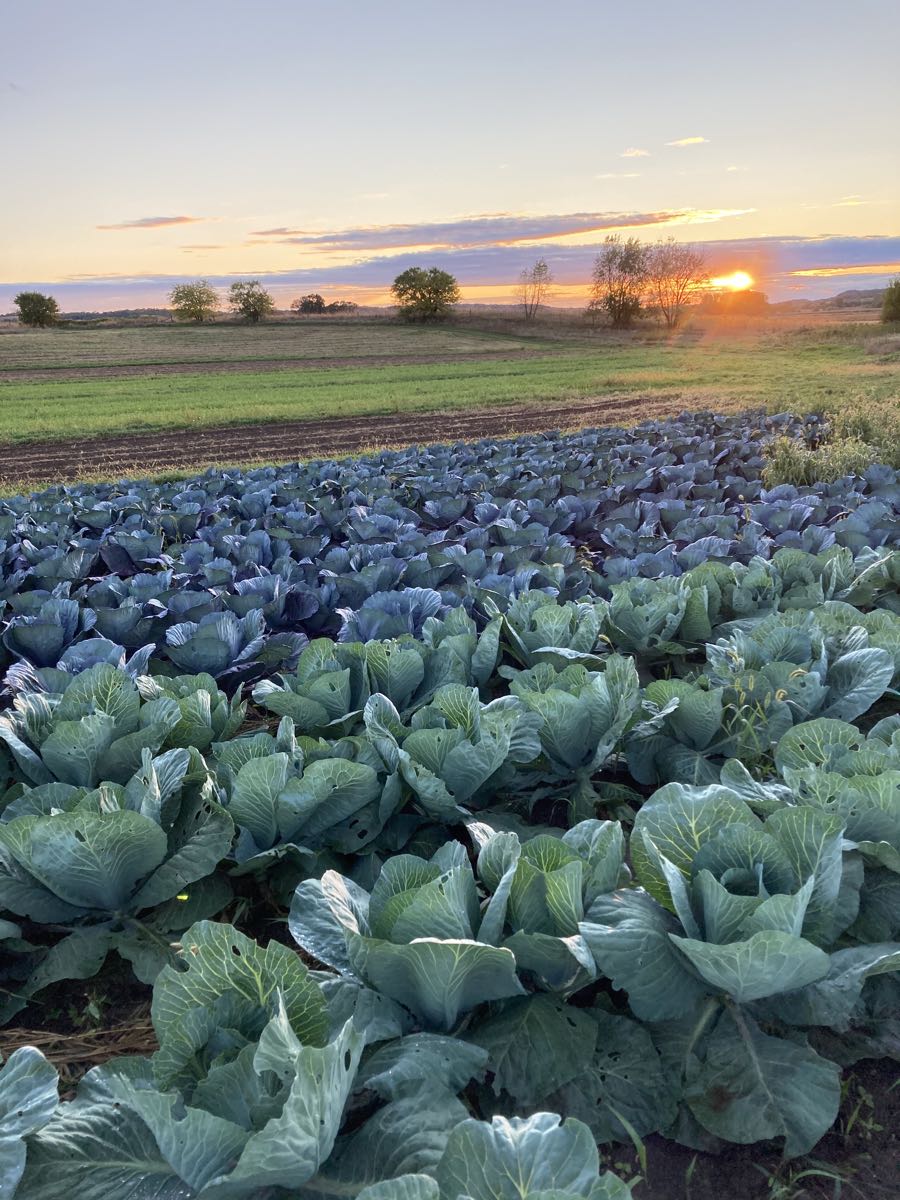
Beth’s dad
My father passed away last week. He was very frail and his time had come. Steve and I left the farm to visit my parents for a few days, the first time I’ve seen them since the pandemic began. I am so grateful that we had those days with my dad. I got him to laugh a few times. He passed the night after we left. The funeral was this week, but we could only attend virtually – this pandemic has wrecked many things.
Thank you for the sweet messages that many of you sent. I feel very supported by all of you, as well as our wonderful farm crew who took on extra work to allow me the space I needed. They kept the farm running. Thank you all. Beth
Veggie List & Veggie Notes
Week #20, October 1/2, 2020
– Weekly shares
– EOW/ purple
– Sampler/ moon
Green beans, 1 lb
‘Molli’ yellow potatoes, ~ 3 1/3 lb
Leeks, 1 or 2
Kale or collards
Broccoli
Romaine lettuce
Peppers, green or red or yellow, 2 – 4
Poblano chiles, 3
(Poblanos are in the bag of beans.)
Parsley, 1 bunch
Garlic
Next week’s box will probably contain sweet potatoes, winter squash, some kind of green, and more.
Yellow potatoes – These are from our friends at Driftless Organics. ‘Molli’ is a good all-purpose potato. Some potatoes have flaws that will need a little trimming.
Peppers (sweet) – We’ve begun stripping pepper fields, so you’ll get a medley this week. It’s time. Frost is coming.
Poblano chiles (triangular, shiny, MILDLY HOT) – We’ve packed your poblano chiles in your bag of beans, so they are easy to identify. Poblanos have lots of great flavor in combination with manageable heat. Roast and add to soup or casseroles. To reduce heat, remove the seeds and midveins.
Your poblano chiles are in your bag of beans. These are mildly hot. All the other peppers (outside the bean bag) are sweet.
RECIPES
Visit our 2020 Recipe Log or our 2019 Recipe Log or join our Facebook discussion group.
LOCAL THYME/ Cooking 101
Broccoli and Braising Greens Soup
Wilted Braising Greens with Bacon and Vinegar (also a vegetarian version in the recipe)
Green Beans Braised with Bay Leaves
LOCAL THYME/ Cooking 202
Broccoli Hummus
Greens and Cheese Stuffed Chicken Breasts with Garlicky White Wine Reduction Sauce with Tomatoes
Niçoise Salade Chickpea Bowl
LOCAL THYME/ Quick & Easy Meal
Taco Salad with Skirt Steak & Roasted Poblano Buttermilk Dressing
RECIPES FROM LAUREN
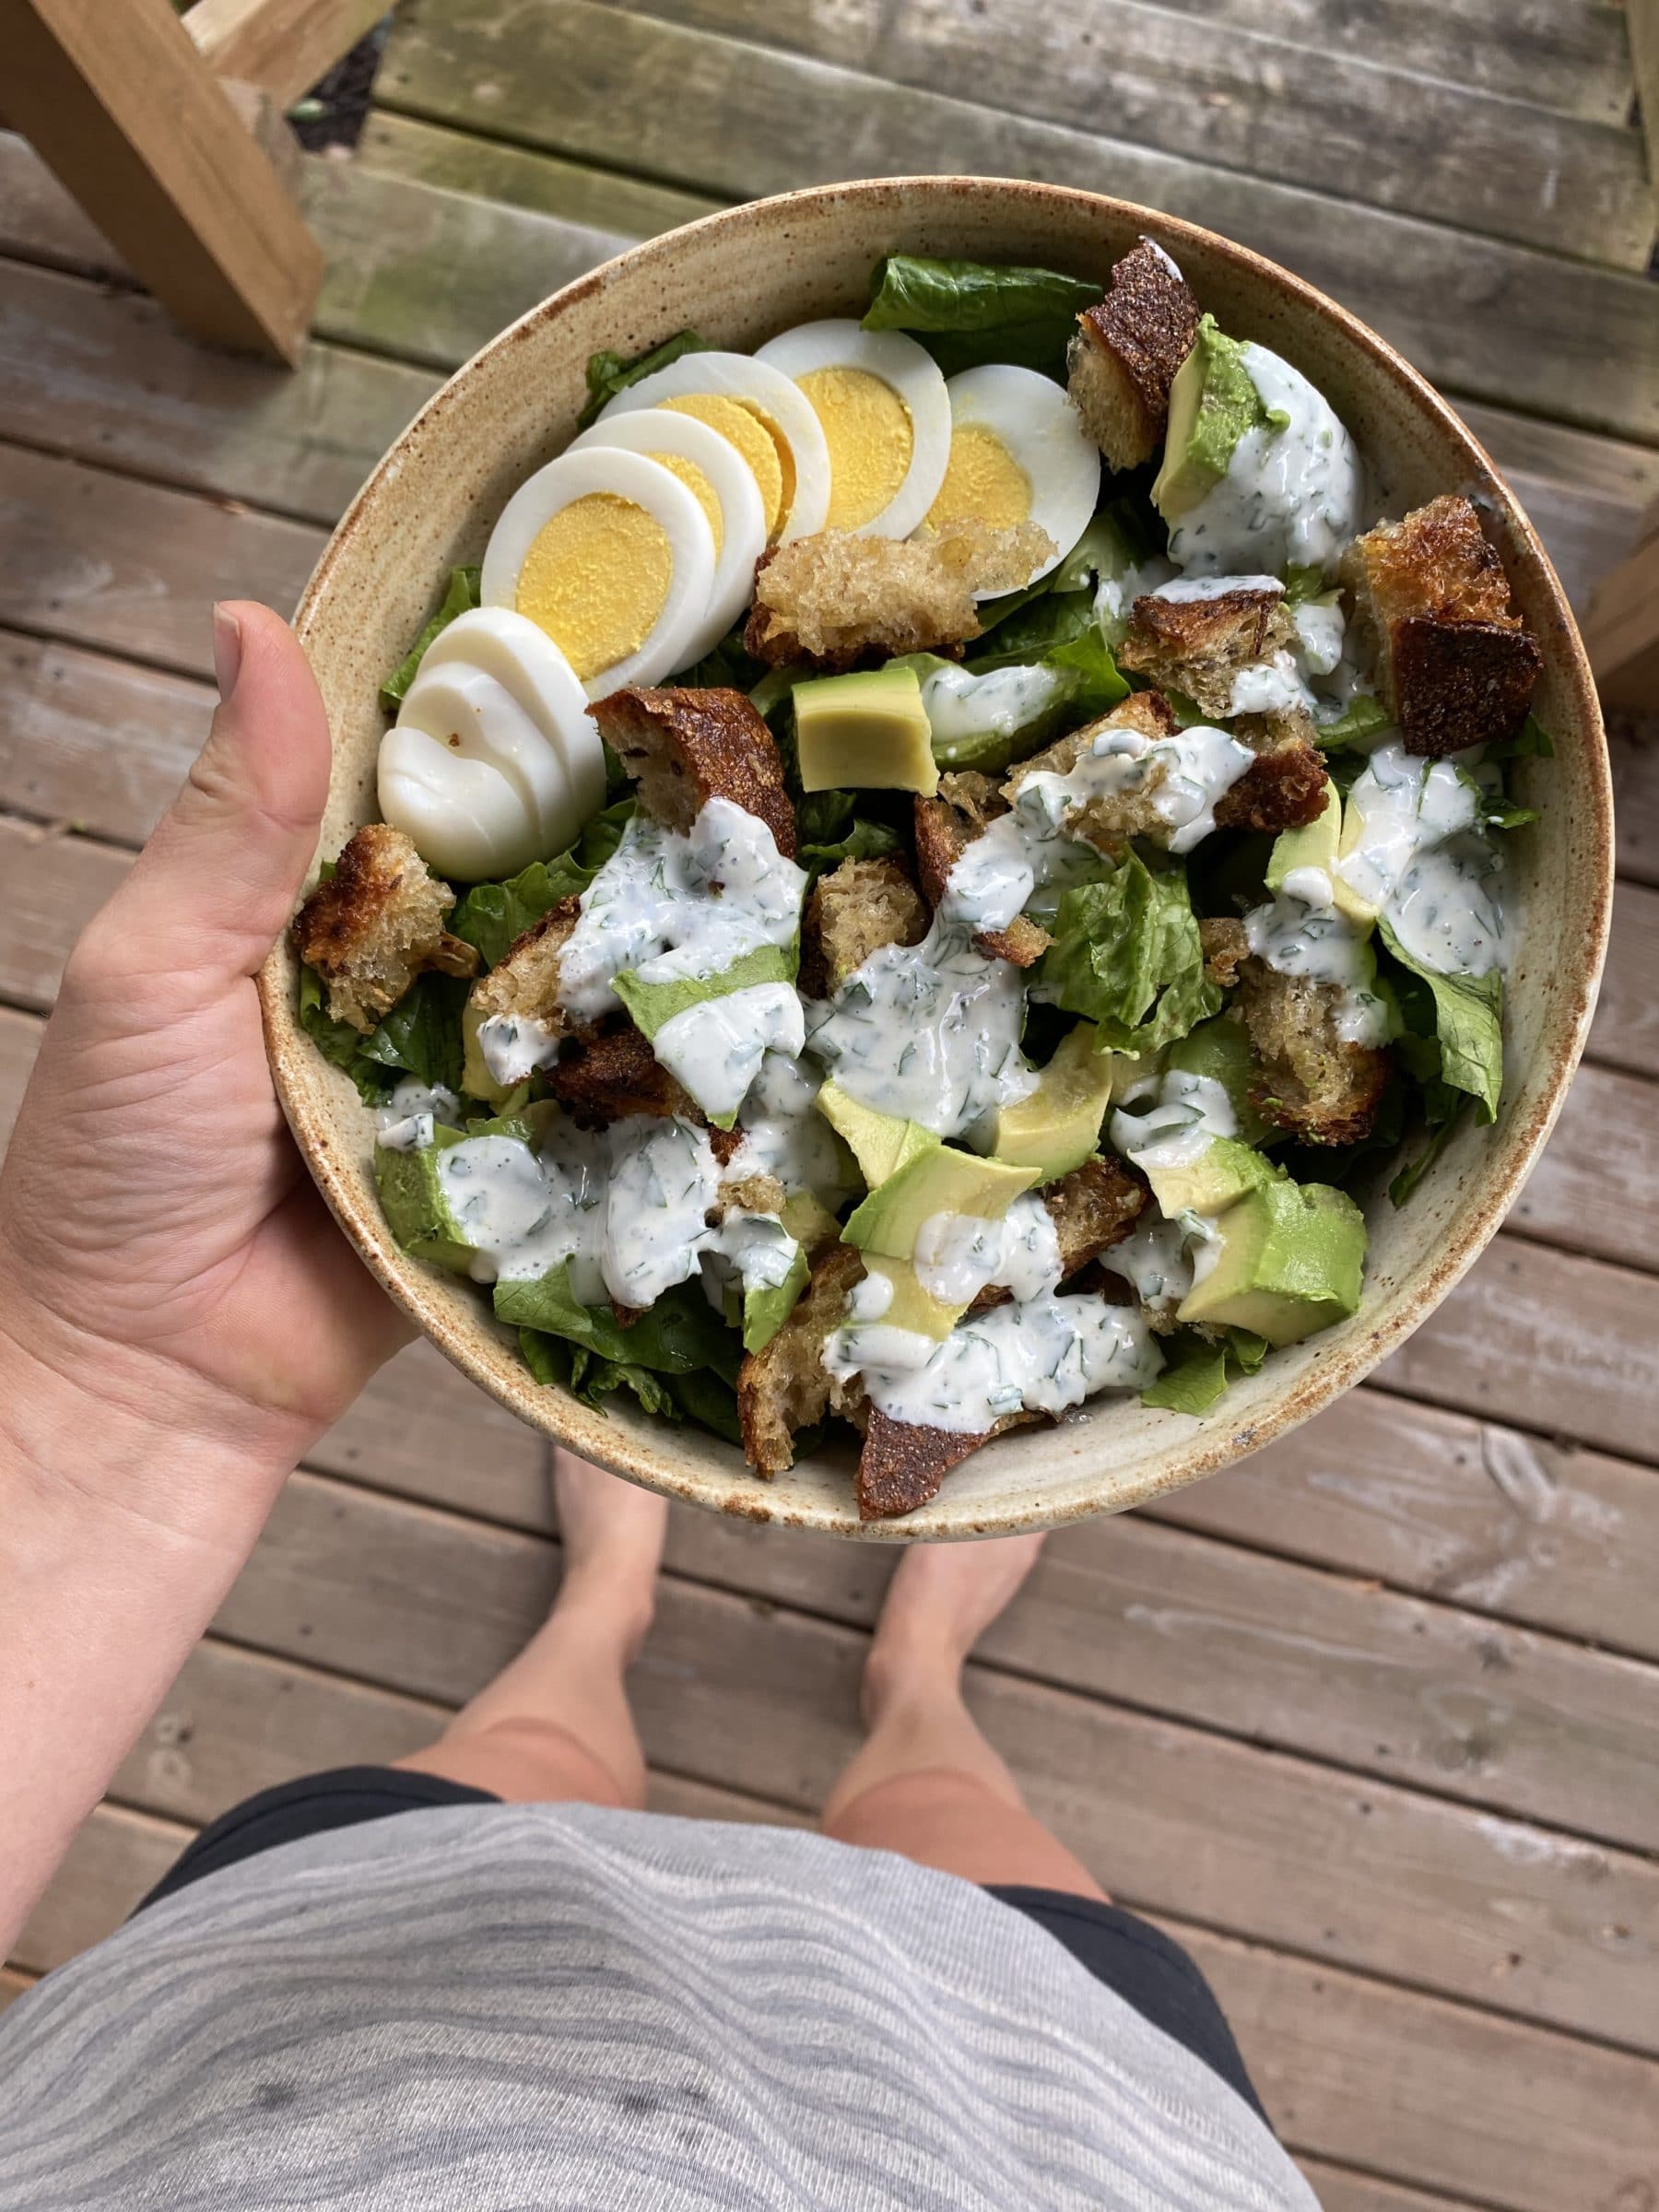
ROMAINE CHOP SALAD WITH ROASTED POBLANO DRESSING
This recipe is intended as a lovely side salad to accompany any fall meal, but if you want to make it a full meal, feel free to add some grilled chicken or crispy tempeh.
Serves 2-4
Takes 30 minutes
3 tablespoons olive oil
4 garlic cloves, smashed
3 cups torn sourdough or ciabatta bread
Kosher salt
1 head romaine
2-3 avocados, cubed
4 hard-boiled eggs
Roasted Poblano Dressing
2 poblanos, broiled for 5-8 minutes; put into a bowl and covered with a plate for 5 minutes
1/4 cup finely chopped parsley
1/2 cup full-fat Greek yogurt
1/4 cup buttermilk
1 teaspoon Kosher salt
1/2 teaspoon garlic powder
1/2 teaspoon onion powder
- Preheat broiler to high.
- Roast poblanos under broiler, flipping every couple of minutes so they are well charred on all sides. This should take 5-8 minutes. Place poblanos in a bowl and top with a plate to let the peppers steam and allow the skins to come off more easily. After 5 minutes, remove the poblano skins.
- Combine poblanos and remaining dressing ingredients in a blender or food processor and process until smooth. Add more buttermilk if the mixture is too thick.
- In a large skillet, heat olive oil. Once it shimmers (but before it smokes), add garlic and bread. Saute for 5-6 minutes until bread is toasty. Discard garlic.
- Serve salad by diving washed and torn romaine leaves among 2-4 salad bowls. Top with avocado, hard-boiled eggs, and fresh croutons. Drizzle with dressing.
.
????
.


ONE POT GREEN CURRY
If green curry paste isn’t currently a staple in your household, it really should be. I love its bright, mellow, herbaceous flavor. I have made my own but honestly generally just keep a jar of the Thai Kitchen green curry paste (available at pretty much any grocery store in the ethnic/international aisle) on hand. It’s super tasty and also happens to taste good with pretty much any vegetable. 101 cookbooks has a Simple Asparagus Soup recipe made with green curry paste (and a handful of other ingredients) and it was the meal that converted me from a red curry to a green curry fanatic.
Serves 6-8
Takes 55 minutes
3-1/2 cups water, divided
1-1/2 teaspoons salt, divided
1 cup white rice
2 tablespoons butter (or coconut oil if vegan)
1 large yellow onion (or 2 medium shallots), diced
1 bell pepper (green or colored– whatever you have on hand), seeded and diced
2 tablespoons green curry paste
1 tablespoon brown sugar
2 16-ounce cans full-fat coconut milk
2 cups potato, sweet potato or winter squash (I usually use potatoes or a combination of sweet potatoes and potatoes but whatever you have on hand will work great)
1 pound steak of your choice, cubed (skip if vegan or substitute a bit more potato/sweet potato)
2 cups green beans, ends trimmed and cut in half
1 tablespoon fish sauce, plus more to taste (skip if vegan)
Lime wedges, optional
- In a medium saucepan, bring 1-3/4 cups water and 1/2 teaspoon salt to a boil. Once boiling, add rice. Reduce to a simmer, cover and cook until all the water is absorbed (about 12 minutes). Remove the pot from the heat but leave the lid on for at least 5 minutes. Remove lid and fluff with a fork just before eating.
- In a large stock pot or Dutch oven, melt butter over medium heat. Add onion or shallots along with 1 teaspoon salt and cook until fragrant and softened (about 5 minutes). Add peppers and cook 5 minutes more. Add green curry paste and brown sugar, cooking until it just begins to brown and gets fragrant, about 1-2 minutes.
- Add coconut milk, remaining water and potatoes. Bring to a boil, reduce to a simmer and cook for 20 minutes. Add the steak and simmer 10 minutes longer. Add the beans and cook until softened, about 5 minutes.
- Remove from heat. Add fish sauce, taste and adjust seasonings as desired.
.
????
.
GLAZED SALMON WITH LEEK & KALE RAMEN NOODLES
Takes 1 hour
Serves 5
6 tablespoons soy sauce, divided
3 tablespoons rice wine vinegar, divided
2 tablespoons brown sugar
2 tablespoons toasted sesame oil
1 pound skin-on salmon filets
2 leeks, thinly sliced
4 garlic cloves, minced
1/3 cup canola oil
2 teaspoons sugar
20 twists black pepper
1/2 teaspoon red pepper flakes
1/2 teaspoon Kosher salt
5 ounces ramen rice noodles (I love anything from Lotus Foods)
1 bunch kale, stems removed and roughly chopped
1/4 cup toasted sesame seeds
- Mix together 4 tablespoons soy sauce, 2 tablespoons rice wine vinegar, brown sugar and toasted sesame oil in a large bowl. Add salmon and place in the fridge for 20 minutes to marinate. If the salmon isn’t full covered by the liquid, flip once during the marinating process.
- Preheat oven to 400 degrees and line a baking sheet with parchment paper.
- In a medium bowl combine leeks and garlic.
- In a small saucepan, heat canola oil over high heat until very hot but not smoking (about 400 degrees). Pour over leeks and garlic. Stir once and then let sit for 5 minutes. Add remaining 2 tablespoons soy sauce, 1 tablespoon rice wine vinegar, sugar, black pepper, red pepper flakes and salt. Toss to combine.
- Once oven is preheated, place salmon skin side down on prepared baking sheet. Pour half the marinade over the top. Discard the rest. Bake for 10 minutes.
- Bring large kettle of salted water to a boil on the stove. Add ramen noodles and cook according to package directions. Drain and add to a large bowl. Add kale while the ramen is still hot and toss to combine so that the kale wilts a bit. Add leek mixture and toss again to combine.
- Remove salmon from oven, flip so it is skin side up, and preheat the broiler. Finish salmon under the broiler so the skin crisps. It will take 1-2 minutes depending how hot your broiler gets. Check it frequently so that it doesn’t burn.
- Serve noodles with salmon and top with sesame seeds.
.
Week #19
- On: September 24, 2020
- 0
Veggie List & Veggie Notes
Week #19, September 24/25, 2020
– Weekly shares
– EOW/ green
Everyone gets most items from this list:
Green cabbage
Beans, ~1.3 lb, mostly green + a few wax
Winter squash (by site, Carnival acorn OR ‘Nutterbutter’ butternut)
Tatsoi
Small bell/frying peppers, ~4, mostly green, maybe 1 red
Jalapeno chile (HOT), 1 or 2
Yellow onion
Garlic
Dill
– Some sites get broccoli.
– Some sites get cauliflower.
Next week’s box will probably contain potatoes, leeks, poblano chiles, peppers, beans, broccoli OR cauliflower and more.
Tatsoi (bundle or head with dark green leaves) – This bok choy relative has darker leaves and thinner stems. Easily substituted for bok choy in recipes.
Dill (bundle with fine leaves and flowers) – Cover and refrigerate. We are sending the dill to pair with the beans.
Winter squash – See last week’s newsletter for lots of information on storing and using winter squash. Expect to wash your squash before cooking, just a rinse and a gentle wipe. This year, we are wiping the squash instead of running them through our brusher washer. The change allows greater social distancing and doesn’t compromise the squash at all. In fact, this system is probably better because we avoid wetting the squash.
RECIPES
Visit our 2020 Recipe Log or our 2019 Recipe Log or join our Facebook discussion group.
LOCAL THYME/ Cooking 101
Swedish Cabbage Rolls
Dilled Green Beans with Walnuts
Cauliflower Latkes
LOCAL THYME/ Cooking 202
Risotto with Braised Green Cabbage and Bacon
Green Beans with Olives
Cauliflower with a Briny Dressing
LOCAL THYME/ Quick & Easy Meal
Cabbage and Green Bean Salad
RECIPES FROM LAUREN

SHRIMP & SAUSAGE OVER BUTTERNUT GRITS
Serves 6-8
Takes 55 minutes
3 cups peeled and diced carnival or butternut squash
2 tablespoons butter, divided
1 small yellow onion, diced
1 teaspoon Kosher salt, divided
1/2 teaspoon freshly ground black pepper, divided
4 garlic cloves, minced, divided
4 cups milk
1 cup grits or cornmeal
1/2 cup parmesan
4 andouille sausages, thinly sliced
1-1/2 cups diced red peppers
3/4 cup scotch ale (or any mild lager-style beer)
1 pound medium shrimp, peeled and deveined
1 tablespoon dried parsley
1. Bring a pot of salted water to a boil. Pour in butternut squash and cook for 10 minutes until soft. Drain and set aside until ready to use.
2. In a large stock pot or deep skillet, melt one tablespoon of butter over medium low heat. Add onion along with 1/2 teaspoon of salt and pepper. Cook for 5 minutes until soft and fragrant. Add half of the garlic and an additional 1/4 teaspoon of salt. Saute an additional 5 minutes until the garlic is fragrant but before it begins to brown.
3. Add milk to pan and bring to a simmer over medium heat. Remove grits from heat and pour in grits slowly. Whisk vigorously until smooth. Return to medium heat and continue cooking and whisking until grits begin to thicken (about 2-3 minutes). Stir in squash and remaining salt and pepper. If you prefer looser grits, add a bit more water or milk. Cook for 10 minutes, stirring occasionally. Add Parmesan and season to taste.
4. In a separate skillet (cast-iron works great if you have it), melt remaining tablespoon of butter over medium heat. Add the garlic and cook until fragrant, about 5 minutes. Add sausage and turn heat to medium high. Stir infrequently so sausage and garlic blackens in spots. After two minutes, reduce the heat to medium, and add red peppers and beer. Simmer gently for 5 minutes until reduced by half. Add shrimp and parsley. Cook until shrimp curl and become opaque (2-3 minutes). Serve over warm grits.
.
????
.

CABBAGE PATCH SOUP
Adapted from Taste of Home
Serves 8-10
Takes 50 minutes
1 pound ground beef (or venison)
2 teaspoons Kosher salt, divided
1/2 teaspoon freshly ground black pepper, divided
2-3 colored pepper, seeded and diced (about 1 cup)
1/2 yellow onion, diced
1 jalapeno, seeded and diced
1/2 large head cabbage (red or green or a mixture of both), chopped (about 6 cups)
32 ounces canned or boxed tomato soup (I love Pacific Organic Creamy Tomato Soup)
28 ounces canned diced tomatoes (or 4 cups diced fresh tomatoes)
4 cups water
1/4 cup brown sugar
2 teaspoons chili powder
In a stock pot, combine ground meat with 1 teaspoon salt and 1/4 teaspoon pepper. Cook ground meat over medium heat until well browned. Add peppers and onion to the pot and cook until gently softened, about 5 minutes. Somethings might stick or brown a little. Don’t worry about that one bit.
Add the remaining ingredients to the pot and stir to combine. Bring a boil, reduce to a simmer and cook uncovered for about 25 minutes over medium low heat until cabbage is well softened.
Taste and adjust flavors to your liking.
.
????
.

CAULIFLOWER QUESADILLA
Inspired by a Smitten Kitchen recipe
Takes 40 minutes
Makes 2 beautiful quesadillas that will serve 2-4 people, depending on hunger levels
Around 5 cups roughly chopped cauliflower, you want small pieces, nothing bigger than an inch
2 tablespoons olive oil
Kosher salt and freshly ground black pepper
1/2 yellow onaion, diced
1 jalapeno, seeded and minced
½ teaspoon cumin
½ teaspoon chili powder
1 tablespoon lime juice
1 cup shredded Colby jack cheese
1 cup shredded spicy jack cheese (we used habanero)
4 10-inch tortillas
Preheat the oven to 450 degrees while you chop your cauliflower and shred the cheese.
Toss chopped cauliflower with olive oil and a generous amount of Kosher salt and freshly ground black pepper in a medium bowl until well coated. Add to a baking sheet and place in preheated oven. Roast for 15 minutes, without touching it. You want it to brown and char in spots. Shake pan after 15 minutes and roast 10 minutes longer so new spots can take on color.
Remove cauliflower from oven and put back in medium bowl. Toss with onion, jalapeno, cumin, chili powder and lime juice.
Warm a large skillet or griddle over medium low heat. Place one quesadilla down on the skillet surface. Add half the cauliflower mixture as uniformly as possible, followed by half of the cheese. Top with another tortilla and press down slightly. Cook for 3 minutes and flip using a large spatula. Cook for another 3 minutes.
Serve warm with sour cream, salsa, hot sauce, etc. Yummmm!

