
Blog
Week #8, July 6 2017
- On: July 05, 2017
 2
2
I queried our crew members about their favorite fruits and vegetables that we grow. Here are some of their responses plus a photo for each. I’ll post more people’s responses in a future newsletter. Think of our hard-working crew when you enjoy one of their favorites! Beth
Smitty Bietila (2008 – 2013, returned in 2017) Kale, the gift that keeps on giving all summer long.
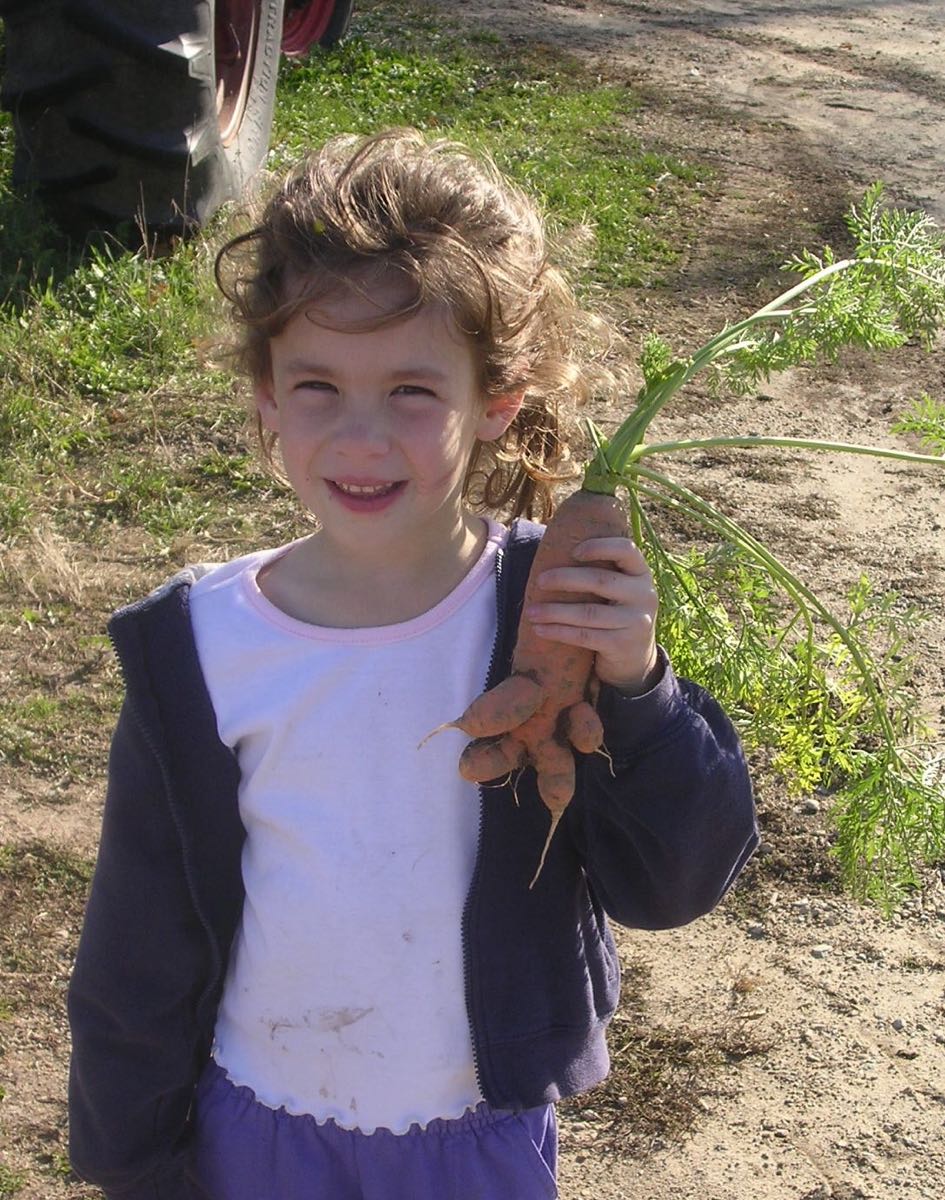
Jory Carlin (2014) Carrots because they are delicious.
Jon Fagan (2013) Crenshaw melons. Jon loves crenshaw melons because they are delicate, ephemeral, sweet and delicious. They are very difficult to grow in Wisconsin so we only get a few each year.
Billy Frain (2013) Onions. He likes the steps in harvesting onions; pull from the ground, leave to dry, pull off tops, gather to cure in the greenhouse. Also … “Carrots. They bring the whole crew together during weeding, despite the tedious, arduous nature of the work.”
Charlotte Hammond (2016) “Watermelons because our watermelons are the best on the planet. I can eat a whole watermelon every day during melon season. If I ever have my own farm, it’s gonna be a watermelon farm.” It’s also her favorite crop to harvest. Charlotte is on Steve’s melon harvest crew because she’s very strong and can catch. Out of season, Charlotte stays in shape with a ‘watermelon chair’ exercise routine, using a Roman chair at her gym (google it for photos). She works with 20+ lb weights to mimic picking up and stacking melons.
Kristin Knoener (2008, returned in 2016) Kristin likes cherry tomatoes, lettuce and watermelons. “There’s nothing like watermelon at 3:00 pm on a hot day.”
Kelcie Morgan (2015) Sweet corn. “It’s a fast-paced straight-forward harvest, a race to the end of the row. Then we get to eat it on the wagon on the way back to the buildings.” Strawberries and peas are other favorites to eat but are not her favorites to harvest. (Beth’s note; these low-to-the-ground crops are hard on everyone’s backs.)
Maggie Schley (1999?) Maggie loves cucumbers because she loves pickles and salt and fermentation. Tipi carrots are a big part of Maggie’s life. They were pictured on her wedding invitation. She has lots of carrot jewelry. Everyone on the farm saves ‘lover carrots’ for Maggie; carrots that have grown together in a spiral. Maggie is always on the carrot harvest crew.
Dana Teske (2015) Sweet corn. It’s her favorite to harvest and favorite to eat.
Jim Walker (2016) Rhubarb. He likes the fact that you can make dessert from a vegetable with mildly poisonous leaves. (Actually, it’s a petiole.) Also, it reminds him of home because rhubarb grew at all the houses where he grew up.

Smitty
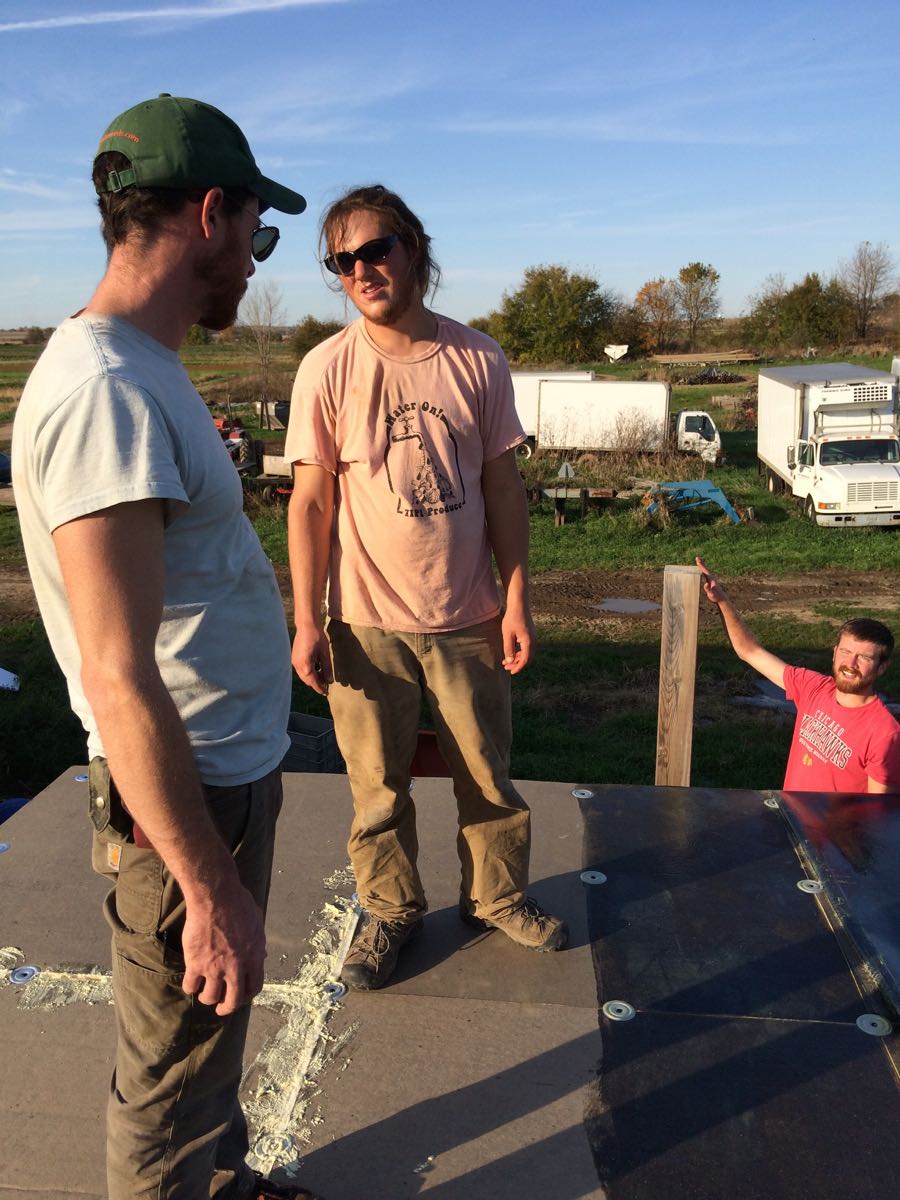
Jory (center) helped re-insulate and re-cover our cooler roofs last year.

Jon loves melons.

Billy shows off some ‘farm bling’ he unearthed in a field. We find all kinds of things.
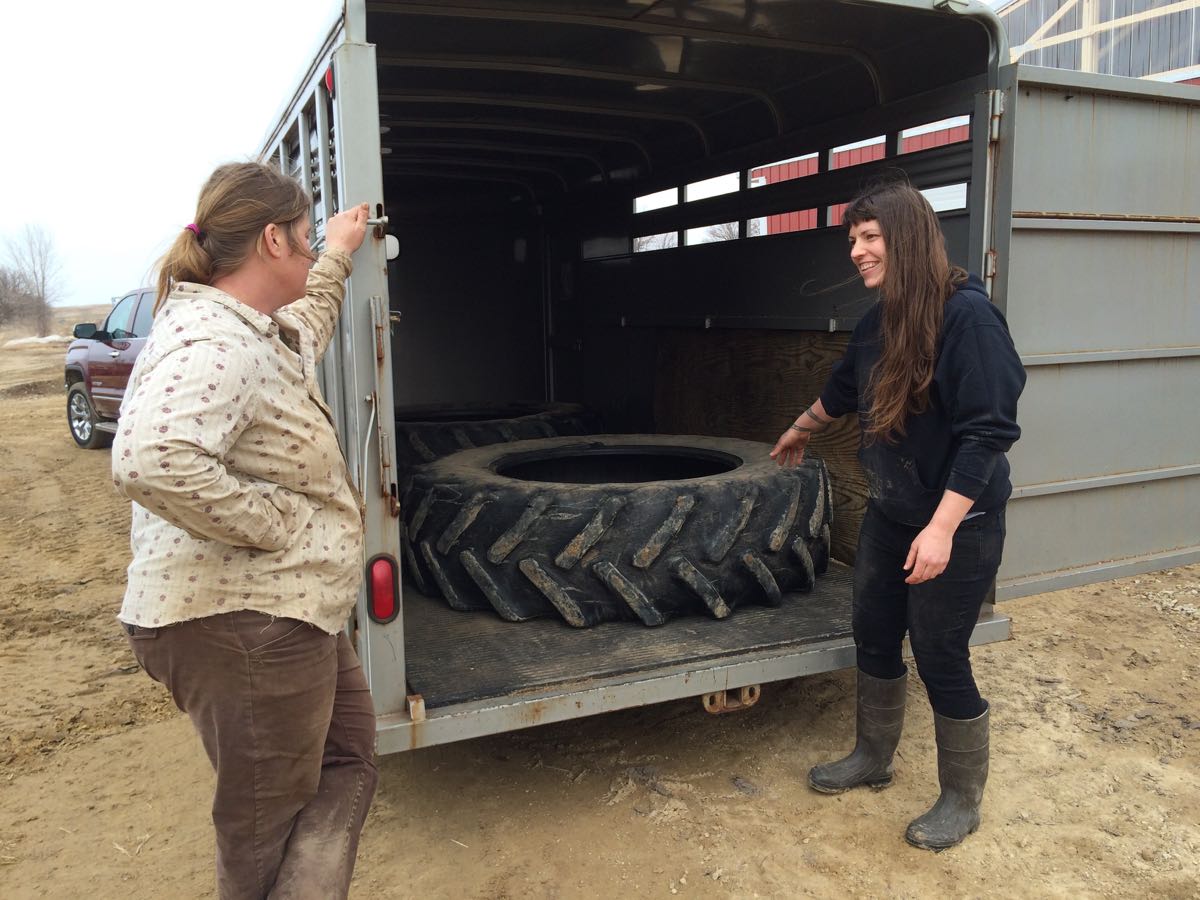
From left, Maggie and Charlotte retrieve an old tractor tire from the farm. It weighs 284 lbs. They took it to Charlotte’s farm for strength training, where they train by flipping the tire. These are two strong women.
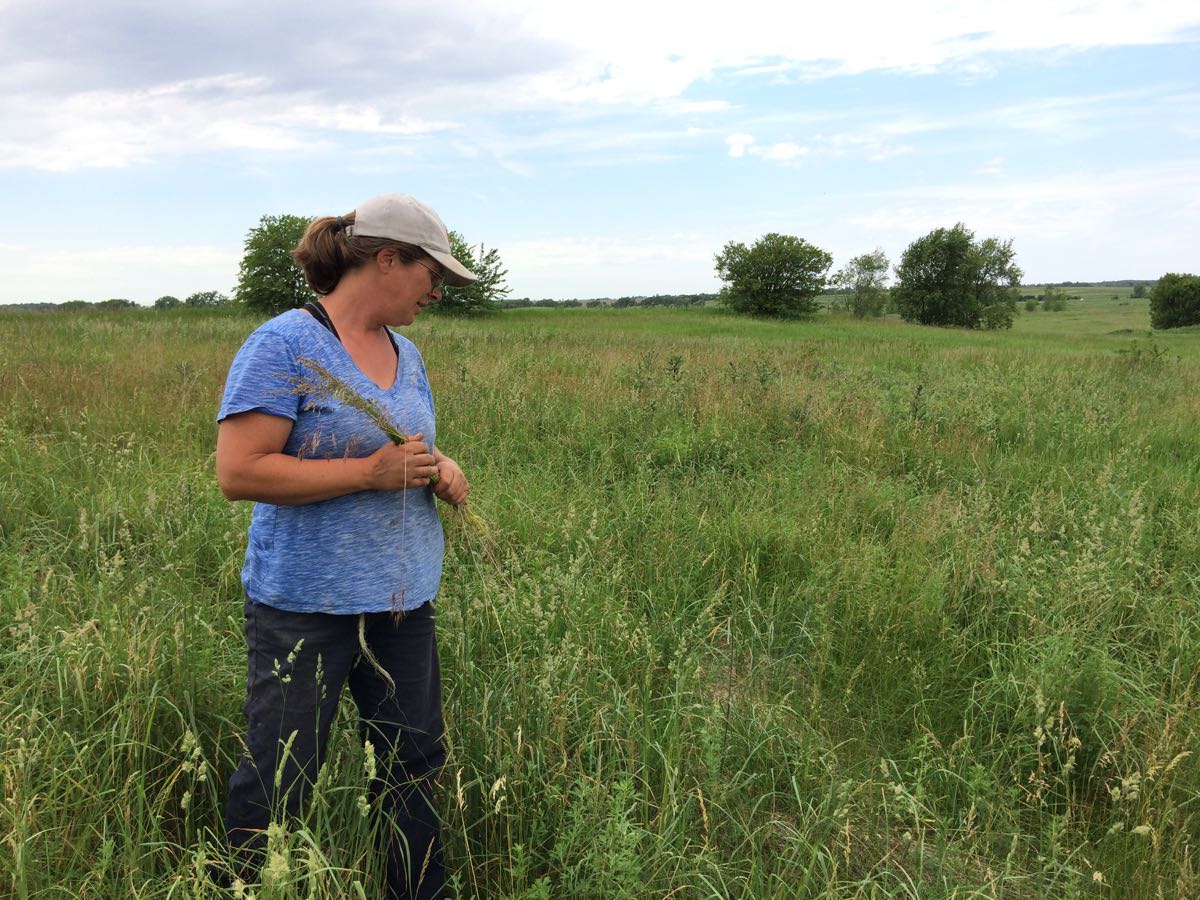
Kristin in an untilled area of our farm. I want to establish prairie plantings and Kristin is helping me figure out how to do it. She’s worked in prairie restoration for years and has deep knowledge about prairie management.

Kelcie and Billy harvest Brussels sprouts two falls ago.
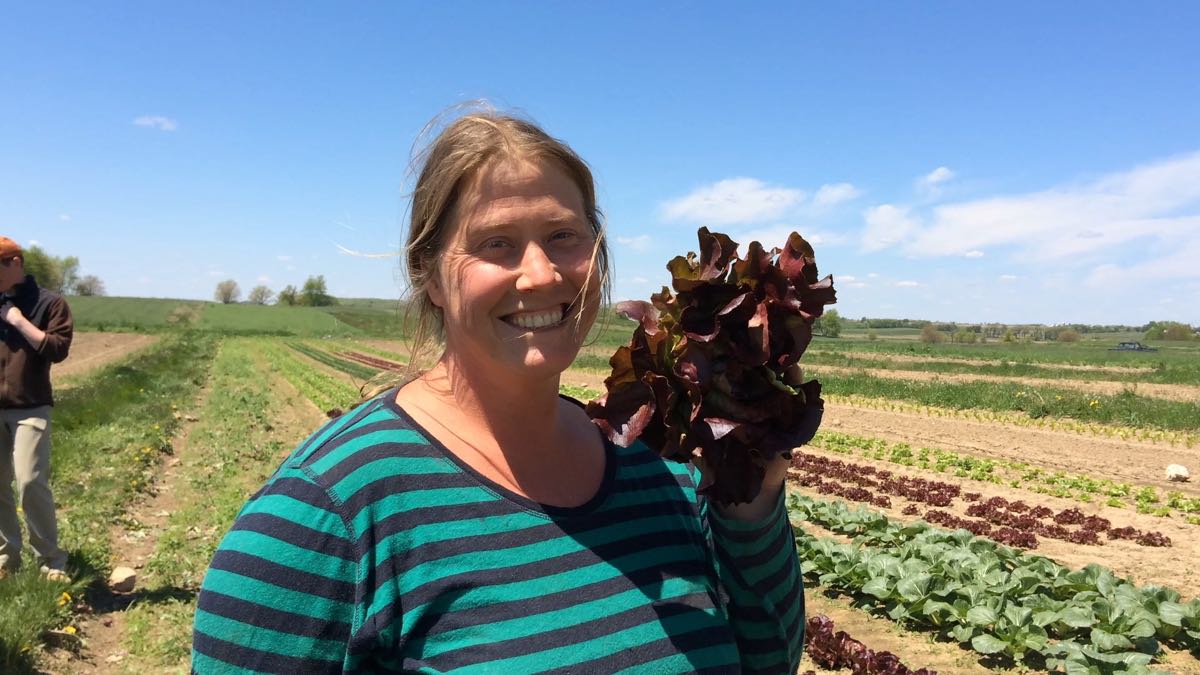
Maggie, our ‘Lettuce Queen.’

From left, Kelcie and Dana weed carrots.
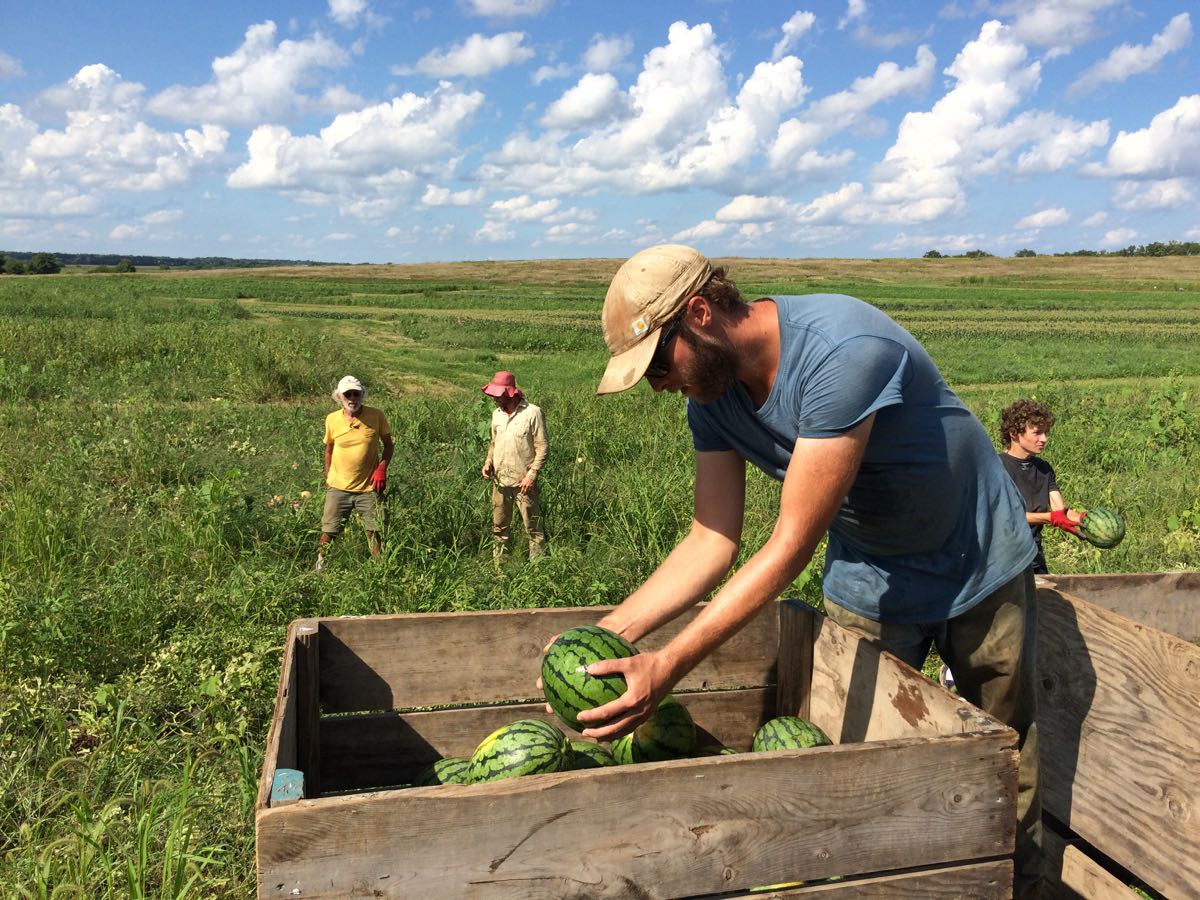
Jim stacks watermelons at harvest.
Veggie List and Veggie Notes
(July 6/7, 2017, green EOW)
Fennel, 1 bulb with fronds
Broccoli, 1 – 2 nice heads
Snap peas, 1.3 lb
Zucchini & summer squash, ~3 lb
‘Salanova’ lettuce (red or green)
Kohlrabi, 1 (or 2)
Sweet Walla Walla onion, 1 large
Basil, 1 husky sprig
Next week’s box will probably contain some type of greens, carrots, Walla Walla onion, zucchini, basil, fresh garlic and more.
Fennel (large vegetable with a fat bulb and lacy fronds) – Fennel is a ‘swing vegetable’; it can be used raw or cooked. Clean well and slice as thinly as possible for use in raw salads. It is good simply prepared with olive oil, lime or lemon juice, salt and shaved parmesan cheese. Cooking softens and sweetens fennel, and mellows its anise flavor. Both the bulb and leaves are edible. Here are ideas from Alice Water of Chez Panisse about how to use fennel: ‘It’s strong anise characteristic seems to suit fish particularly well. … We use fennel all the time. We add the feathery leaves to marinades for fish and to numerous salads, sauces and soups and we use them as a garnish, too. … The bulbs are sliced and served raw in salads in various combinations with other vegetables, parboiled for pastas; caramelized and served as a side dish; braised whole; or cooked in vegetable broths & fish stocks.”
Snap peas – We harvested two varieties this week. One has strings, the other is stringless. You’ll just have to figure out which one(s) you receive.
Kohlrabi (round, pale green) – See our June 15 newsletter for info on kohlrabi.
Walla Walla onion – Yeah for the first Walla Wallas! These are sweet onions, crisp and very mild. Wonderful raw or lightly cooked. Try cutting into wedges, threading on a skewer and grilling. Do not try to fry these onions – it doesn’t work because of their high water content. Storage: It’s OK to store at room temperature for up to one week. Otherwise, refrigerate.
Basil (curly-leaved sprig) – Almost everyone receives the ‘Napoletano’ variety this week. The leaves are larger and more frilly than most basils. We like this variety because it remains tender and flavorful even as the plants mature. Storage: Basil will blacken if stored in the refrigerator. It is best stored at room temperature with the cut ends in water, for example in a jar or vase. Treat it like a flower. Give the stem a fresh trim. You will receive one sturdy sprig this week.
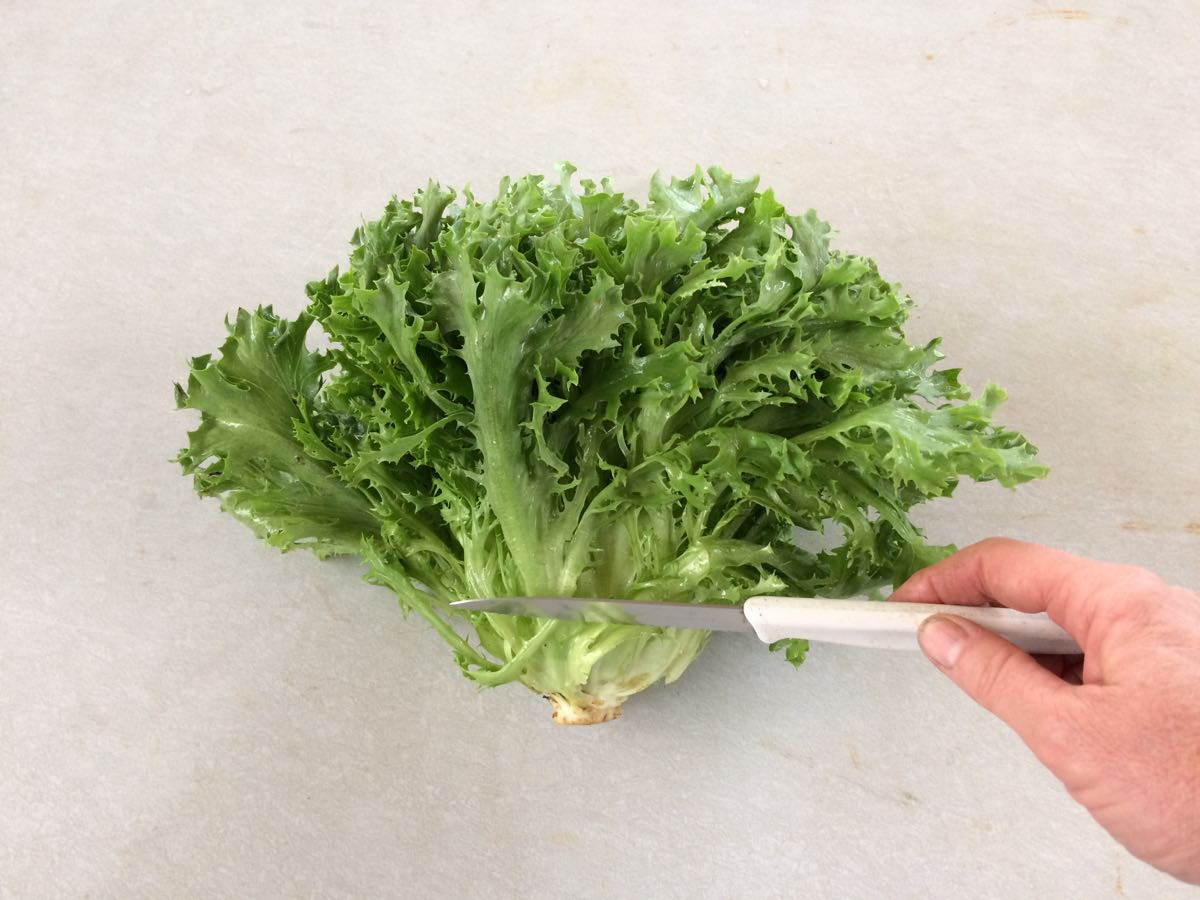
‘Salanova’ lettuce – This is a new innovation in lettuce breeding that lets you prepare salad mix easily. It also has nice flavor and texture, even during the summer when it’s otherwise difficult to grow lettuce. Cut the head across the base and it will fall apart into individual leaves. Dunk and swish in a tub of water. Drain and spin dry to store.
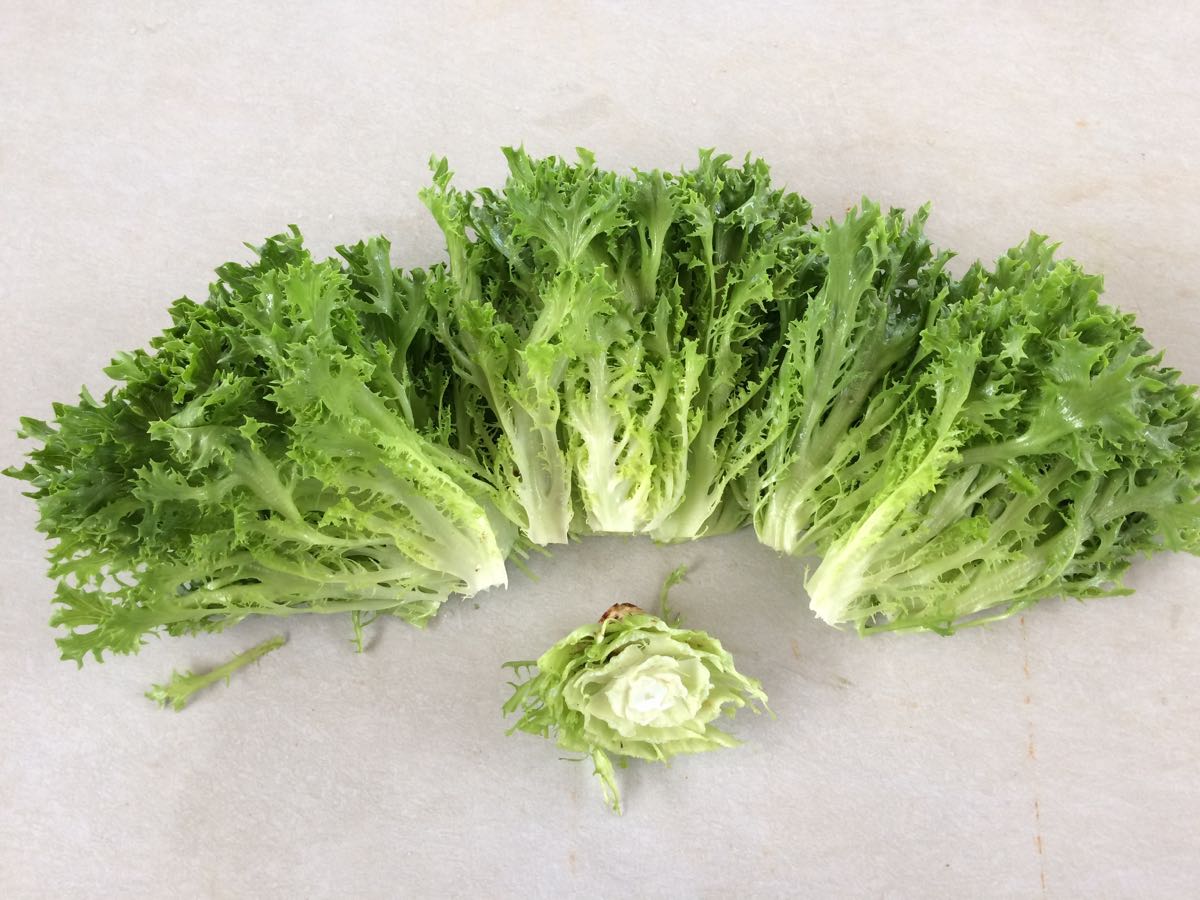
We’re pleased with the new ‘Salanova’ lettuce variety. Cut the lettuce head at the base and it falls apart into salad mix. Isn’t that great?! You’ll get either red Salanova or green Salanova this week.
RECIPES
Visit our Recipe Log, a list of all our 2017 recipes. We’ve already accumulated several zucchini recipes over the past two weeks.
LOCAL THYME RECIPES
Comforting Classics
Chopped Salad of Kohlrabi, Snap Peas, Chicken (other options listed) and Sweet Basil Dressing
Barefoot Contessa’s Roasted Broccoli with Pine Nuts, Lemon and Parmesan
San Franciscan Cioppino
Sweet Onion Rings with Basil Buttermilk Dip
Outside the Box Recipes
Snap Peas with Japanese Seasoning
Pasta Salad with Broccoli, Zucchini, Basil, Feta and a Medley of Olives
Roasted Chicken and Fennel with Oranges and Olives
Curried Squash Soup
Quick and Easy Meal
Kohlrabi and Lamb Stew
RECIPE FROM LAUREN
Summer Pad Thai
Pad thai is a quick easy meal, but it does require quite a bit of slicing and dicing. Get all your vegetables prepped before you start as things will move very quickly once you begin cooking. Lauren.
Takes 45 minutes
Serves 4-6
8 ounces rice noodles (Thai Kitchen is in most every grocery store and has great Pad Thai noodles)
1/4 cup peanut oil or other mild oil (vegetable or olive oil would both work fine), divided
1/4 cup tamarind paste (if you can find it, I never seem to have any on hand so I substitute 2 tablespoons lime juice with 2 tablespoons brown sugar or raw sugar)
1/4 cup fish sauce
1/3 cup honey
2 tablespoons rice wine vinegar
1 tablespoons soy sauce or tamari
1-2 teaspoons red pepper flakes
1/2 Walla Walla onion, diced
3 garlic scapes (if you have some leftover, skip it if you don’t)
2 eggs
1 head broccoli, finely chopped
2 pounds zucchini and summer squash, cut into matchsticks
1/2 cup chopped peanuts plus more for garnish
1/2 pound snap peas, end removed and thinly sliced, for garnish
Basil, thinly sliced, for garnish
Limes, quartered
- Place noodles in a large bowl.
- In a large stock pot bring enough water to cover the noodles to a boil. Pour over noodles and let stand for 7 minutes. Drain noodles, return to bowl and toss with 1 tablespoon peanut oil.
- Meanwhile, in a small sauce pan combine tamarind paste (or substitutions), fish sauce, honey, rice wine vinegar, soy sauce and red pepper flakes. Whisk to combine and then heat over medium heat until sugar and honey dissolve. Remove from heat.
- In a large skillet, heat remaining oil over medium heat. Add onion and garlic if using. Saute for 3-5 minutes until fragrant and soft. Add eggs and scramble gently. Once eggs are most cooked add the broccoli. Continue sauteing and cooking the eggs for 5 minutes until broccoli is bright green.
- Add noodles, zucchini, summer squash and sauce. Stir to combine then cook for 2 minutes until everything is warm and zucchini is just barely cooked. Stir in 1/2 cup peanuts just before serving.
- Serve warm with peanuts, snap peas, basil and lime wedges.
.
Fennel & Kohlrabi Salad
Borrowed from my dear friend Andrea Bemis of Dishing Up the Dirt
I always thought I couldn’t eat fennel raw until I shaved it real thin and paired it with some apple and a light homemade vinaigrette. Something about this simple salad transformed the way I looked at fennel. Now I love to eat raw fennel as a side to something real rich and hearty (like a grilled steak or porkchop). This recipe takes things a bit further pairing fennel with crunchy kohlrabi and onion alongside some walnuts and blue cheese. Together it makes for a powerhouse dish. PS Feel free to sub feta for blue cheese if you are a real blue cheese hater. It won’t make much of a difference. Lauren.
Takes 20 minutes
Serves 4
1/4 cup apple cider vinegar
3 tablespoons honey
1-1/2 teaspoons Dijon mustard
1/2 teaspoon celery seeds
1/2 teaspoon Kosher salt
1/2 teaspoon freshly ground black pepper
3-1/3 tablespoons extra virgin olive oil
1 large or 2 smaller kohlrabis, stems and greens discarded, peeled and cut into matchsticks
1 large fennel bulb, stems removed (and saved for another use), halved, cored and very thinly sliced (if you have a mandoline- use it!), plus a few fronds for serving
1/2 Walla Walla onion, very thinly sliced
1 apple (honey crisp or granny smith work best in my opinion), sliced into thin matchsticks
1/4 cup walnuts, roughly chopped and toasted
1/4 cup good quality blue cheese, crumbled
- In a large bowl wisk together the vinegar, honey, mustard, celery seeds, salt and pepper. Slowly whisk in the oil until well combined.
- Add all the thinly sliced vegetables (and fruit!) to the bowl and toss well to combine.
- Divide between plates and top with toasted walnuts, crumbled blue cheese and a few fennel fronts. Season to taste with additional salt and pepper if need be.
.

Week #7, June 29 2017
- On: June 29, 2017
- 0

Steve sunk a tractor in the ground on Monday. Before plowing a wet bottom field, he attempted to set the plow to a shallower depth but accidentally set it deeper. He plowed a furrow that was too deep and got stuck. Steve came moping back to the house, worried that we would need help extracting the embedded tractor and plow. That’s expensive (if we hire a rig) or embarrassing (if we ask a neighbor for help). It’s difficult and risky when the tractor and implement are still hitched together. He didn’t sleep well at all that night. By morning, Steve and Roger had a plan that worked, using other tractors and a front-end loader. All was well but it was an unsettling moment for Steve. Beth
Veggie List and Veggie Notes
(June 29/30, 2017; week #7, purple EOW, moon Sampler)
‘Caraflex’ cabbage
Beth’s Box Logic: We planned this delivery with your July 4th celebrations in mind. You’ve got ingredients for …
– cole slaw (cabbage, scallions),
– cold salads (Romaine, peas, parsley),
– grilling (zucchini),
– pasta salad, our go-to meal for picnics (grilled zucchini, peas, Swiss chard, scallions, parsley) and
– cocktails (tomato juice)
You will find something festive to prepare. Have a great 4th of July!
Box Contents
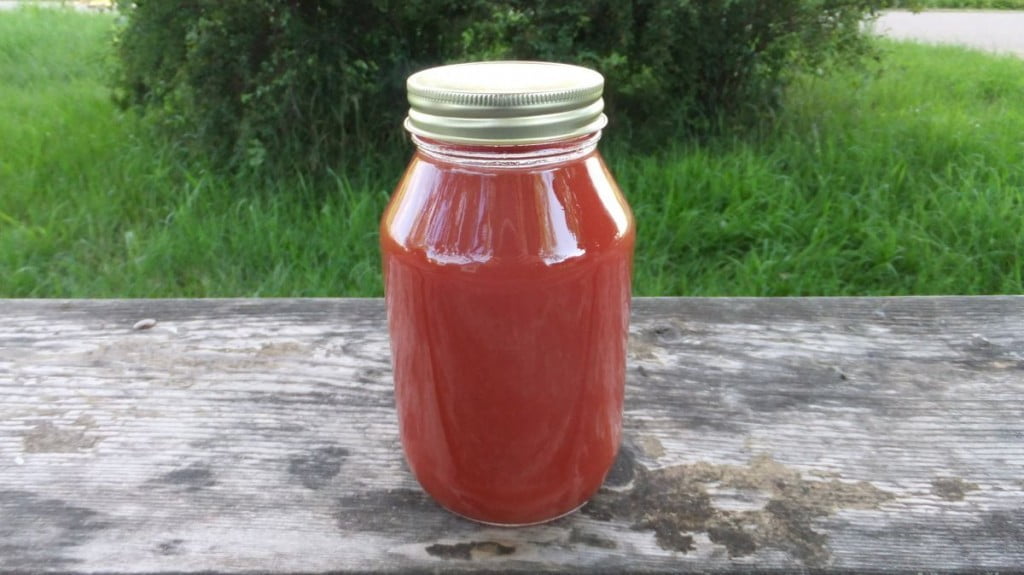
Tipi tomato juice, 1 quart
‘Caraflex’ cabbage
Sugar snap peas, ~1.2 lb
Swiss chard, 1 big bunch
Zucchini & yellow summer squash, ~3 lb
Romaine lettuce
Scallions, 1 bunch
Curly parsley, 1 bunch
Next week’s box will probably contain sugar snap peas, beets with greens, zucchini, broccoli, sweet Walla Walla onion, basil and more.
‘Caraflex’ cabbage – This is a nice salad-type that we grow in summer. Don’t you love the pointy shape? It has thinner, more tender leaves than the usual green cabbage. Great in salads and slaws but can also be cooked. Here’s the description from the seed catalogue: “Inner leaves are tender, crunchy, and have an excellent, sweet and mild cabbage flavor. Perfect for summer salads, slaws, or cooked dishes.”
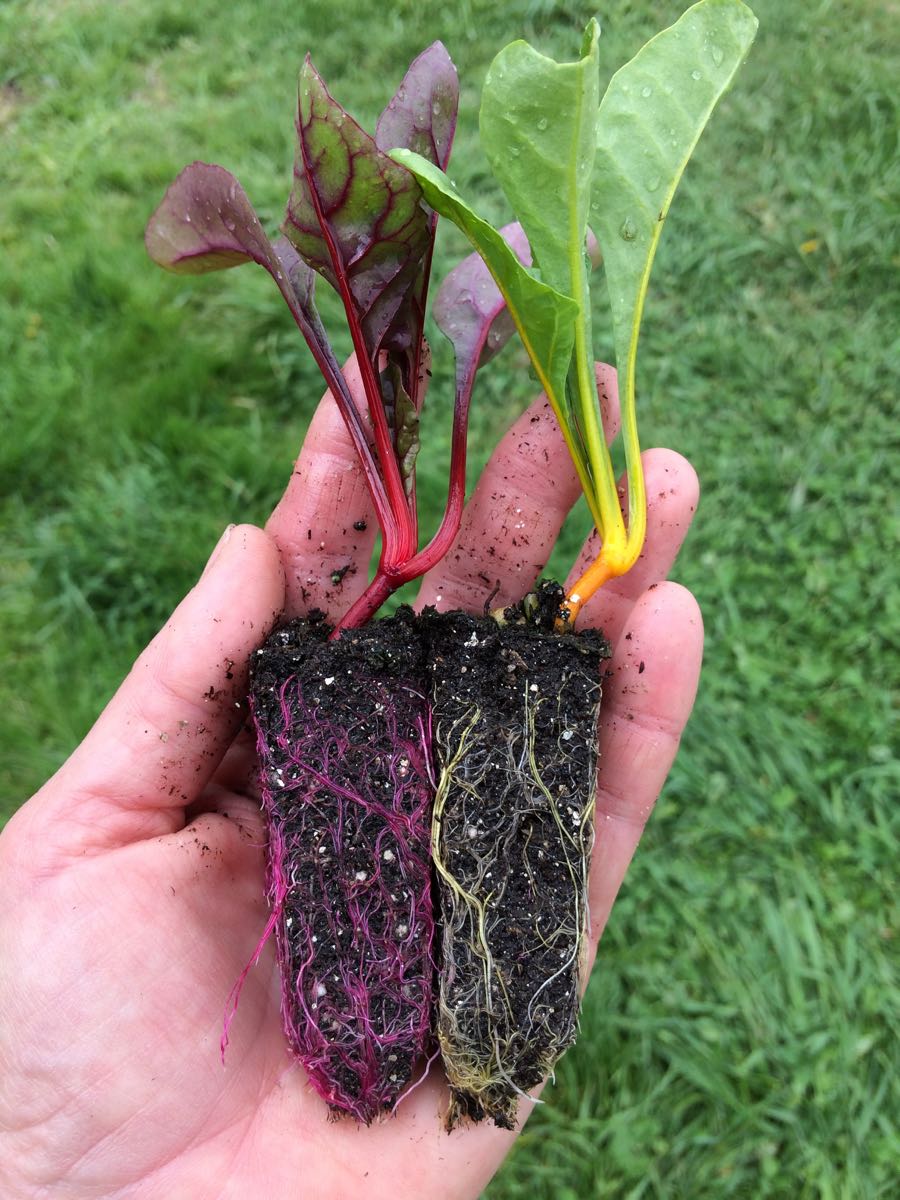
Swiss chard (pretty bundle of green leaves) – Our crew did a nice job mixing colors for pretty bunches. Swiss chard is a close relative of spinach, but requires a bit more cooking. Use as a substitute in any recipe that calls for spinach, just cook the chard a little longer. Both stems and leaves are delicious. The stems requite longer cooking, so cut them free from the leaves when preparing. That allows you to cook the stems longer.
Parsley – This is the most versatile, widely-used herb that we grow. This week, I plan to make a tabouleh-style salad with snap peas, grilled zucchini, scallions and lots of parsley.
Tipi tomato juice – We had this juice bottled from our tomatoes last summer. It’s a great way to capture ripe tomatoes at peak season, at a moment when we are swimming in tomatoes. Drink it or try making an easy soup. Simmer diced zucchini and Swiss chard in the juice. Add minced scallions and parsley near the end of cooking. Voila! Soup!
Storage: Store the juice out of sunlight at room temperature when unopened. Refrigerate after opening. The juice is already seasoned so do not add salt if you cook with it.
Ingredients: organic tomatoes from Tipi Produce, salt, organic garlic, organic onion, organic black pepper. I’ve posted the nutritional information here.
LOCAL THYME RECIPES
Comforting Classics
Greek Swiss Chard and Zucchini Soup
Pan Fried Tofu on Cabbage and Snap Pea Salad
Zucchini Scallion Fritters
Classic Coleslaw
Outside the Box Recipes
Zucchini and Swiss Chard Tart
Vietnamese Snap Pea Stir Fry
Orzo Salad with Grilled Summer Squash
Swedish Cabbage Soup
Quick and Easy Meal
Turkey, Bacon and Parsley Pesto Mayo Sandwich with Romaine
RECIPES FROM LAUREN
GRILLED CABBAGE, SNAP PEA & SCALLION SALAD
There’s little I enjoy more than bringing home a huge tote of vegetables and tossing them on the grill for a simple but amazing dinner. This week’s creation involves grilling a lot of things not commonly thought of as grillable but you’ll have to trust me that grilled cabbage and snap peas are a real thing of beauty. If you don’t have a grill or equipment good enough to keep veggies from falling through the grates you could broil your vegetables on a sheet pan for 15-20 minutes until very well charred in places. That was my go to “grilling” technique before we purchased an awesome grill last summer. And still my technique when summer storms keep me inside. Lauren.
Takes 30 minutes
Serves 4-6 as a side to some hearty cut of meat also done on the grill or 2 as a main dish
1/4 cup olive oil, divided
1 cabbage, cut it half lengthwise and cut in half
1 pound snap peas (or as many as you can spare), ends trimmed
1 bunch scallions, ends trimmed
Kosher salt and pepper
2 tablespoons rice wine vinegar
1 tablespoon toasted sesame oil
2 tablespoons brown sugar
1 tablespoon tamari or soy sauce
1 teaspoon fish sauce
1/2 teaspoon red pepper flakes
2 tablespoons toasted sesame seeds
- Drizzle one tablespoon of olive oil on a baking sheet. Add cabbage, snap peas and scallions. Drizzle with additional tablespoon of olive oil and then sprinkle generously with salt and pepper. Toss gently with your hands to coat veggies evenly with oil.
- Get your grill ready. The hotter the better. Grill veggies directly over heat (one of these fancy grill pans or baskets that keeps the veggies from falling through might be helpful) flipping so both sides get blackened in spots. This takes about 5-6 minutes for the scallions and peas and closer to 10 minutes for the cabbage. A little char is a great thing, especially for the cabbage. If you are broiling, just keep them on the baking sheet and put them RIGHT under the broiler for 20 minutes, flipping the veggies after 10 minutes.
- Remove veggies, allow to cool briefly. Add peas to a medium bowl. Slice cabbage and scallions thinly (as best you can) and add to the same bowl.
- Whisk rice wine vinegar, remaining olive oil, sesame oil, brown sugar, tamari, fish sauce and red pepper flakes together in a small bowl. Pour dressing over veggies. Add sesame seeds and stir to combine. Serve warm or cold.
.
ZUCCHINI & SWISS CHARD TART
Recipe adapted from New York Times
I make pie crust in my food processor following Smitten Kitchen’s basic guidelines for “all butter, really flaky pie dough” every single time I need a pie crust regardless of what the recipe calls for and I am NEVER disappointed. It’s simple, quick and incredibly flaky. Do note that this makes a double batch (aka two pie crusts) so either make half the Smitten Kitchen portion (which is a little more difficult in your food processor) or two tarts! Lauren.
Makes 1 tart
Serves 4-6
Takes 1 hour, 45 minutes (much of it inactive), a little longer if you make the dough from scratch
1 store-bought pie crust or follow instructions for my favorite pie crust (see note above)
2 tablespoons olive oil
2-3 scallions, white and pale green parts, diced
1 teaspoon Kosher salt, divided
1/2 teaspoon freshly ground black pepper, divided
1 bunch Swiss chard, stems removed and diced, leaves roughly chopped
2 pounds zucchini and/or summer squash, diced
1/4 cup minced curly parsley
3 eggs, beaten
3/4 cup Gruyere (or Swiss if you can’t find that) cheese
- If making pie crust from scratch, do this first so it has time to chill in the fridge for 20 minutes.
- Preheat the oven to 375 degrees.
- In a large saute pan, add olive oil, scallions and chard stems. Season with 1/2 teaspoon salt and 1/4 teaspoon pepper. Cook over medium heat for five minutes until fragrant. Add zucchini and chard leaves, stir often for 10 minutes. Zucchini should be tender but still bright green and greens should be wilted. Add parsley, cook about 1 minute longer just to combine flavors. Remove from heat and set aside.
- Beat the eggs in a large bowl. Stir in remaining salt and pepper. Add zucchini chard mixture and cheese. Mix everything together and then add remaining pepper.
- If making your own pie crust, roll it out into a circle and line a 9 or 9.5-inch pie pan. †If not, just grab your store-bought crust. Fill pie crust with zucchini chard mixture. Bake for 50 minutes or until center is set and top is golden brown. Allow to set for 15 minutes before serving. It’s fine to serve this warm or at room temperature.
U-pick re-cap
- On: June 21, 2017
- 0
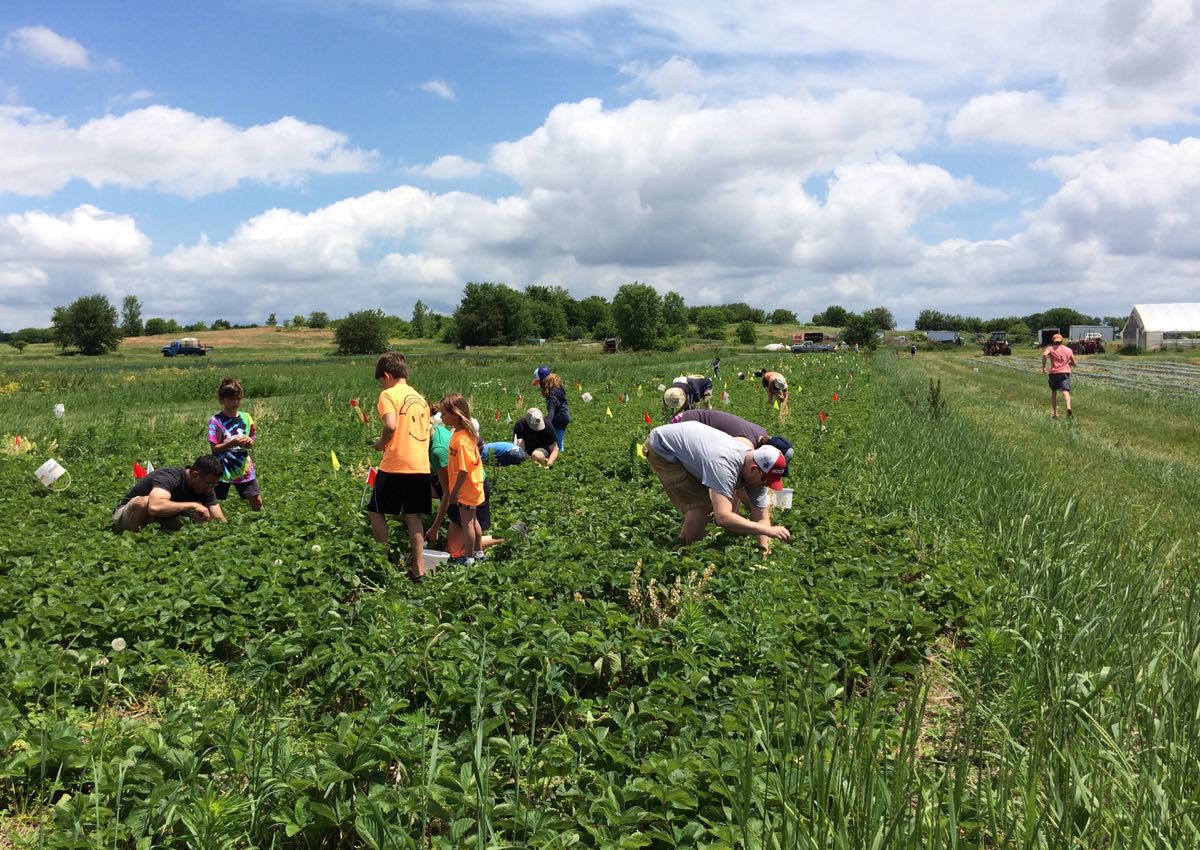
I cannot tell you how much how much Steve and I enjoy the u-picks, mostly because you folks enjoy them so much. Ripe strawberries straight from the plant are spectacular. Most fruit sold in the grocery store is mediocre by comparison. The weather on Saturday was unexpectedly perfect and mild; warm with a gentle breeze and some cloud cover. It was a picture perfect day. Beth
Steve, Ari and Billy staffed the berry field, showing people where and how to pick. You can see Billy at right in an orange shirt, running to greet the next group of members.
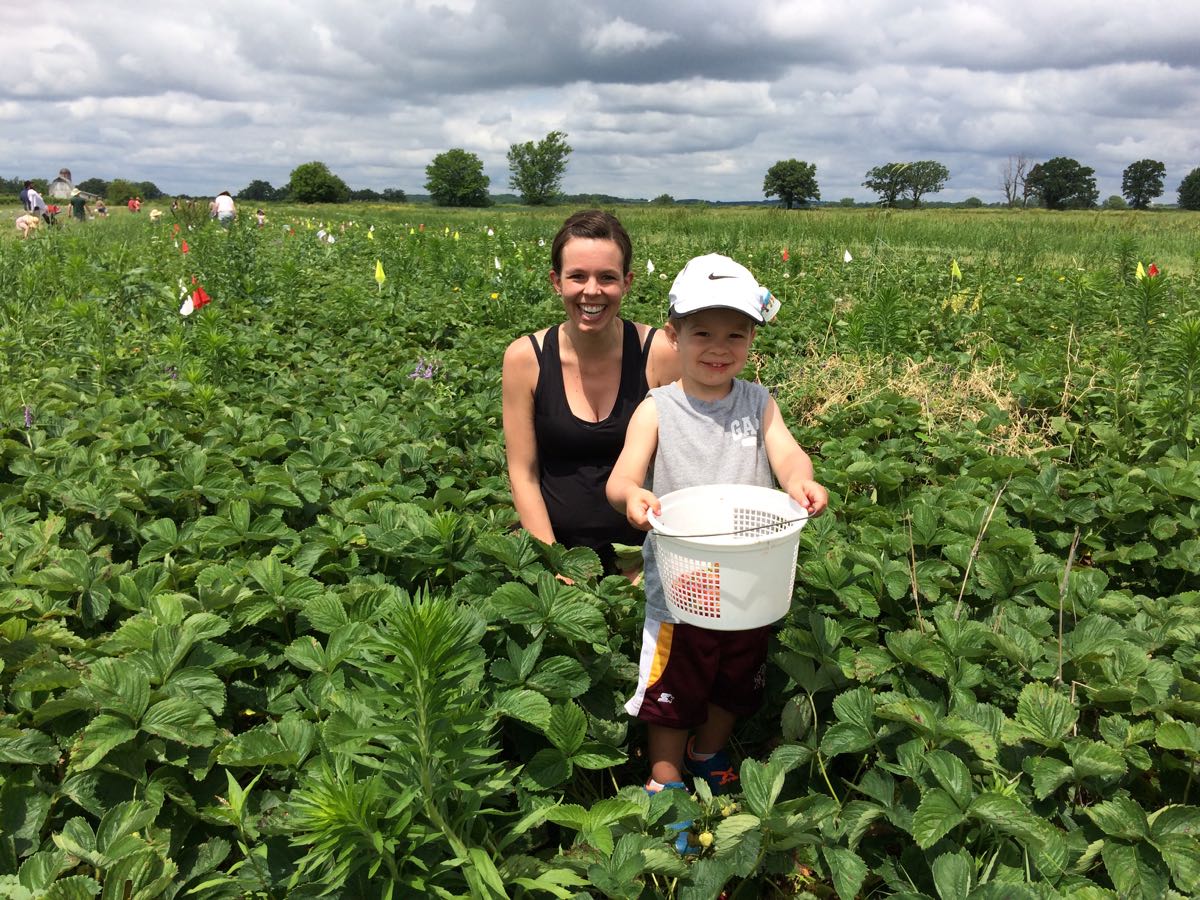
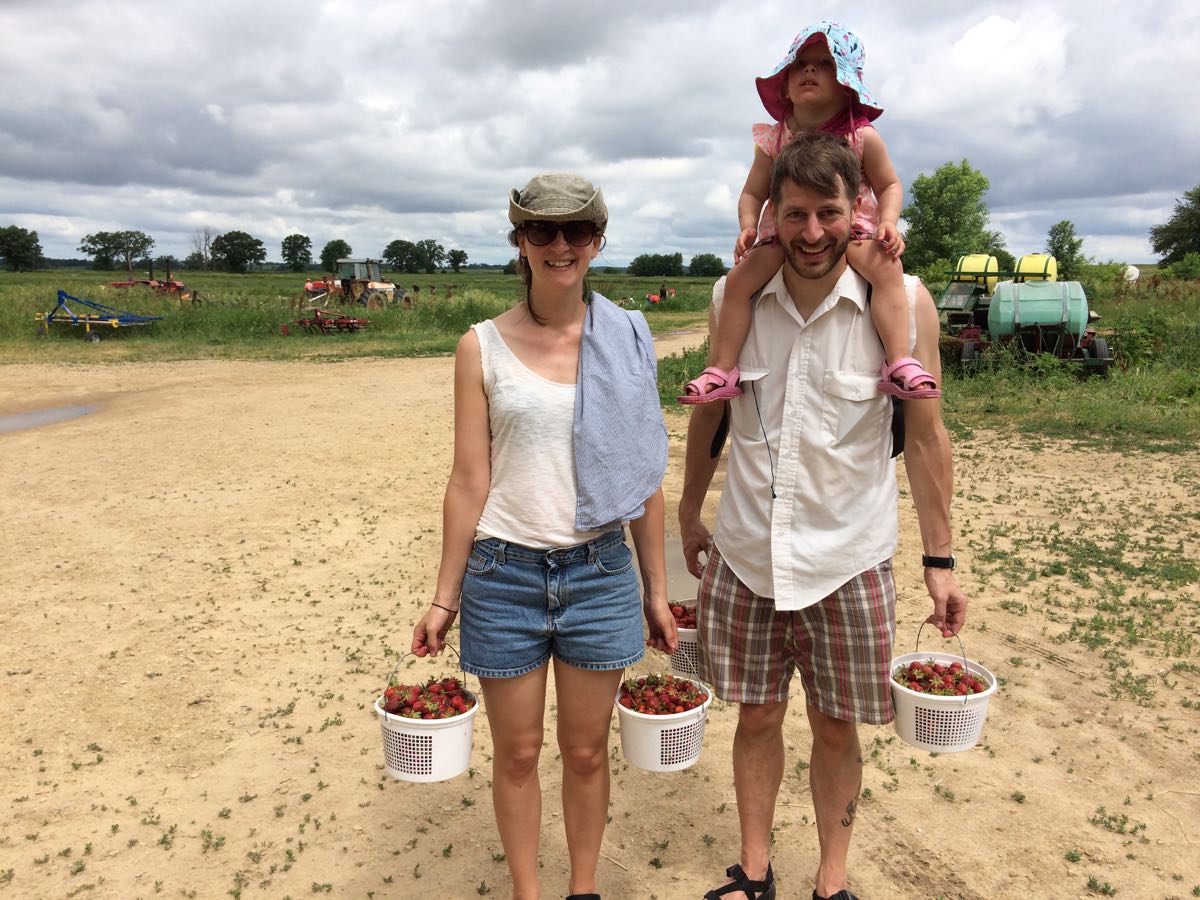
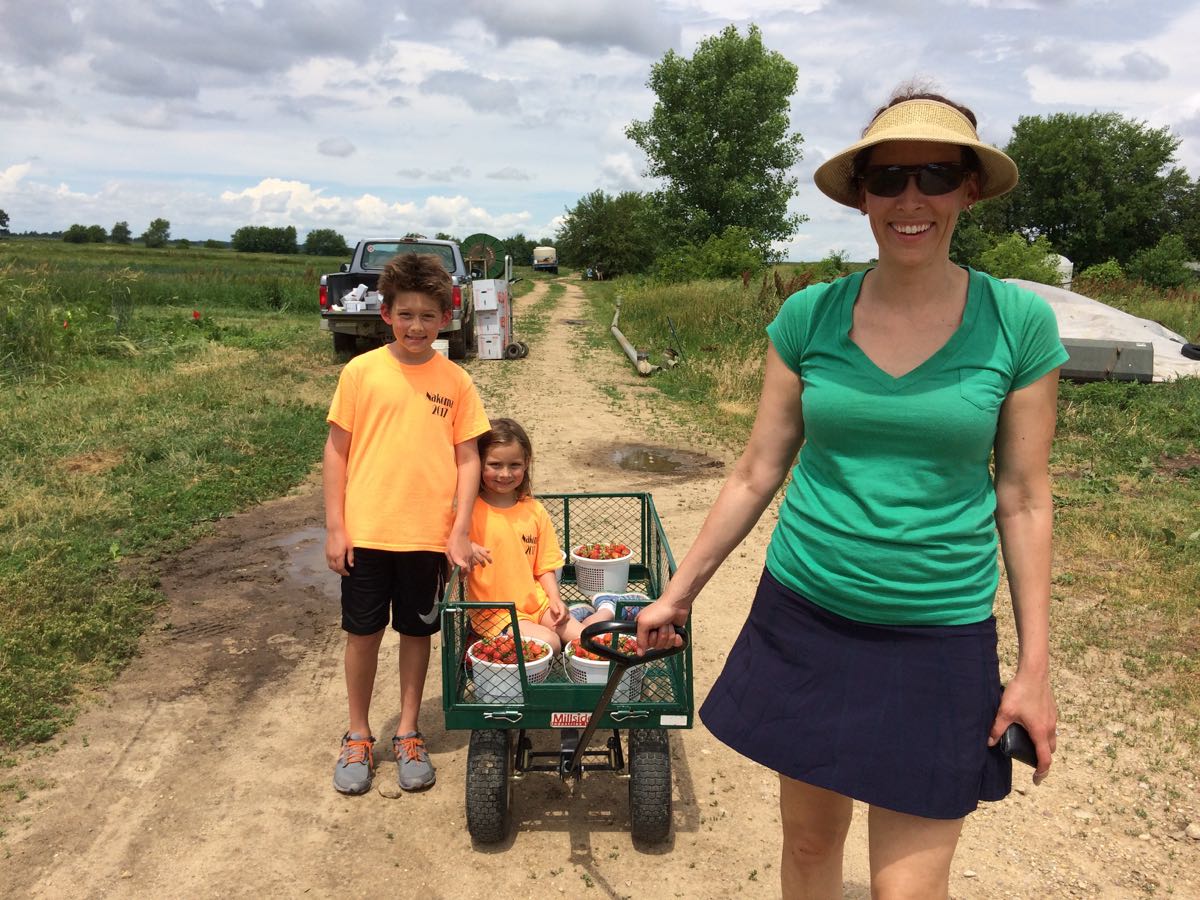
Happy berry pickers. Almost everyone picked more than they planned because the berries were abundant.

This young lady wore her special strawberry sunglasses!
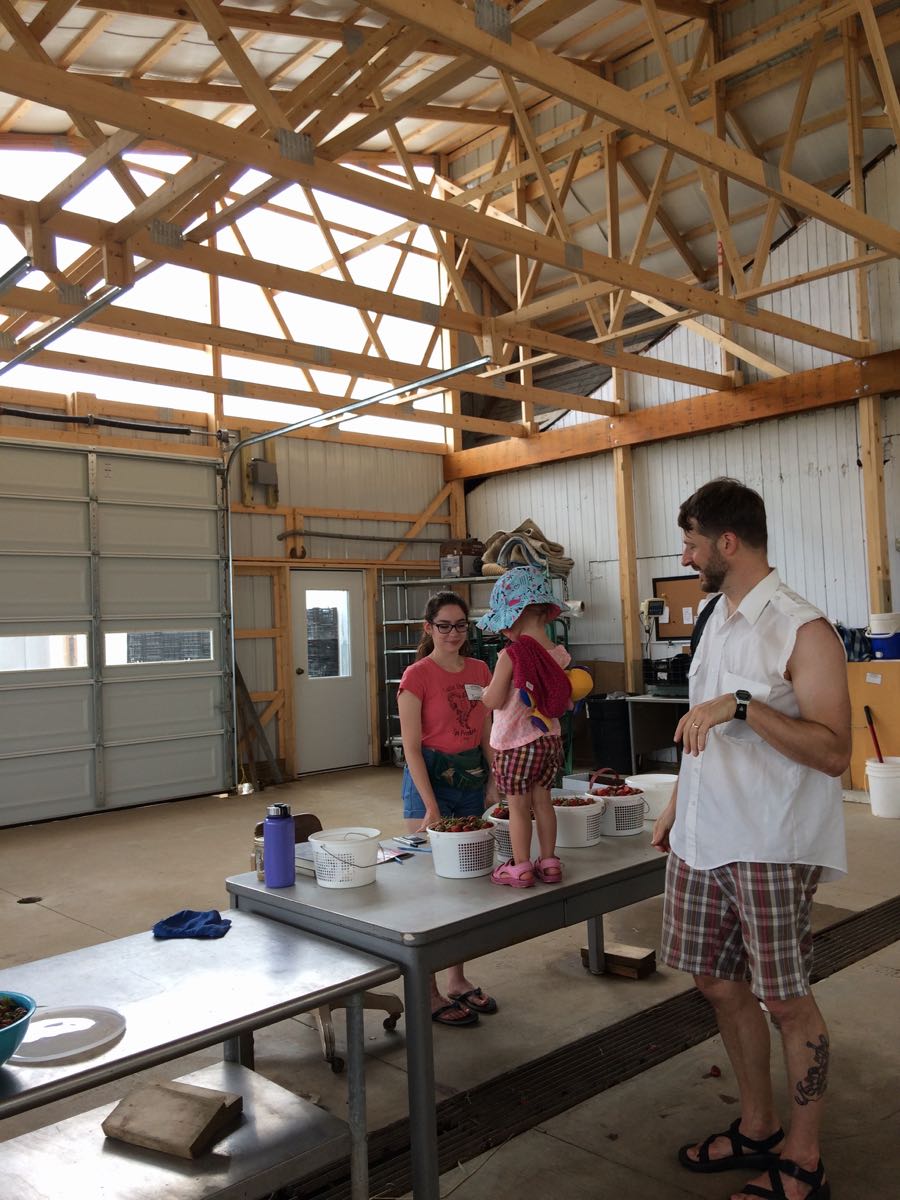
Everyone got to see our new pack shed when it was time to weigh their berries.
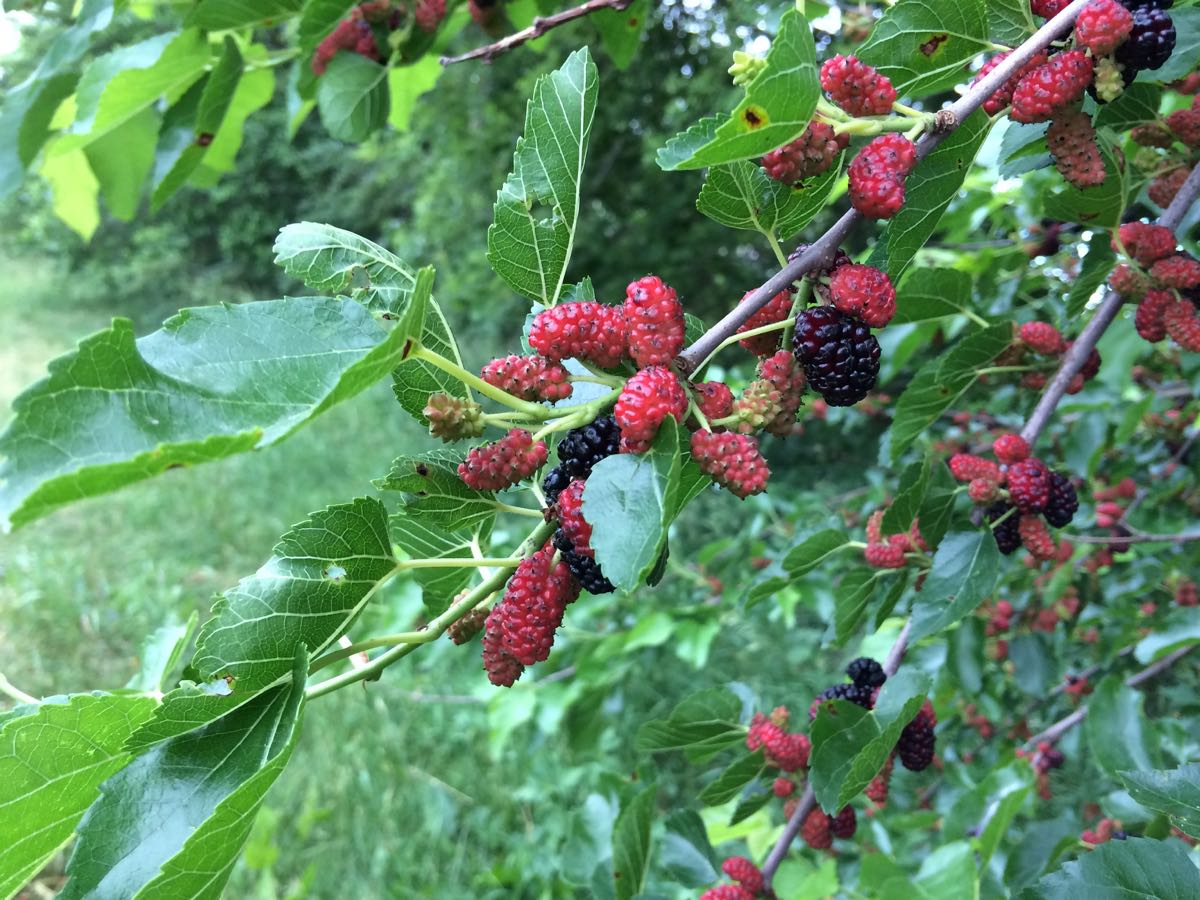
The mulberries are just beginning to ripen.
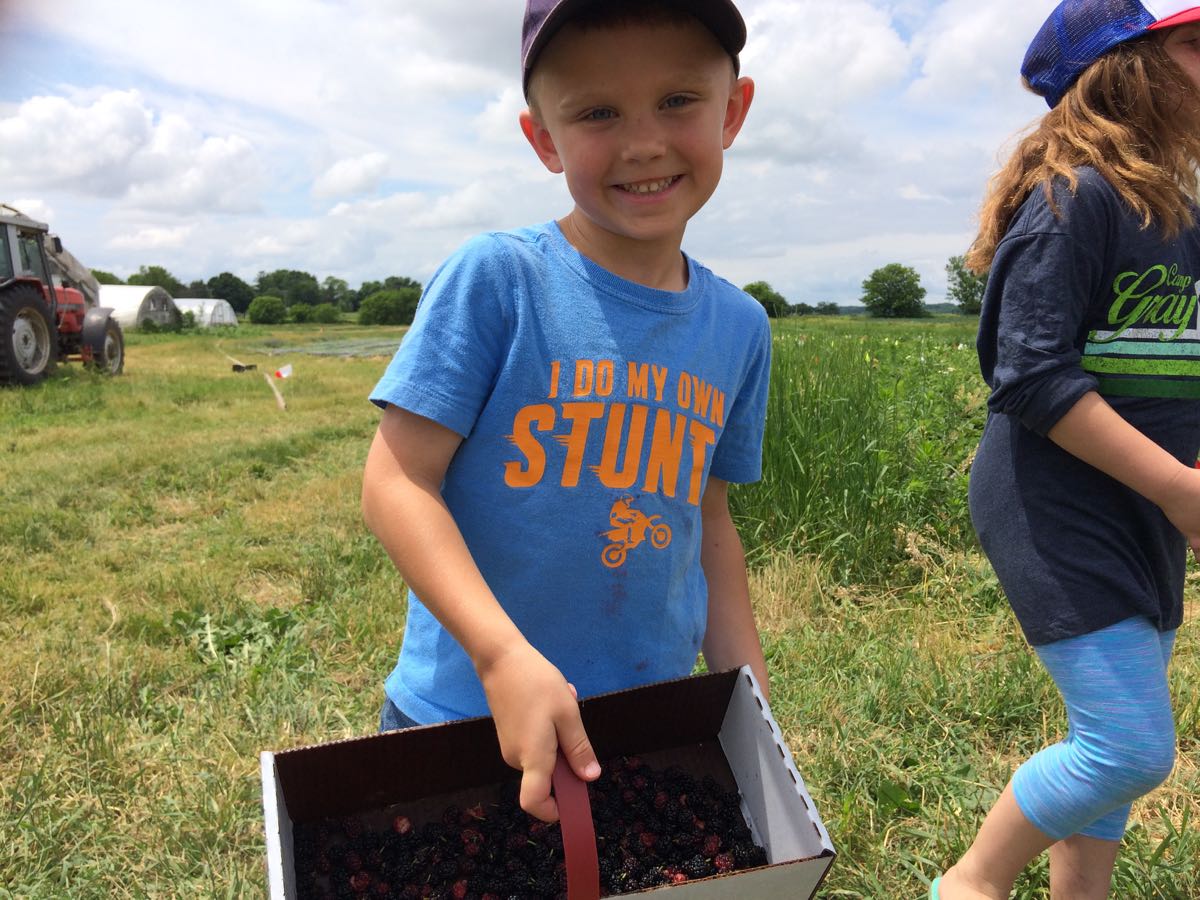

Mulberry pickings and a special one to share with Billy.
Veggie List and Veggie Notes, June 22/23, 2017, week #6, green EOW
Strawberries, 1 qt
Snow peas &/or snap peas, 1.1 lb
(In same bag, snap peas on bottom, snow peas on top.)
Zucchini &/or summer squash ~3 lb
Broccoli, 2/3 – 3/4 lb
Red bibb lettuce
Kale, 1 bunch
(Some sites get lacinto, some get Red Russian.)
Daikon, white
Daikon, purple
(2 – 4 daikon total; 1.5 – 2 lb)
Greek oregano, 1 bunch
Garlic scapes, a handful
Next week’s box will probably contain ‘Caraflex’ cabbage, snow peas, zucchini, Swiss chard, scallions and more.
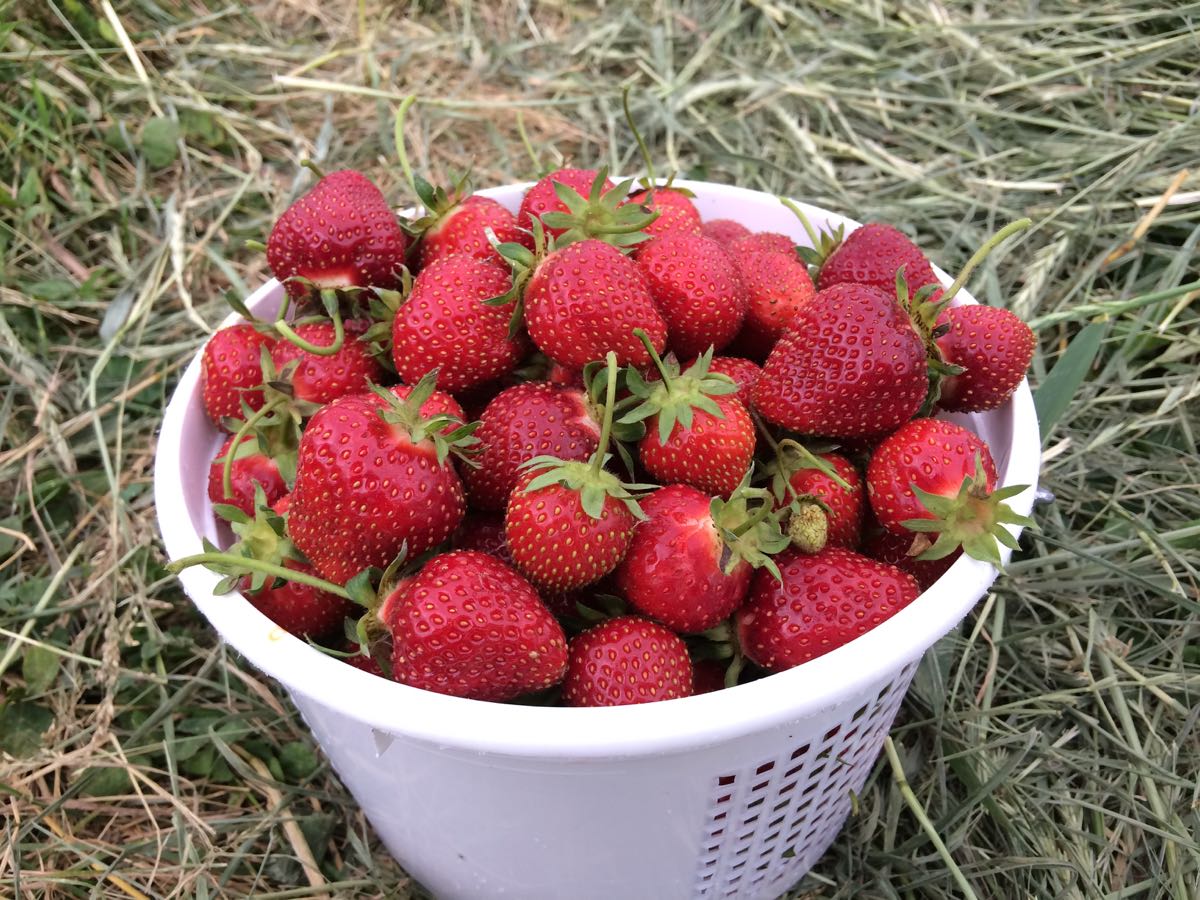
Strawberries – These are ripe. Eat soon.
Snap peas and snow peas. These will be together in one bag.
– Snap peas (plump pea pods) – These peas should be eaten pod and all. They are delicious raw, or very lightly cooked or stir-fried. Preparation: They will need a quick rinse to remove faded gray blossoms. This is a new stringless variety, so there is no need to remove any strings. Remove the stem and they are ready to eat. Storage: Refrigerate.
– Snow peas (flat pea pods) – These are excellent stir fried or in raw salads. Preparation: Snow peas have strings. Here’s how to remove them. Snap off the stem end and pull the string down the concave side of the pod (the inward-curing side). Throw away the string and eat the pod. The thicker pea pods will usually have a string along both edges. Remove them when you snap off the stem.
Kale – Each site gets either Red Russian kale (green leaves, pink midveins) or lacinato kale (dark green, pebbled texture). They can be used interchangeably. Super nutritious, this first picking of the year is great cooked or used in raw salads. Storage: Cover and refrigerate.
Daikon radish – For the first time, we grew Korean instead of Japanese daikon. Korean daikon are sweeter and less harsh than the long Japanese types. The Korean daikon can be recognized by their fat, stubby shape. Look at the beautiful purple variety! Everyone gets both purple and white radishes this week. These Asian radishes are good cooked or raw. We often make a sliced radish salad, with Asian-style dressing (rice vinegar, mirin, sesame oil, soy sauce, minced garlic). Even a brief marination mellows the radish’s sharpness, although it’s less necessary with these Korean types. Both Pat and Lauren have given us interesting daikon ideas this week. Storage: Cover and refrigerate.
Greek oregano – We timed the oregano to go with zucchini and garlic scapes. Seems like a good combination! To store your oregano, you can …
– Keep at room temperature in a jar with the cut stems in shallow water. This is good for short-term storage as the flavor fades after a few days. OR
– Wrap in a cloth or paper towel, place in a plastic bag and refrigerate. OR
– Alternatively, you can wash it well then hang it up to dry in a place with good air movement.
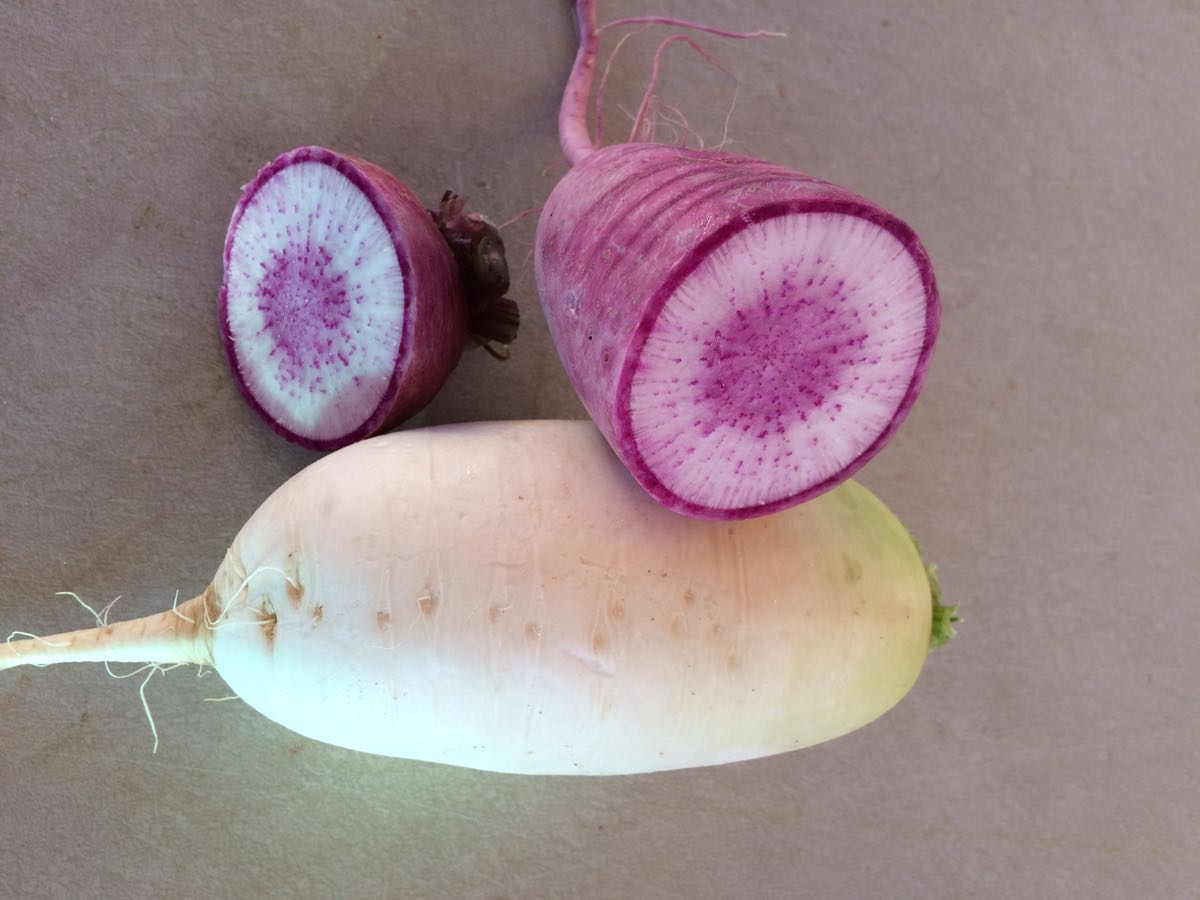
These Korean daikon are beautiful AND milder than usual!
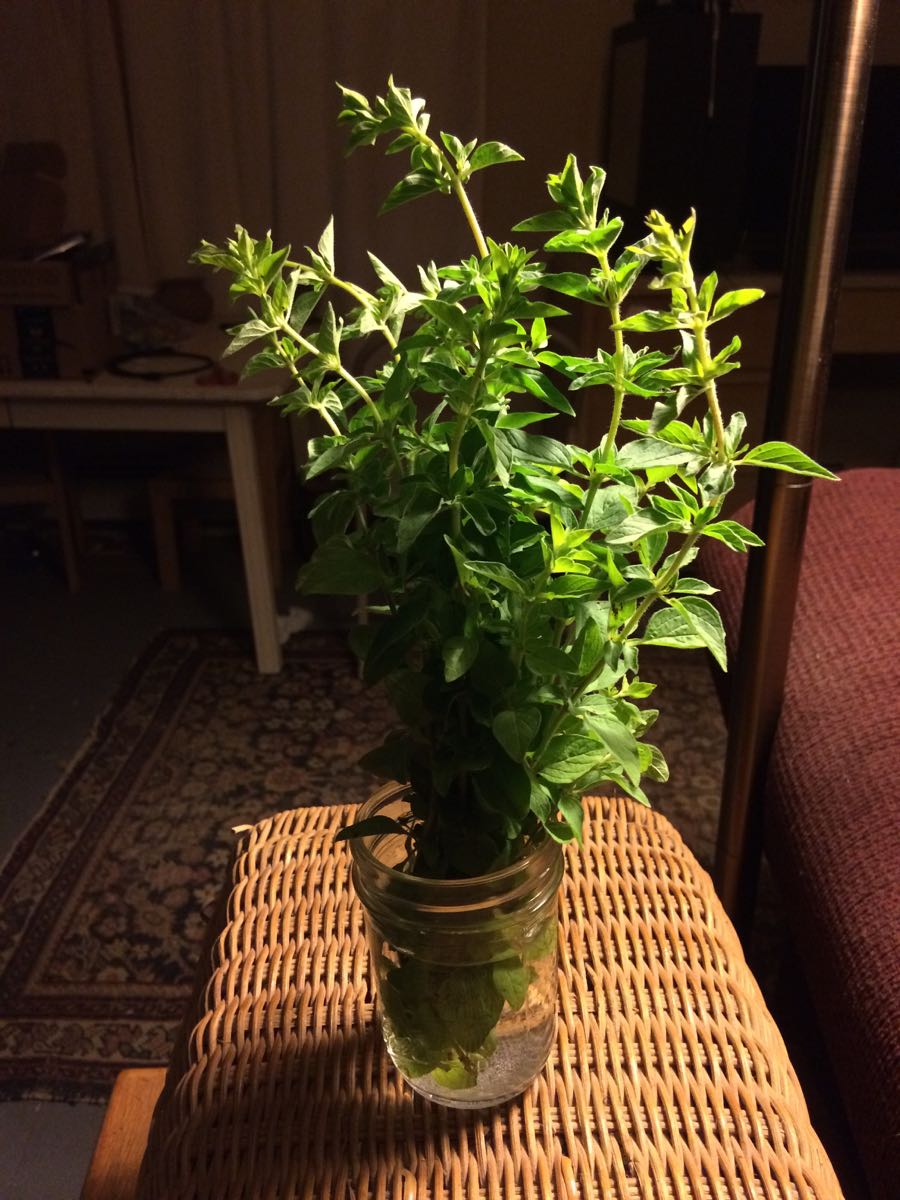
You can store your oregano at room temperature with the cut stems in water. See notes above for other options.
LOCAL THYME RECIPES
Comforting Classics
.
Outside the Box Recipes
.
Quick and Easy Meal
RECIPES FROM LAUREN
PORK, BROCCOLI & SNOW PEA LETTUCE WRAPS WITH PICKLED DAIKON
When I run out of ideas for lettuce, which always happens by late June, I have to get creative. Lettuce wraps are a great solution for when I’m sick of salads but the lettuce is still ultra beautiful and I desperately want to find a way to enjoy it. It’s especially fun if I can fill my lettuce wraps with a bunch of other veggies and top them with pickled veggies. That’s a CSA dream meal! Hope you enjoy! Lauren.
Serves 6-8
Takes 1 hour
2-1/4 cups water
1 cup brown rice
1 tablespoon toasted sesame oil
1 tablespoon olive oil
1 pound ground pork
3 garlic scapes, sliced
1/4 teaspoon Kosher salt
1/4 teaspoon freshly ground black pepper
2/3-3/4# broccoli, stems and florets, roughly chopped into bite-size pieces
1/4 cup tablespoons soy sauce or tamari
2 teaspoons fish sauce (or add more soy sauce or tamari if you don’t have fish sauce)
2 tablespoons maple syrup
1-2 tablespoon sriracha or favorite hot sauce, we used 2 but base it on your own heat tolerance
1 cup cashews
2/3 cup snow peas, stems removed and slicedRed bibb lettuce leaves, for serving
Pickled Daikon:
1/4 cup white sugar
1/2 cup rice wine vinegar
1 tablespoon toasted sesame oil
1 teaspoon Kosher salt
1-1/2# daikon, cut into matchsticks (no need to peel)
- Bring water to a boil over high heat. Add rice, reduce to a simmer, cover and cook for 45 minutes. Turn off heat after 45 minutes but leave the lid on for †an additional 15 minutes.
- Meanwhile, prepare the rest of the meal. To make the pickled daikon, whisk together sugar, rice wine vinegar, sesame oil and salt in a large bowl. Once sugar is dissolved, add daikon. It likely won’t be enough liquid to cover the daikon at first, but give it a good stir anyways. The daikon will release water as they sit there and you’ll wind up with plenty of pickling liquid. Allow to sit for 30-60 minutes, stirring occasionally.
- In a large saute pan (I used my cast-iron skillet), heat sesame and olive oils over medium heat. Add ground pork, garlic scapes, salt and pepper. Cook for 10 minutes until pork is browned. Add broccoli, soy sauce, fish sauce, maple syrup and sriracha to skillet. Cook until broccoli looks tender, about 5-8 minutes. Add snow peas and cashews and cook just for a couple minutes to allow flavors to combine. Add fully cooked rice just before serving.
- Serve a scoop of the rice mixture in a lettuce leaf and top with pickled daikon.
.
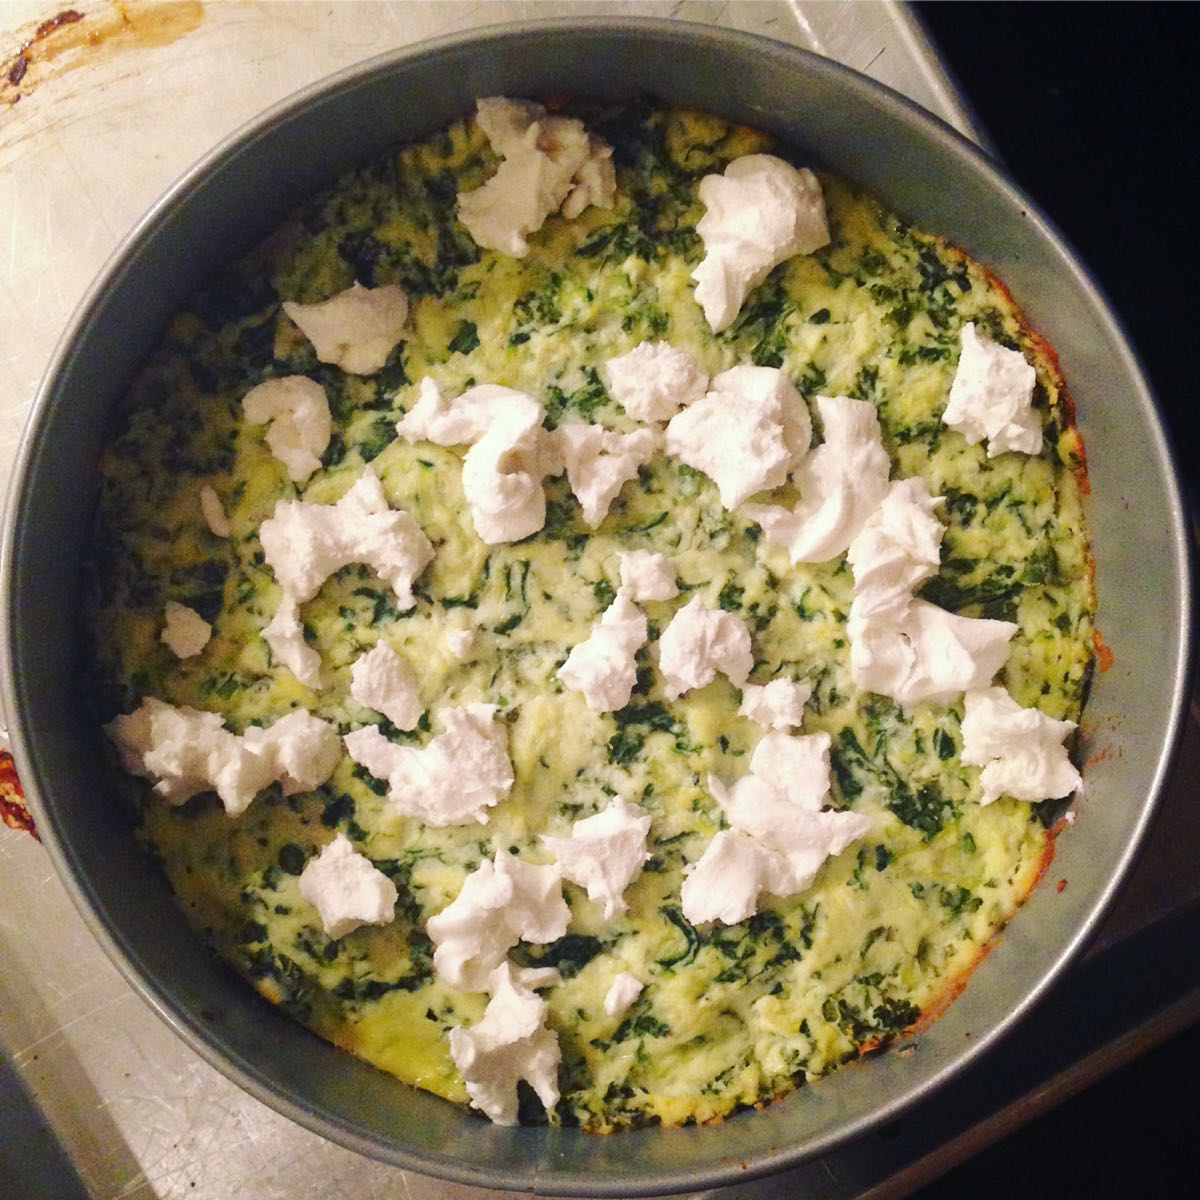
ZUCCHINI & KALE CHEESECAKE
Inspired by 101 Cookbooks
When I came across a recipe for zucchini cheesecake, I couldn’t quite believe it. A savory cheesecake that I can toss veggies and herbs into and serve warm or cold?! A rich hearty dish that’s packed with all my favorite cheeses and can be easily packed up for lunch or for a picnic?! This is a great simple, elegant meal that will surely impress any crowd. Make it for dinner. Make it for brunch. Whatever you do, just make it! Lauren.
Makes an 8-inch cheesecake
Serves 4-6
Takes 2 hours, most of it inactive
2 heaping cups unpeeled zucchini (about 1 large or 2 smaller)
1 teaspoon Kosher salt
3 cups whole-milk ricotta
1/2 cup finely shredded parmesan
2 green garlic, sliced
3 leaves kale, stems removed and torn into bite size pieces
1/4 cup greek oregano, leaves removed and roughly chopped
2 eggs
1/3 cup goat cheese
- Preheat the oven to 325 degrees. Grease an 8-inch spring-form pan. If you don’t have one, a 9-inch pie pan will work fine as well.
- Shred zucchini, toss with salt and place in a colander or fine-mesh strainer or colander. Leave here to drain while you do the next step.
- In a large bowl (or the bowl of your stand mixer), combine ricotta, parmesan, green garlic, kale and oregano. Don’t worry, it should seem like A LOT of kale. Don’t worry, it will cook down while it bakes. Stir to combine. Add eggs and stir until incorporated.
- By now your zucchini should have been draining for 10-15 minutes. Remove from colander and squeeze the water out until about half the original size. You can do this several ways (with cheesecloth, with towels, with a firm spatula in the fine mesh stainer), but I just put it in a ball in my hands and squeezed for about a minute. You don’t have to remove all the liquid. Just a lot of it.
- Add the squeezed zucchini to your ricotta mixture and stir to combine.
- Dump the mixture into your prepared pan and place the pan on a baking sheet (to prevent dripping). Bake for 60 minutes. Remove from oven and dab away any water that has formed on the surface with a paper towel (for me this wasn’t much). Add the goat cheese in crumbles to the top and bake for 35 minutes longer until cooked through.
- Remove from oven, allow to cool slightly and enjoy!
Resilient crew
- On: June 14, 2017
- 0
Our crew deserves a round of applause for their efforts during this hot, hot week. They persevered in good spirits. As one crew member said, “I am so glad to work with people who take their work seriously, and work hard, and enjoy each others’ company.” All this while picking strawberries on a 94o day.
Basically, we have to forge ahead with our farm work during any weather. We try to be strategic, finishing tough jobs early and saving indoor work (like bundling asparagus) until afternoon. More often, the vegetables dictate the work sequence. Delicate crops like lettuce and spinach have to be harvested in the morning while it’s still cool. Here are just a few of the many things the crew accomplished this week.
![]()
They transplanted sweet potato slips, using our 70’s era strawberry planter. We use it twice per year, once for strawberry seedlings, once for sweet potatoes. From left, Kelsie, Kristin, Karen, Michio, Jim, Smitty and Simone (on tractor).
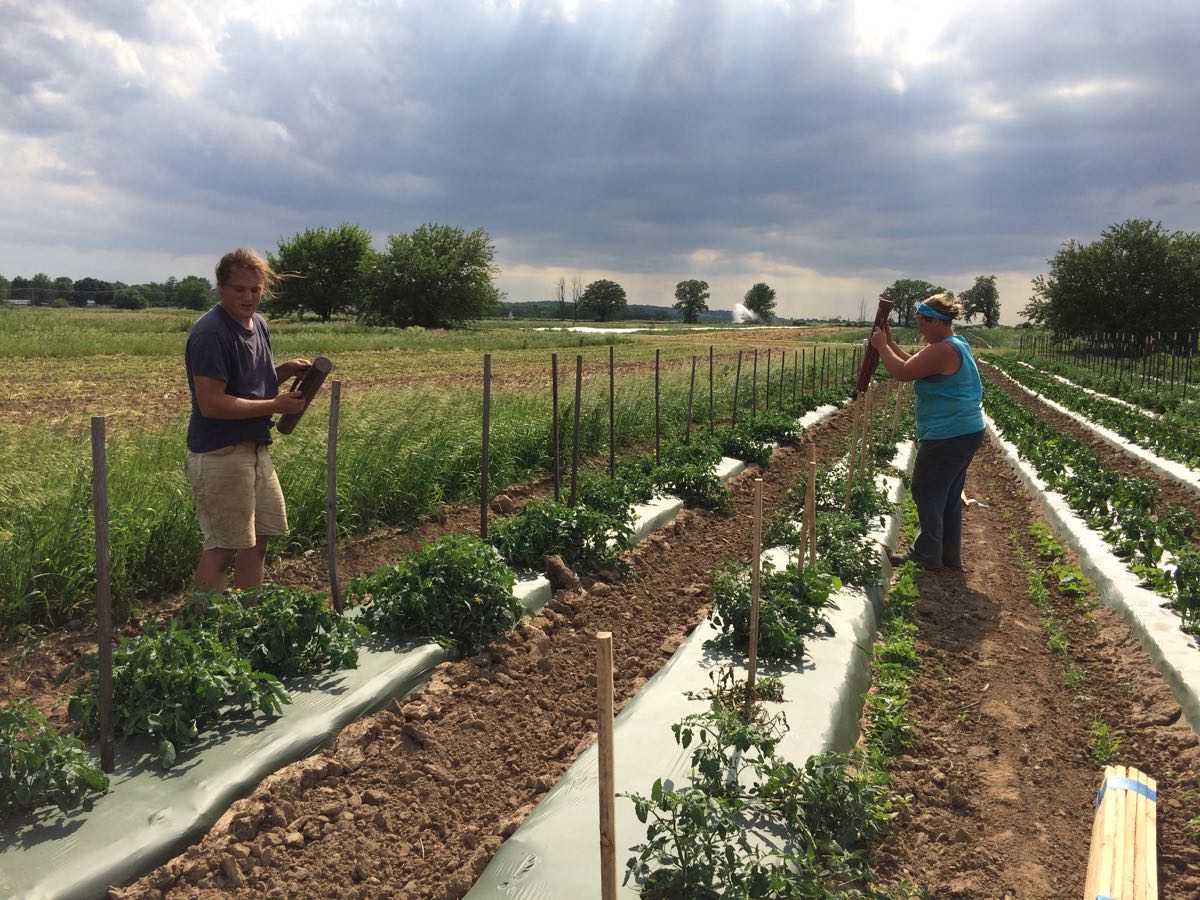
Jory and Maggie (and Billy off-camera) pound wooden stakes in the tomato field. We’ll intertwine string along the posts to support the tomato plants and keep the tomatoes off the ground. This is a very demanding job in the heat but they got it done. You can just see the irrigation running in the distance. Look for a white spurt at the horizon left of Maggie.
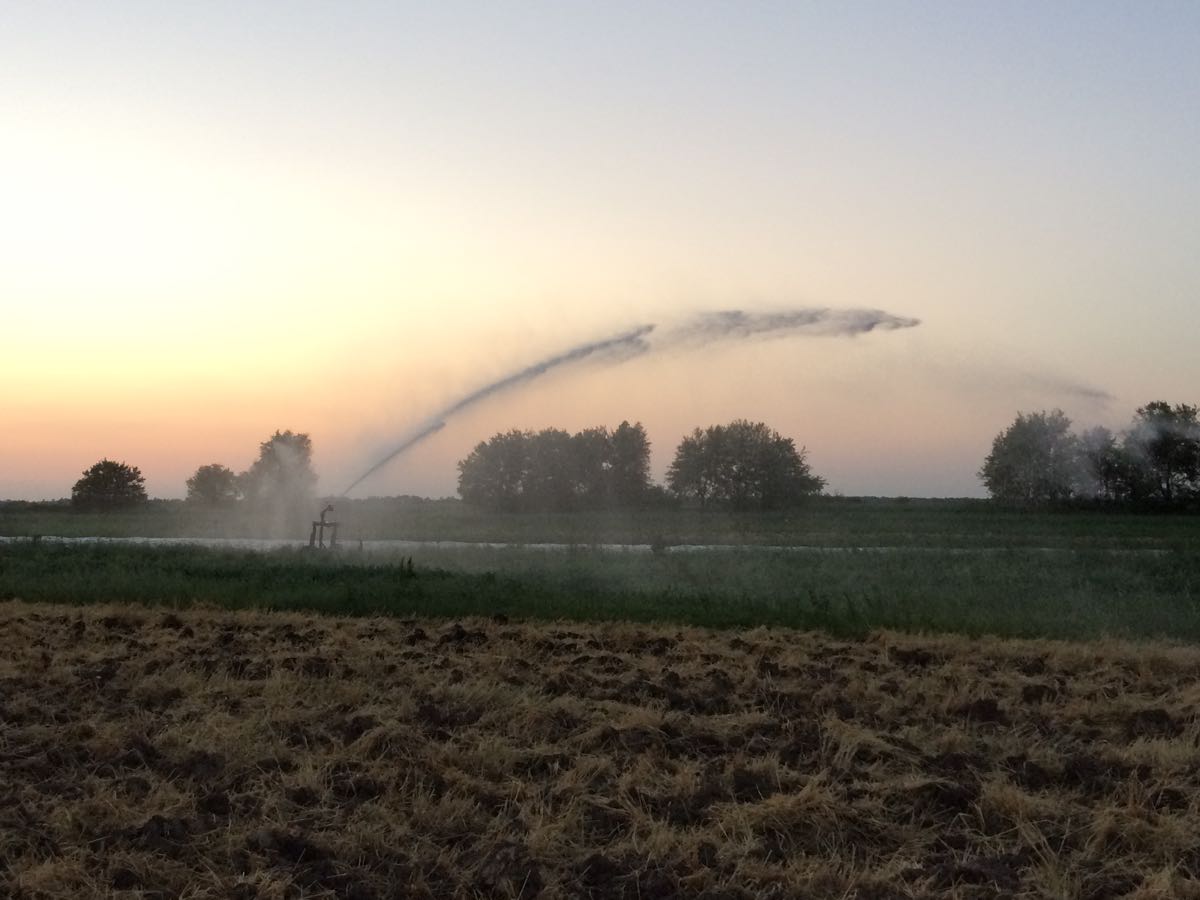
Steve ran the irrigation gun every day this week. All the storms sweeping through the area skipped our farm. We hope for rain but will continue to make our own.
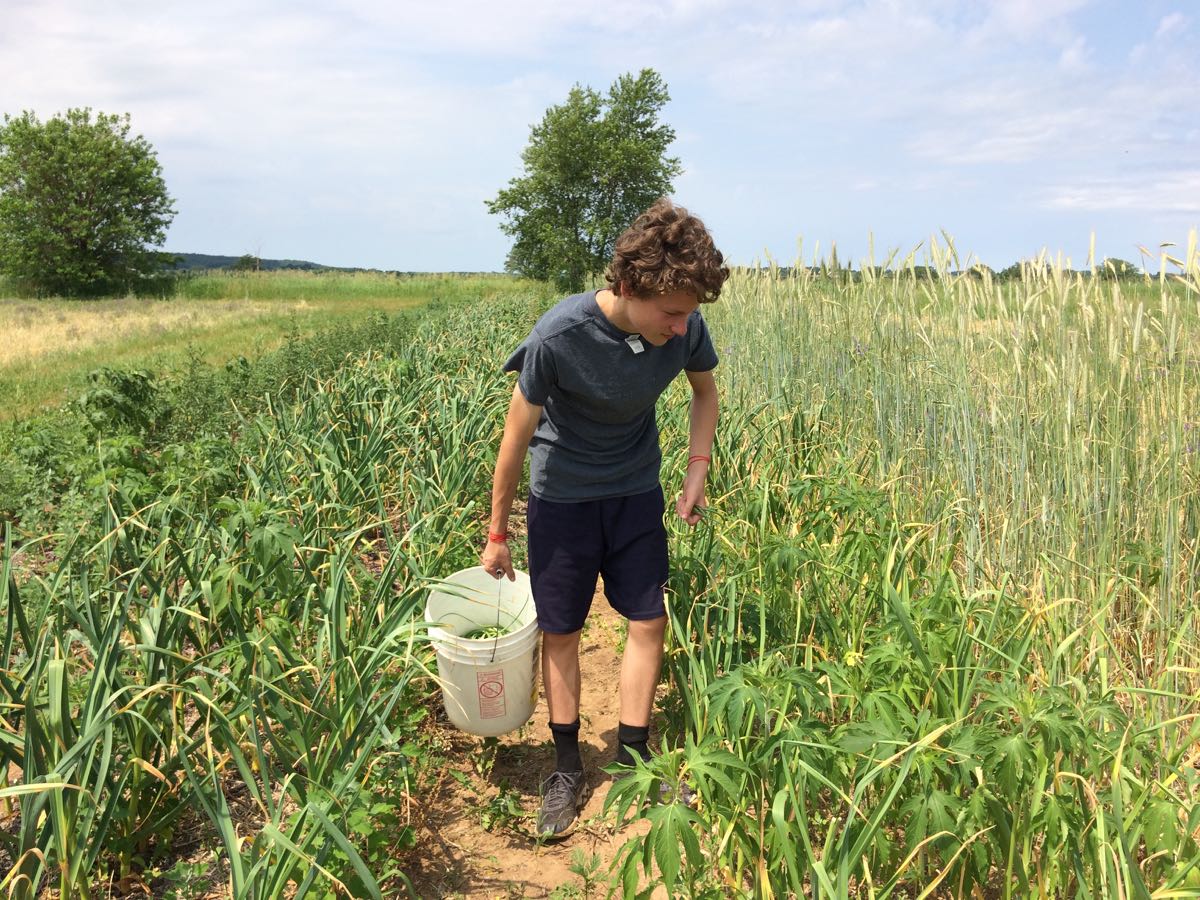
Ari picks garlic scapes, one by one. We count each scape, even though we put the scapes in the CSA boxes by the un-counted handful. The scape count is a good predictor of how many garlic heads we’ll harvest in July so it’s worth the extra effort.
We picked a zillion strawberries this week. They ripened quickly in the heat.
Resilient strawberries
We have beautiful, ripe berries for you this week. Quality and flavor are excellent because of the dry weather. (For strawberries, wet weather = rot.) Eat your berries soon; they are ripe and will not store for long.
Strawberries are not resilient plants. This field appears to be the exception. Throughout it’s life, we repeated thought the planting might be lost. Remember how much it rained last summer and early fall? We couldn’t control the weeds in this field. Steve cultivated and the weeds re-rooted in the next rain. The strawberries re-rooted too, erasing the aisles which delineate the varieties. We mulched and headed into winter not knowing if the plants were strong enough to set flower buds. Come February, freakishly warm weather risked breaking the plants’ dormancy. In spring, we irrigated to protect on frosty nights, as usual. By June, we had a mass of berry plants, long wandered out of their rows but bearing excellent quality berries. It is a happy outcome.
Veggie List and Veggie Notes
(June 15/16, 2017, Week #5, purple EOW & sun sampler)
Strawberries, 1 pt + 1 qt
Asparagus, about 3/4 lb
Broccoli, 1.25 – 1.75 lb
Zucchini, 2+ lb
Kohlrabi, 1 large
Spinach, 1 medium bunch
Red bibb lettuce
Some sites will get …
Garlic scapes, a handful
Scallions, 1 small bunch
Some sites will get …
A larger amount of garlic scapes
Next week’s box will probably contain strawberries, peas, broccoli, zucchini, garlic scapes and more.
Strawberries! – We’ve been waiting for these.
♦ Ripe strawberries are perishable. Ripe berries should be eaten immediately, or stored in the refrigerator. Most berries are quite clean. If you want to clean your berries, rinse gently. Don’t soak them, just rinse.
♦ You will receive two containers of strawberries. Compare the containers, judge which berries are softer and more ripe, and eat those first.
♦ Please recycle your strawberry containers. We no longer collect them for re-use. Please don’t return them to your pick-up site.
Asparagus – This is the final delivery. It’s time to let the plants grow and replenish their enormous underground storage roots, accumulating energy to fuel next spring’s harvests.
Broccoli – Refrigerate in a plastic bag.
Zucchini & summer squash – First pick of the season! Zucchini needs refrigeration but does not do well at very cold temperatures, as it will soften and form pits in its surface. Keep these squash in a plastic bag in the warmest part of your fridge.
Kohlrabi (pale green, round vegetable with thick skin) – Crunchy and sweet, kohlrabi is a great addition to salads.
Storage: Kohlrabi bulbs will store for a month in the refrigerator.
Uses: Kohlrabi are good peeled and eaten out of hand, or added to sandwiches. Mix into lettuce or spinach salads, or prepare as a salad on it’s own. You can grate it, slice it, or cut it into matchsticks. It’s also good cooked. If you have it, the Asparagus to Zucchini cookbook has a long list of kohlrabi suggestions.
Red bibb lettuce – This delicate lettuce came through the hot weather beautifully.
Garlic scapes (curly green things) – Garlic scapes grow at the top of garlic plants. They look like flower buds but are actually clusters of tiny bulblets. We snap off the young scapes to direct the plants’ energy into forming garlic bulbs underground. Use scapes as a substitute for garlic cloves. They can be minced, mixed with olive oil, and added to stir fries or simple pasta dishes. If you have a larger amount, puree with oil to form a pesto to add to pasta or line a pizza. The scapes can be sautéed, but will not brown like garlic cloves. Expect them to retain their crunch even when cooked, and to be milder than garlic cloves, closer in pungency to the green garlic we’ve sent. This week’s scapes are from our friend John Hendrickson of Stone Circle Farm who grows organic garlic bulbs for our CSA. Next week, we’ll deliver scapes from our farm and from John.
LOCAL THYME RECIPES
Comforting Classics
Paprika and Oregano Roasted Kohlrabi
Strawberry Buttermilk Pancakes
Rice Noodle Stir Fry with Broccoli, Spinach and Kohlrabi
Shaved Zucchini Salad with Parmesan Dressing
Outside the Box Recipes
Grilled Zucchini and Kohlrabi Sandwich
Red Bibb and Strawberry Salad
Mediterranean Farro with White Beans and Broccoli
Spinach Salad with Dates and Almonds
Quick and Easy Meal
RECIPES FROM LAUREN
ROASTED ASPARAGUS & GREEN GARLIC FARRO SALAD
My instructions as written are best on a day that is less than 90 degrees (a.k.a. requires you to turn on your oven) which lately seems impossible. If you are wanting to make this right away, you could roast the asparagus and green garlic in the toaster oven (as I did) or just saute them gently for 10-15 minutes until tender. I for one love the texture of roasted asparagus (and green garlic). It will always be my technique of choice, even when not weather appropriate. Lauren.
Serves 4 as a side or 2-4 as a hearty breakfast with a fried egg on top
Takes 45 minutes
2 tablespoons olive oil
3/4 pound asparagus
3 garlic scapes
1-1/2 teaspoons Kosher salt, divided
1/4 teaspoon freshly chopped black pepper
1/4 teaspoon red pepper flakes
1 cup farro
2 cups chopped spinach
Fried eggs, for serving
1. Preheat your oven to 400 degrees.
2. Once preheated, drizzle baking sheet with olive oil. Add asparagus and garlic scapes, along with 1/2 teaspoon of the salt and all of the pepper and red pepper flakes. Roast for 20 minutes, tossing after 10 minutes to cook evenly.
3. While the asparagus and scapes roast, bring a large saucepan of water and 1 teaspoon Kosher salt to a boil.
4. Meanwhile toast your farro in a large saute pan for 5 minutes until it browns slightly and begins to smell nutty. Add the farro to your boiling water and simmer gently for 12 minutes. I always cook farro like pasta for the best success. It will be perfect and tender everytime (without getting mushy). Drain after 12 minutes and return to pot. Stir in spinach while farro is still warm and stir just to wilt.
5. Remove asparagus and scapes from oven and preheat to 500 degrees. Roast 5-10 minutes longer until charred and a little crispy in spots. Remove from oven and dice asparagus into bite-size pieces. Slice scapes into little coins. Toss asparagus and garlic scapes with farro to combine.
6. Eat the farro and veggies as is or serve with fried eggs for a more complete meal.
.
THE BEST BROCCOLI SALAD
I love broccoli salad. I didn’t grow up liking it very much (or even understanding it really), but man oh man, do I love it now. It is the first thing I make every year when I receive the first broccoli of the season. This recipe uses other items in your box but can be easily customized with onions, shallots, regular garlic, green garlic or any other allium you have on hand if you don’t have scallions in your box. The addition of kohlrabi also isn’t required (but I love it!). My mom used to make it with pieces of bacon (which you should totally try if you aren’t vegetarian and have never had it that way!). You can use Greek Yogurt instead of the mayo or buttermilk (or both!). You can change up the nuts. Leave out the dried fruit if that isn’t your thing. This is a very versatile salad so feel free to play around with it. Hope you enjoy! Lauren.
1/2 cup diced pecans
1 head broccoli, stem removed, florets cut into bite-sized pieces
1 large kohlrabi, peeled and diced
1 bunch scallions, sliced (you can use all of it, white and dark green parts)
1/2 cup dried cranberries
Dressing:
1/2 cup buttermilk
1/2 cup mayonnaise
2 tablespoons apple cider vinegar
1 tablespoon sugar
1/2 teaspoon Kosher salt
1/4 teaspoon freshly ground pepper
1. In a large saute pan, toast pecans (or whatever nut you decide to use) for 5-10 minutes until browned and smelling really delicious.
2. In a large bowl, combine broccoli, kohlrabi, scallions, dried cranberries and toasted nuts.
3. In a small bowl (or Mason jar with a lid that will be shaken) combine all dressing ingredients and whisk (or shake) until well-combined. Pour over veggies and stir to combine. It takes the veggies a little while to soak up the dressing so try to make it an hour ahead or the day before.
Week #4, June 8 2017
- On: June 07, 2017
- 0
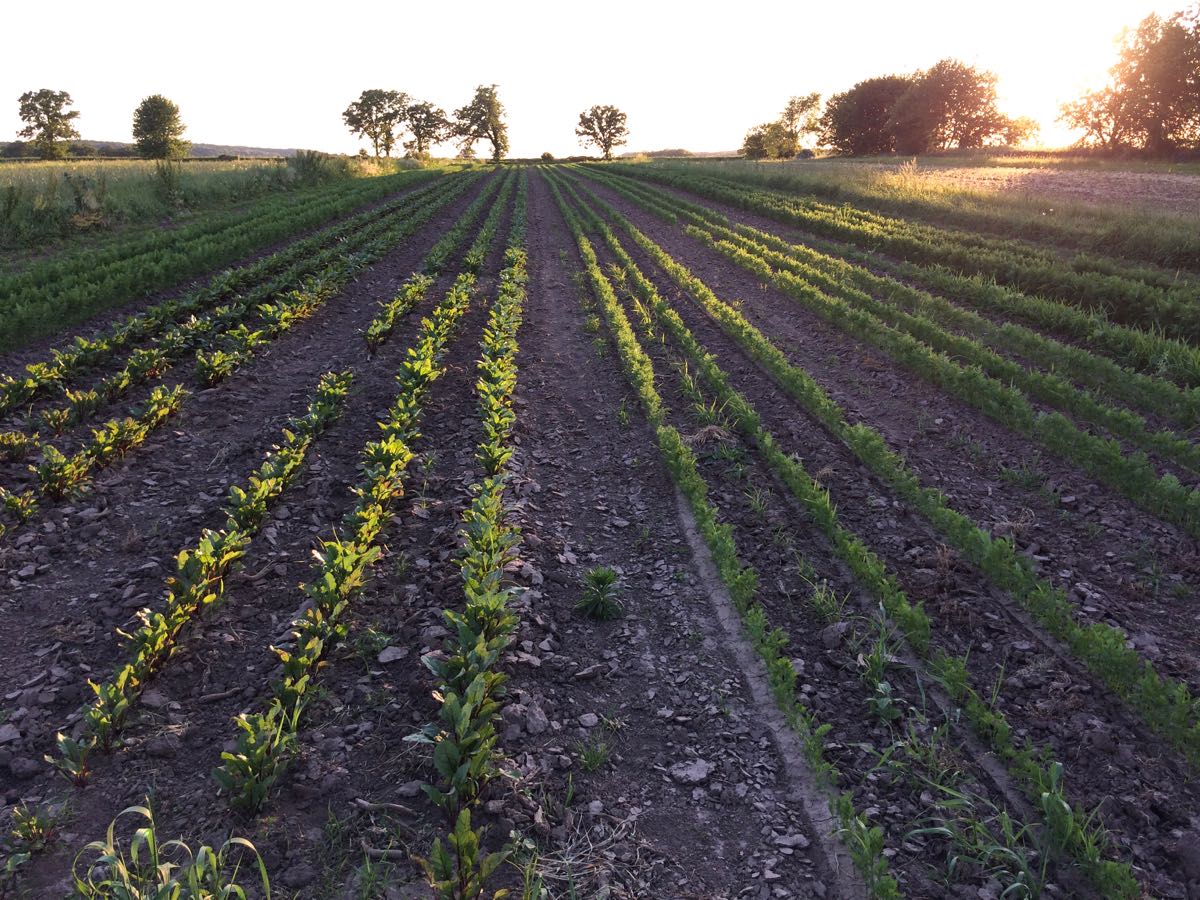
A beet and carrot field in the evening sun.
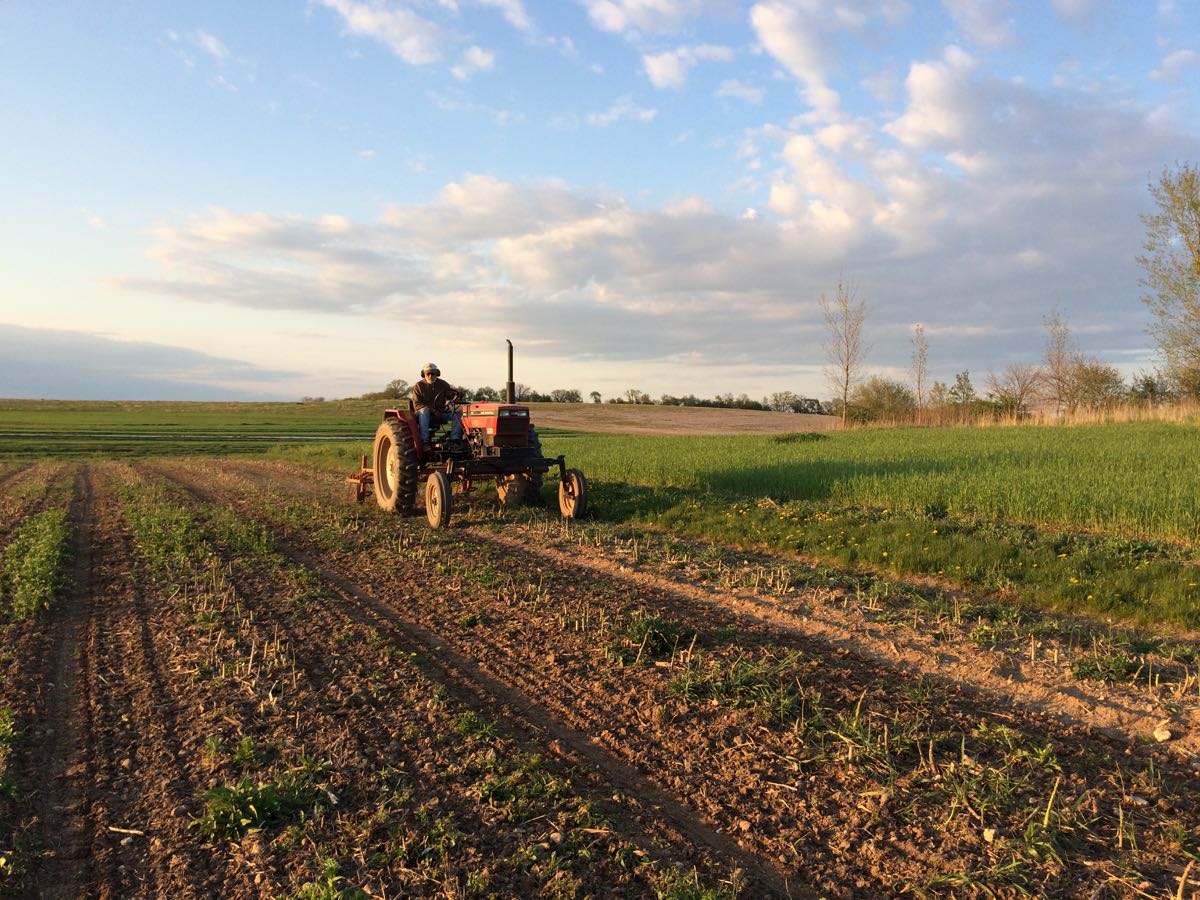
Steve is committed to better weed control this spring. Weeding tends to get neglected during the spring hustle to get crops in the ground. This year, we’ve got new cultivating tools, more employees with tractor cultivation experience, and a stronger commitment to putting the weeding first on the schedule. If left to the end of the day, it doesn’t get done. We’ve even got a new Dutch harrow on the way to the farm. We’ve had mixed experiences importing machinery from Europe so let’s all keep our fingers crossed here are no hitches.
Beginning last year, we stopped growing spring lettuce for our wholesale customers (Willy Street, Outpost, Basics, etc) in hopes the change would free up more time to get our spring crops established. We plant most of your CSA vegetables during the months of May and June, so it’s a very important period. Blink and you can lose a field to weeds. The change did not go as planned last year. Steve was still recovering from a bike accident the previous fall. His energy was low and he didn’t keep the farm organized and running on a schedule. He’s much improved this spring and our whole farm is functioning better. The result is pretty fields like in the photo. Beth
Veggie List and Veggie Notes (week#4, June 8/9, 2017)
Napa cabbage
Spinach, 1st big bunch
Spinach, 2nd big bunch
Asparagus, about 1 lb
Red Romaine lettuce (some sites get red bibb)
White salad turnips, 1 bunch
Radishes, 1 bunch
Red scallions, 1 bunch
Next week’s box will probably contain strawberries, asparagus, spinach, lettuce, scallions, garlic scapes and more.
Napa cabbage (large, pale green cabbage with crinkled leaves) – This week’s napa average 2.75 lb in size. This is an interesting vegetable, useful for both fresh, raw salads and for cooking. Napa’s most famous use is fermented kimchi. I like to prepare a fresh, unfermented kimchi. Same seasonings, but it’s ready to eat right away. You will be amazed at how much shredded napa cabbage shrinks when prepared this way. See here for an example, but cut the salt in half: Grilled Flank Steak with Kimchi-style Coleslaw.
Storage: Napa stores very well. Cut off wedges as needed and keep the rest covered and refrigerated, and it will keep for several weeks. Peel off the outer layer and it will be ready to use. Here are a few preparation ideas from the ‘Asparagus to Zucchini’ cookbook.
– Chop raw napa into green salads.
– Substitute napa in traditional coleslaw.
– Chinese cabbage cooks quickly. Steam 3-5 minutes, or until leaves are wilted down but remain slightly crisp.
– Substitute napa cabbage for common cabbage in recipes, but reduce the cooking time by 2 minutes.
– Napa cabbage is the main ingredient in egg rolls. Try making an egg roll mixture to eat as a cooked side dish instead of preparing time-consuming egg rolls.
Spinach – That’s not a typo; you will receive two bunches of spinach this week. We are sharing lots this week while it is lush and abundant. Total combined weight for the 2 bunches will be about 2 lb. This is a good week to try cooked recipes, as spinach shrinks substantially when cooked.
To freeze; Frozen spinach is so useful – add to lasagne, casseroles, quiches, soups. Spinach needs blanching before freezing. Wash well, chop coarsely, and place in a large pot with 1 inch of water in the bottom. Steam until the color changes, stirring a few times. Turn off heat, return cover to the pot, wait a few minutes and stir again. The residual heat will finish the cooking. The spinach should be completely collapsed. Cool, then pack into containers. Choose a container sized to the amount you will want to thaw later.
Asparagus – Some of you will get very short asparagus this week. The asparagus field needs weeding midway through the harvest season. We pick the field very short, then mow down the weeds. It’s a quick fix that lets us keep picking for another week or so. Once the weeds get too tall we can’t find the asparagus spears. We’ll do a more thorough weeding once the harvests are finished.
Salad radishes – Uses: Traditionally, radishes are sliced thinly and added to salads. If you dislike radish spiciness, slice and toss with salt in a bowl. Let sit for 10 minutes, then rinse. Radish sandwiches on buttered bread are surprisingly good. I first enjoyed them as part of an appetizer platter at the Coopers Tavern. This recipe uses too much butter but you’ll get the idea. All you need are good quality radishes, good quality bread and good quality butter. Don’t forget the salt.
Storage: To store, cover and refrigerate. To maximize the life of your radishes, remove and discard the greens.
Red scallions – Steve tried this variety just because they are pretty. Use like normal scallions. We don’t know yet if the color will change with cooking but we’ll find out soon with a batch of scallion biscuits. That’s a spring favorite in our household.
RECIPES
See the RECIPE LOG for recipes from previous weeks. There are dishes for asparagus, spinach, lettuce, scallions, turnips, and radishes that might be useful with this week’s produce.
Local Thyme Recipes
Comforting Classics
Turkey or Hummus and Radish Wraps with Spinach Pesto
Seared Sesame Asparagus
Chinese Cabbage Salad with Radish and Crispy Ramen Noodles
Marcella’s Slow Cooker Stuffed Cabbage Rolls
Outside the Box Recipes
Chicken Valdostana Over Braised Lentils
Grilled Pizza with Fig, Asparagus and Scallions
Warm Napa Cabbage Slaw with Dill
Chinese Tofu or Chicken and Cabbage Noodle Soup
Quick and Easy Meal
Salmon with Shaved Asparagus and Radish Salad
Recipes from Lauren
CRUNCHY NAPA CABBAGE & PEANUT RICE BOWL
Adapted from Bon Appetit magazine
Now this, this dish serves a crowd. It’s a great vegan, gluten-free (if you use the tamari instead of the soy sauce) dish to bring to a party or to make on a Sunday to have in your fridge for lunches all week long. Napa cabbage and peanut sauce is one of my absolute favorite combinations. I hope you enjoy!
Takes 1 hour
Serves 8-12 (even more if eaten as a side dish only)
4-1/2 cups water
2 cups brown rice
1 teaspoon Kosher salt
1 head Napa cabbage, cleaned and thinly sliced (I slice the white stem and green leafy portion together)
1 bunch radish, greens removed, cut in half and thinly sliced
1 bunch turnips, greens removed, cut in half and thinly sliced
1 bunch scallions, sliced (you can use all of the scallion, whites, pale green and dark green portions)
Roasted peanuts, chopped, optional
Warm Peanut Sauce:
1 cup creamy peanut butter
3/4 cup coconut milk
2 tablespoons brown sugar
2 tablespoon soy sauce or tamari
Juice from 1 lime (or 2 tablespoons lime juice)
1 tablespoon fish sauce
1/2 teaspoon red pepper flakes
Kosher salt
1/4 cup water
- Bring water to a boil in a large saucepan on the stove top over high heat. Once boiling, add rice and salt and reduce heat to low. Cover and cook for 50 minutes (or less, depending on your type of rice; read the package directions).
- While the rice cooks, prepare your veggies. In a (seriously really) large bowl, toss napa cabbage, radishes, turnips, and scallions together. Add a pinch or two of sauce and toss veggies so evenly distributed. Set aside.
- When the rice has about 10 minutes left to cook, begin the sauce. Combine peanut butter, coconut milk, brown sugar, soy sauce or tamari, lime juice, fish sauce and red pepper flakes in a large saucepan. Whisk together until smooth. Place on stove and turn heat to medium. Add a pinch of salt and water. Whisk until smooth and hot. You will want the dressing to be warm to wilt the greens.
- Serve in a bowl with the ratio of about a 1/2 cup of rice and 2 cups of veggies. Pour 2-3 tablespoons of peanut sauce over the greens and toss gently to coat. Add peanuts if you like. (I didn’t use them but could see how they’d add a great crunch).
.
SHAVED ASPARAGUS & SPINACH CAESAR SALAD
If you have never before shaved asparagus you are in for a real treat. The thin ribbons can be tossed into things like pasta or quiches. I also love it on pizza ala Smitten Kitchen. But I especially love shaved asparagus raw. It has a wonderful texture and adds a lot to simple salads. With the red romaine, this salad will be a vibrant and beautiful dish to serve alongside any meal.
Please note for this recipe, you will be making Caesar dressing from scratch. If that’s not your thing and the word emulsify scares you, feel free to buy a high quality Caesar (it will likely be in the refrigerator section of your grocery store) and use that instead. If you plan to make the dressing, but are freaked out by raw egg yolk, you can substitute 2 tablespoons of mayonnaise instead. Lauren.
Beth’s note. We don’t eat raw eggs in our house. Use bottled dressing, or Lauren’s mayo substitute, or buy pasteurized eggs at the grocery store. If you hunt around online, you can find food scientist Harold McGee’s method to pasteurize egg yolks in the microwave.
Takes 30 minutes
Serves 4-6
1 pound asparagus
1 pound spinach, chopped
1 head red romaine, roughly chopped
1/2 cup finely grated Parmesan
4 cups croutons, store-bought or made from scratch
Caesar Dressing:
Juice of 1 lemon (or 2-3 tablespoons)
1/2 teaspoon garlic powder (or 2 teaspoons minced green garlic if you have some leftover)
1 teaspoon Kosher salt
1/2 teaspoon Worcestershire sauce
2 large egg yolks
5 tablespoons vegetable oil
5 teaspoons extra-virgin olive oil
1/2 cup finely grated Parmesan cheese
1/2 teaspoon freshly ground black pepper
- Shave your asparagus! You will do this with a standard vegetable peeler. It works best for me when I lay the asparagus close to the edge of the counter. One hand holds the crown of the asparagus to keep it from moving and the other holds the peeler shaving off ribbons until about half of the asparagus is gone. Then I flip over the asparagus and continue until the peeler can’t go any further. You will have uneven pieces but that’s totally fine. Feel free to snap any larger pieces in half. This process is a little tedious so once you get the hang of it, you can do two or three pieces of asparagus at a time to speed things up.
- Toss the asparagus into a bowl with the lettuce and spinach.
- Now prepare you dressing. Whisk two tablespoons of lemon juice and garlic together in a large bowl. Let sit for 5 minutes. Add Worcestershire, salt and egg yolks into lemon mixture. Slowly whisk in each batch of oil until well-incorporated. Start slow, drop by drop, then start adding more at a time, consistently whisking throughout the additions. You are looking to emulsify the dressing (this means the oil and vinegar will no longer be separate and the mixture will become thick, creamy and glossy as you whisk). Add the Parmesan cheese and pepper, whisking again to combine. Taste and adjust seasonings by adding more salt, pepper or lemon juice.
- Toss the asparagus and greens with the dressing. Or, if you don’t plan to eat it all tonight, toss just as much of the veggies with dressings as you plan to eat. Top with a dusting of Parmesan and the croutons. Feel free to add chicken breast or an egg to make it a complete meal.
.
Entertaining visitors
- On: May 31, 2017
- 0
Our weekend was devoted to entertaining visitors, in both meanings of the phrase. Sophie’s graduation and party were big successes. Our families extended their visit so we brainstormed ways to entertain our urban (Steve) and suburban (Beth) relatives and show them a bit of Wisconsin life. Keep these ideas in mind next time you have visitors.
Green County Dairy Breakfast
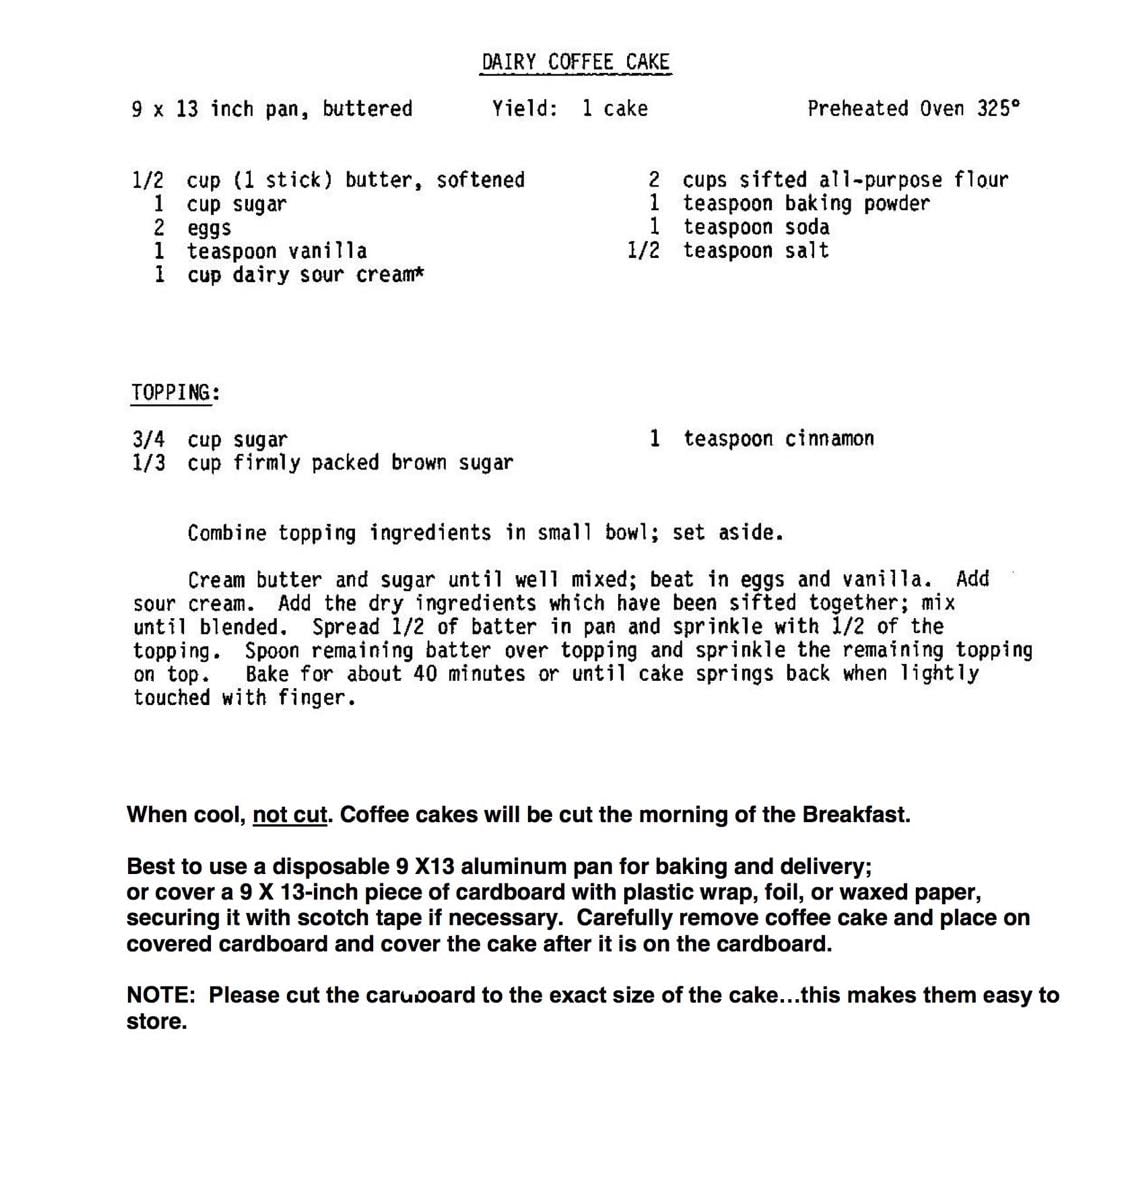
The annual dairy breakfast was just down the road this past weekend. It’s a slice of Wisconsin life: breakfast, farm tours, arts & crafts, antique tractor displays, petting zoo, educational stations and a live band. I assured Steve’s bachelor brother that all the local dairy queens would be in attendance. Breakfast was eggs, sausage, cheese, coffee cake, orange juice, coffee, and strawberry sundaes. Local families contribute homemade coffee cake, all using the same recipe and dropping their cakes off at local banks in Albany or Monticello for collection.

It was a beautiful day (finally) so turnout was good.

Instead of a sandbox, there’s a box filled with shelled corn. Those kids went home with pockets, underwear and hats filled with kernels.

Steve’s brother Nate with the calves.
Below is the coffee cake recipe used by the volunteer bakers.
Explore a State Natural Area (SNA)
Wisconsin has amazing State Natural Areas, “outstanding examples of Wisconsin’s native landscape of natural communities, significant geological formations and archeological sites.” The DNR’s Wisconsin Natural Resources magazine features a tempting photo of a different SNA on the back of each issue. Of course this lovely self-funded magazine is on the chopping block. Subscribe today. My favorite SNA is Muralt Bluff, just 20 minutes west of our farm. It is short-grass prairie, up on a ridge that just escaped the glacier’s edge 10,000 years ago. The density of native plants is remarkable. My mom turned 80 the day after our hike so I am very proud of her and my dad for getting up on the bluff.

From front, my aunt Cathy, father Jack, mother Rose and uncle Tom.
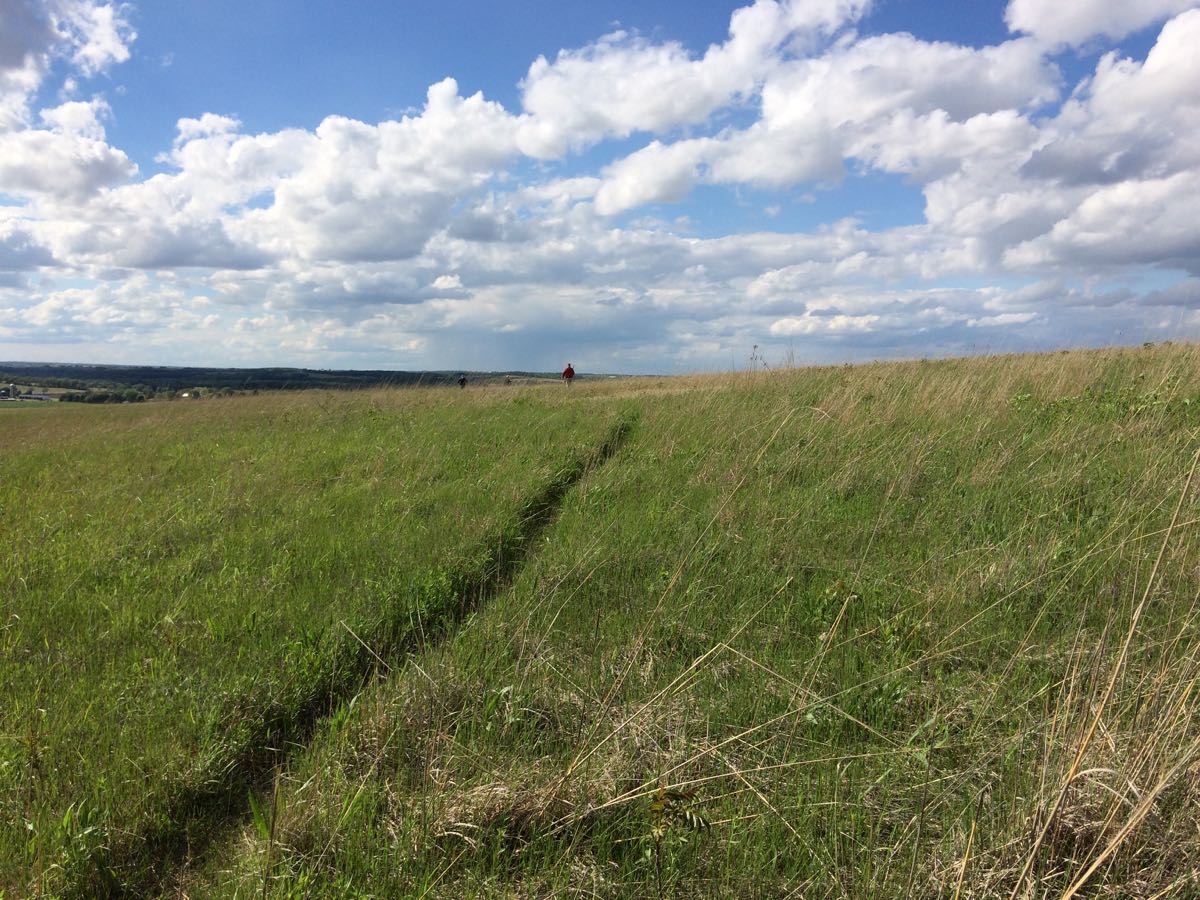
As my mom said, it seems like we’re closer to the clouds up on the bluff.
Beth
June 1 checks
Many of you paid us with checks post-dated to June 1. We will deposit those checks next week, on June 5 or 6.
Veggie List and Veggie Notes
This week’s produce will be much less muddy than last week but still needs careful washing, a remnant of rains over the past few weeks. However, it is much better than last week. Sampler share members, we provide detailed information about a vegetable the first week we pack it in the CSA boxes. Review the previous newsletters for this info.
Asparagus, 0.9 lb
Escarole
Portobello mushrooms, about 8 oz
Spinach, 1 bunch
Red bibb lettuce
White salad turnips, 1 bunch
Salad radishes, 1 bunch
Scallions, 1 bunch
Green garlic, 1 bunch
Next week’s box is likely to contain asparagus, napa cabbage, spinach, lettuce, scallions and more.
Escarole (large head of wavy green leaves) – This member of the chicory family can be eaten raw or cooked. Its slightly bitter flavor is a good addition to mixed salads. It is excellent cooked alone or mixed with other greens. It cooks quickly, but not as quickly as spinach. Cover and refrigerate.
Portobello mushrooms – These beauties are from Mary at Hidden Valley Mushrooms in the Wisconsin Dells. We will pack them in brown paper bags. Mary says to store them in your fridge in the paper bag. Eat soon; they are fresh, lovely and perishable.
Red bibb lettuce – This is my favorite type of lettuce. Bibb lettuce is tender and yummy. Handle gently. Enjoy.
Scallions (bundle of green onions) – These are useful raw or cooked. Thinly-sliced raw scallions can be folded into biscuit dough or sprinkled on top of soups or salads. Terrific garnish for pasta dishes. Think pad thai. We will send both scallions and green garlic so see photo below.
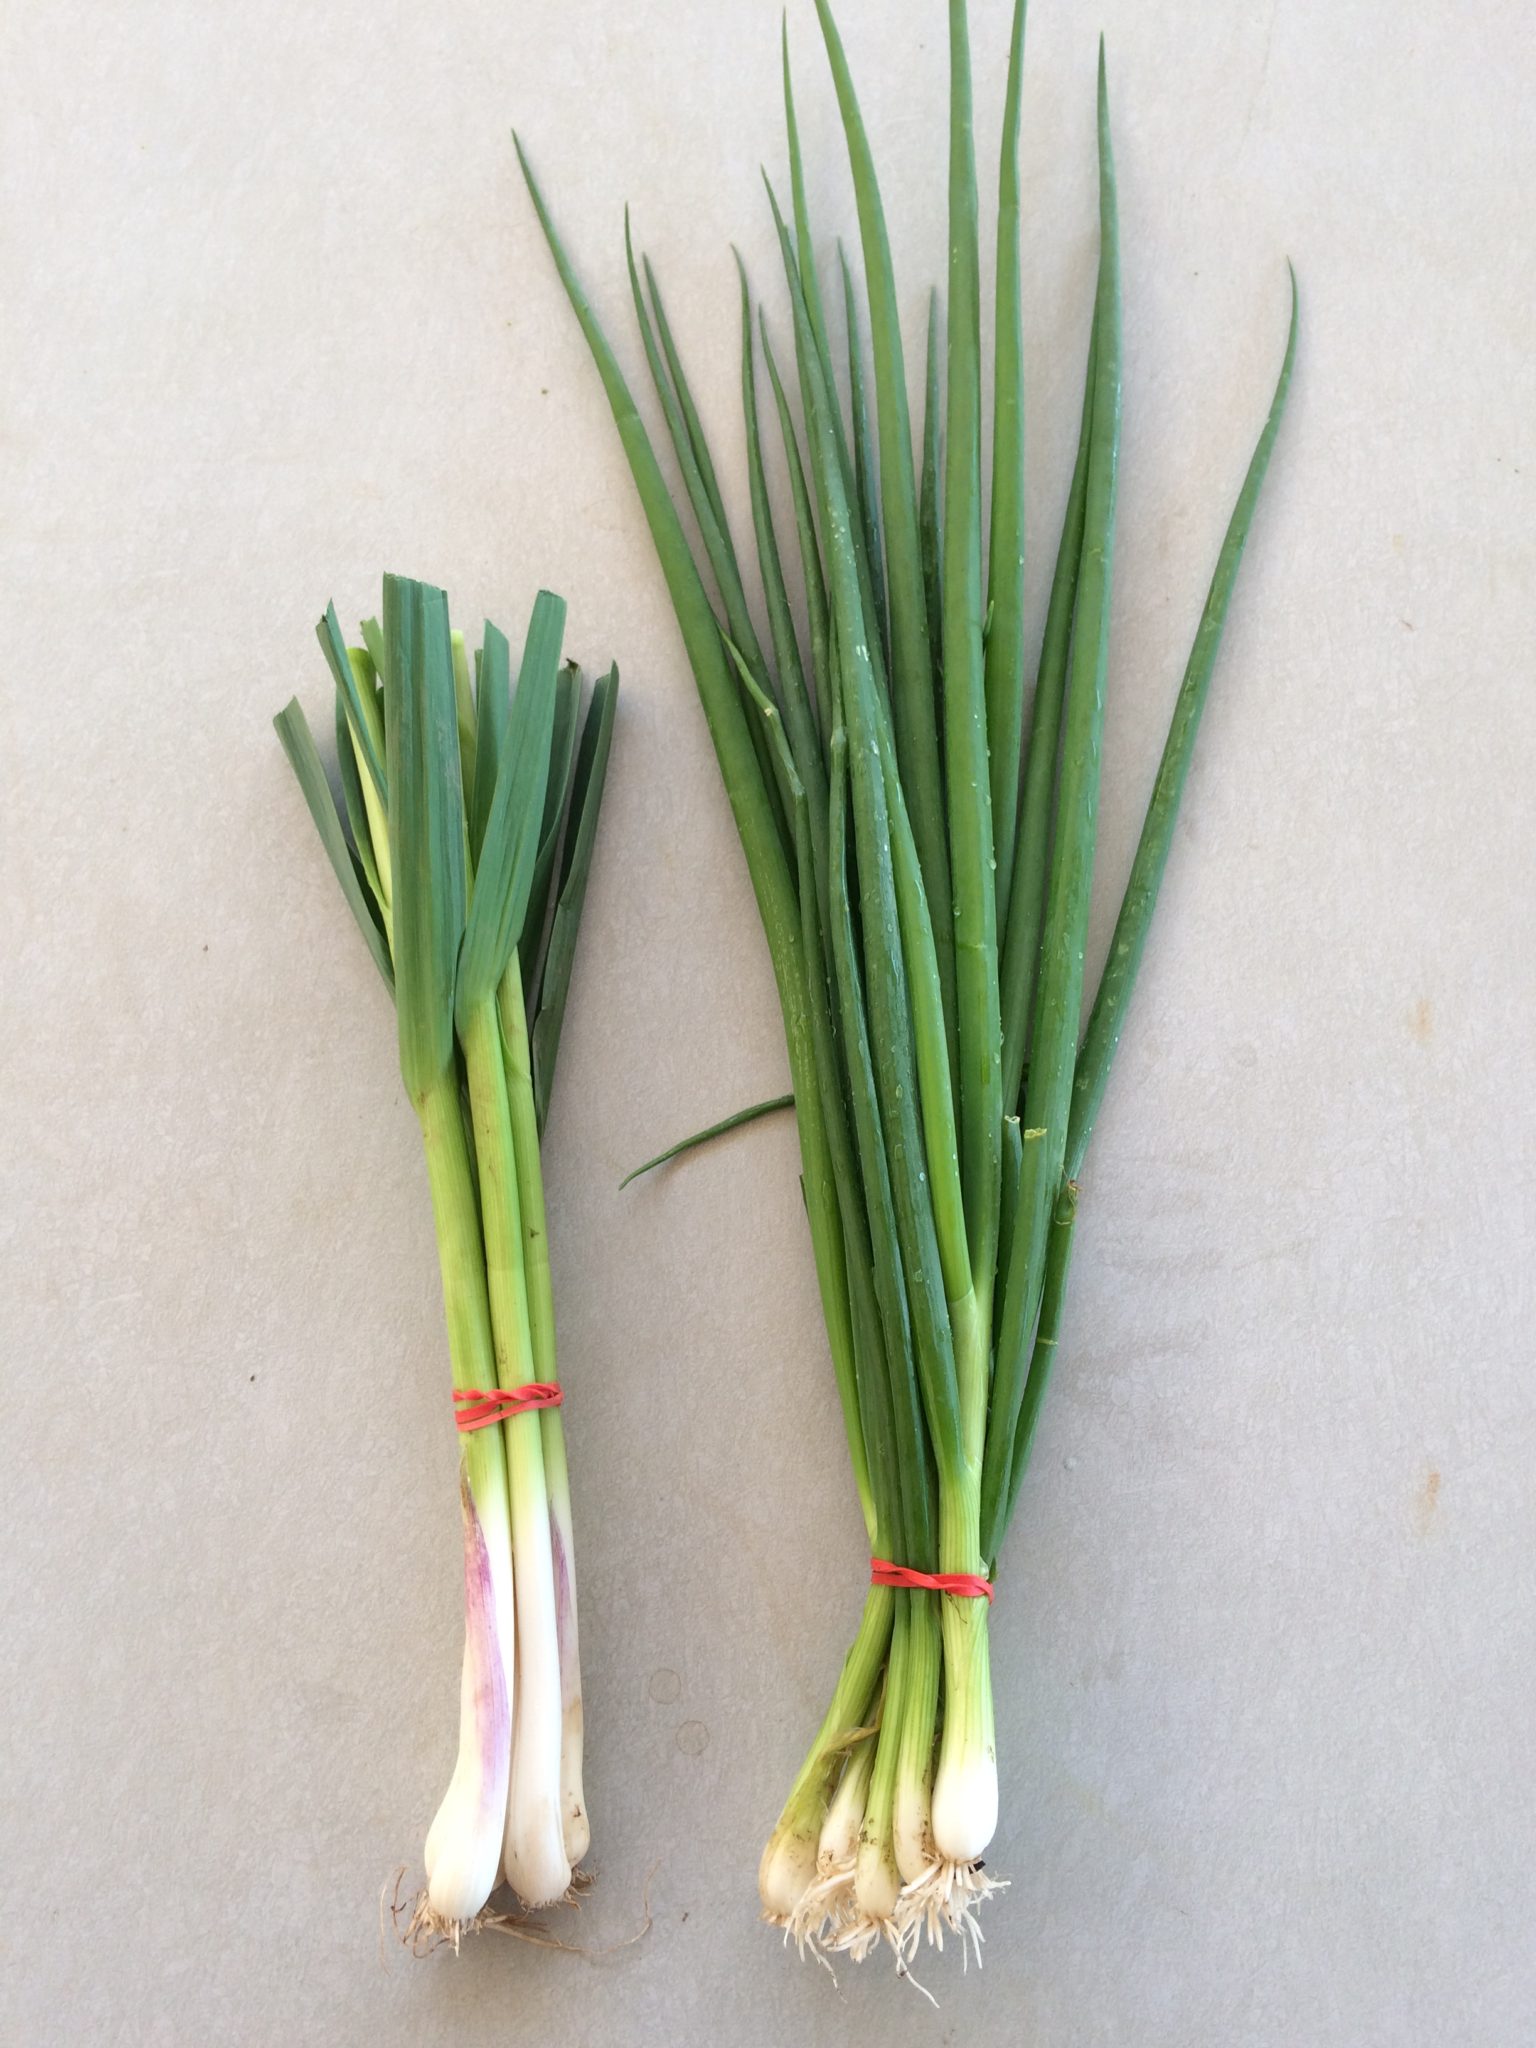
Green garlic (left) and scallions (right) look so much alike! Distinguish them this week by whether the leaves are trimmed (green garlic) or untrimmed (scallions). They smell very different too. However, it’s not a crime if you interchange them in recipes. The green garlic leaves are increasingly fibrous; use just the white and pale green sections. You can use scallions all the way to the tips.
RECIPES
See the RECIPE LOG for recipes from previous weeks. There are dishes for asparagus, spinach, mushrooms, lettuce and radishes that might be useful with this week’s produce.
Local Thyme Recipes
Comforting Classics
Braised Escarole
Grilled Chicken, Radish and Turnip Salad with Scallion Vinaigrette
Mushroom, Spinach and Fontina Lasagna
Soy and Butter Braised Salad Turnip with Spinach
Outside the Box Recipes
Escarole and Semolina Soup
Radish, Turnip and Smoked Trout Salad with Wasabi Vinaigrette
Beans, Radish, Turnip and Spinach Enchiladas
Quinoa Salad with Radishes, Salad Turnips, and Green Garlic Dressing
Quick and Easy Meal
Thai Red Curry
Recipes from Lauren
PORTOBELLO, GREEN GARLIC & SPRING GREENS LASAGNA WITH WHITE SAUCE
Inspired by the great Ina Garten
If you want to use your spinach or escarole for another use, feel free to just toss one of these greens into this lasagna. It won’t change the end result too substantially. If you have extra turnip greens or arugula from last week, they could be substituted as well.
Takes 1 hour, 30 minutes
Serves 6-8 depending on your appetite
Kosher salt
12 tablespoons butter, divided
1/2 cup flour
4 cups warm milk (whole preferred, but 2% will work fine), I throw mine in the microwave for 60†seconds to warm it
Freshly ground black pepper
3/4 pound dried lasagna noodles (or 12 noodles)
2 green garlic, white and light green parts only, minced
1/2 pound portobella mushrooms, cleaned, stems removed, and sliced 1/4-inch
1 bunch spinach, roughly chopped (about 2-3 cups)
1/2 head escarole, roughly chopped (about 3 cups)
1/4 cup water
1-1/2 cups freshly shredded Parmesan
- Preheat the oven to 375 degrees.
- Bring a large pot of salted water to a boil.
- While waiting for the water to boil, begin your white sauce. Melt 8 tablespoons of butter in a large saucepan over medium low heat. Once fully melted, add the flour and stir constantly with a whisk for 1 minute. Pour in the warm milk, 1 tablespoon Kosher salt, 1 teaspoon black pepper and†whisk consistently for 15-20 minutes, scraping the bottom and edges of the pan occasionally, or until mixture is thickened. Remove from heat.
- By now, your water is likely boiling. Add the lasagna noodles and cook for 10 minutes or until al dente. Strain, toss with olive oil in colander and set aside.
- Meanwhile, melt remaining butter in a large saute pan over medium heat. Add green garlic and saute for 3-5 minutes until fragrant. Add mushrooms and sprinkle with salt and pepper. Cook for about 3 minutes until just beginning to release their juices. Add the greens and water and cook until wilted, about 5 minutes longer. There will likely be a lot of liquid in the pan. That’s fine.
- In a 9×13-inch pan, begin to layer the lasagna. First spread about a 1/2 cup of sauce on the bottom of the pan, just enough to cover it followed by three noodles, overlapped slightly. Add 1/4†of the remaining sauce followed by 1/3 of the mushroom mixture, and 1/4 cup of parmesan. Continue this layering two more times: noodles, sauce, mushroom mixture and parmesan. Finishing with a fourth layer of noodles, the remaining sauce and cheese.
- Bake the lasagna for 45 minutes, until the top is browned and bubbly. Let set for 15 minutes before diving in. Serve with a simple green salad or some roasted asparagus.
.
COLD SOBA NOODLE SALAD WITH RADISHES & TURNIPS
Inspired by a recipe in the Near & Far cookbook by Heidi Swanson
This is a great simple side dish for a potluck or to make on the side of some grilled pork chops for dinner. I love cold noodle salads and this one that’s heavy on the veggies is a light, bright tasty spring dish!
Takes 20 minutes
Serves 4
Kosher salt
8 ounces dried soba noodles
1 bunch radishes, greens removed
1 bunch turnips, greens removed
1 bunch scallions, sliced, white and pale green parts only
1/2 cup extra virgin olive oil
1/4 cup rice wine vinegar
1 tablespoons honey or maple syrup
1/2 teaspoon ground coriander
1 teaspoon paprika
1 tablespoon toasted sesame seeds
- Bring a large pot of salted water to a boil over high heat. Once boiling, cook the soba noodles according to package directions. Drain and rinse under cold water until cool.
- While the noodles cook, prep your radishes and turnips. You’ll want to sliver them. The smaller the pieces, the better. To do this, I cut a bit off the top where the green was and then set the radish or turnip on that flat surface. Then cut the radish or turnip into 8 or 12 pieces depending on the size as you would cut a pizza or a pie.
- In a small bowl, toss the radishes and turnips with scallions and 1/4 teaspoon Kosher salt. Set aside.
- In a large bowl, combine olive oil, vinegar, honey or maple syrup, coriander and paprika. Whisk until well combined. Add noodles and toss to coat with tongs. Add radishes and turnips and toss to combine.
- Sprinkle with sesame seeds. Serve at room temperature or cold.
.
Week #2, HS graduation
- On: May 24, 2017
- 0
Our daughter Sophie graduates from high school this week as valedictorian of her class. This isn’t exactly farm news, but is a big part of our lives right now. We are so proud of how hard she has worked. In fall, she heads to Macalester College in Saint Paul to study math and studio art. Our families are coming to visit so we are hosting a grad party this weekend. The low point of the party preparations came a few days ago, when a skunk sprayed in our garage. The scent is fading but is still very, very recognizable. The high point has been gathering Sophie’s prolific artwork to display all over our house. Anyway, we will be busy this weekend. I will watch for emails but might be slow to respond. Thank you in advance for your patience. Beth
Just a few years ago.

Beth, Sophie and Steve on academic awards night, with all of Sophie’s academic swag.
Recipe Log
Over the winter, some of you asked for better organization to review recipes from previous weeks of the current season. This is a good idea. The vegetables often overlap from week-to-week so the previous week’s recipes can be quite useful. I’ve started a webpage to collect the recipes. Go to our 2017 Recipe Log. I’ll try to keep it updated each week, although that might not happen until Friday each week.
Veggie List and Veggie Notes
Heads up. It has rained a lot this week. Rain splashes soil and grit into your asparagus, lettuce and spinach. These vegetables will need extra attention and washing this week. This phenomena goes hand-in-hand with eating locally. Lettuce grown in the desert in California is never exposed to rain! Right now, we’d be glad to farm in a desert. We are impatient for the end of this rainy spell.
Asparagus, 0.85 lb
Button mushrooms, 12 oz
Spinach, 1 bunch, 1 lb or more
Romaine lettuce
White salad turnips, 1 bunch
Radishes, 1 bunch
Arugula, 1 bunch
Green garlic, 1 bunch
Rhubarb, 1.75 lb
Next week’s box will probably contain asparagus, spinach, lettuce, escarole, scallions and more.
Asparagus, lettuce, spinach, green garlic, rhubarb – Check last week’s newsletter for prep and storage information. I provide a crop overview the first time we deliver each season. After that, I’ll provide weekly updates when needed.
Button mushrooms – These organic mushrooms are from Hidden Valley Mushrooms from Wisconsin Dells. We buy mushrooms from Mary every year; they are a great addition to spring salads and quiches. Here are Mary’s suggestions for storing the mushrooms. Store separate from leafy greens, which hasten mushroom aging. If storing for more than a few days, remove from the box and store in a paper bag with holes punched in the side. Keep dry. Don’t wash to clean, just wipe with a damp cloth.
Romaine lettuce (tall head of lettuce with crisp leaves) – More sturdy and less fragile than our other spring lettuces. Great for salads. To wash, slice crosswise into ribbons. Submerge in a pan or sink of water. Drain. Repeat. Expect to wash this Romaine several times. Dry it in a salad spinner and store in a dry container.
Arugula – (small bunch of green leaves with pungent scent) – Arugula is good mixed with lettuce or spinach in salads, or added to cooked dishes such as lasagne or quiche. I love it on sandwiches. This arugula is thin-leaved and tender and will not store for long. Eat soon. Cover and refrigerate.
White salad turnips (bunched white roots with green tops) – I know that returning members look forward to these sweet and delicious turnips, which taste nothing like the turnips that are harvested in fall.
– Storage: Cover and refrigerate.
– Uses: Both the turnip roots and tops are edible. Slice the sweet roots and add to salads. They can be cooked and are especially good when lightly sauteed in butter. Stir as little as possible so they brown on at least one side. The turnips greens are excellent cooked. Treat them like mustard greens.
– Our favorite use: Slice the roots very thinly and combine with a mixture of rice vinegar, mirin, soy sauce, sesame oil. Eat immediately or marinate.
Rhubarb – Rhubarb is easy to freeze because it does not need blanching. Slice, put in a container and freeze – that’s it.
LOCAL THYME RECIPES
Comforting Classics
Rhubarb Pudding Cake
Spinach and Mushroom Salad
Romaine Arugula Salad with Walnuts, Parmesan and Creamy Lemon Dressing
Chicken A la Maria (vegetarian option in recipe)
Outside the Box Recipes
Rhubarb-B-Q Sauce
Arugula Pesto-packed Lentil and Mushroom Balls
Ground Turkey, Mushroom and Radish “Macos”
Pappardelle Florentine
Quick and Easy Meal
Spicy Asian Noodles with Asparagus and Mushrooms
RECIPES FROM LAUREN
MUSHROOM & “LOTS OF GREENS’ SHEET PAN QUICHE
Inspired by Smitten Kitchen
Because this is a sheet pan quiche, it’s a little trickier to use store bought pie crust. I promise you that following the techniques below, you can make pie crust from scratch, but if you really don’t want to or don’t have the time, you could do this quiche in two store-bought frozen 9″ pie crusts. Trader Joe’s has really stellar frozen pie crust! You can also go crustless entirely and just make a delicious egg bake in a well-greased pan.
Takes 1 hour, 45 minutes†if making the crust from scratch (much of it inactive) or 45 minutes with store-bought (or no) crust
Serves 12-16
Pie Crust:
1 cup butter (2 sticks)
1 cup water
2-1/2 cups all-purpose flour
1 tablespoon sugar
1 teaspoon salt
Filling:
2 tablespoons butter
1 green garlic, white and pale green parts only, minced
12 ounces mushrooms, sliced
3 cups arugula, roughly chopped
3 cups spinach, roughly chopped
Turnip greens, roughly chopped
1/4 cup water
1 teaspoon Kosher salt
1/2 teaspoon freshly ground black pepper
1/4 teaspoon red pepper flakes
6 ounces cream cheese, softened
2/3 cups whole milk
6 large eggs
1 cup shredded cheddar cheese
1/2 cup finely grated parmesan
- Begin preparing your crust (if you plan to make it; if you don’t skip to step #8). Cut the butter into small cubes and place in the freezer until ready to use. Fill measuring cup with 1 cup cold water and place in the freezer.
- In a large bowl, combine flour, sugar and salt. Add butter and use your fingers to incorporate the butter into the flour. You will pinch the butter cubes into smaller pieces until they are about the size of peas and uniformly incorporated. Some pieces of butter will be small and some will be larger; that’s absolutely fine!
- Remove†the water from the freezer and pour in half. Use a rubber spatula to press the dough together. If it’s still dry (it likely will be) continue to add water until the dough comes together. You may need to knead with your hands a little bit.
- Wrap pie dough in plastic wrap and place in freezer for 20 minutes.
- Remove dough from the freezer and roll out to an approximately 12×16-inch rectangle. Carefully, fold it in half and then in half again. Move the dough to a 10×14-inch baking sheet and unfold. Press gently into pan. Remove any excess dough from the edges. Prick the crust with a fork and place pan in the freezer.
- Preheat the oven to 425 degrees and while you wait for it to preheat, begin slicing your mushrooms and chopping your greens!
- Once the oven is preheated, line your pie crust with foil and fill with pie weights (or dried beans or rice you don’t plan to cook). Bake for 20 minutes. Remove the foil and weights and bake 5 minutes longer. If using store-bought crust, follow package directions for pre-baking.
- While the crust bakes, melt the butter for the filling in a large, deep saute pan (the larger the better, you’re going to be throwing a lot of greens in here– if you don’t have a large saute pan use a soup kettle) over medium low heat. Add the green garlic and cook for a couple minutes until fragrant. Add mushrooms and saute until soft, about 10 minutes more. Add all the greens, water, salt, pepper and red pepper flakes to your pan. Saute until the greens are well wilted.
- In a large bowl, beat softened cream cheese with a wooden spoon until smooth. Add the milk and whisk until smooth. Add the eggs, two at a time, again whisking until smooth after each addition. Stir in sauteed mushrooms and greens along with the cheeses.
- Pour filling into the prepared, prebaked crust until filling is set, about 30 minutes.
.
MY FAVORITE ASPARAGUS SOUP
Adapted from 101 Cookbooks
This recipe calls for two ingredients you may not have in your pantry, but they are very simple to find and great to have on hand.
Coconut milk is one of my favorite ingredients. It can transform a pile of sauteed vegetables into a curry. It can replace dairy in a soup (as it does here). It can thicken mashed potatoes. I even put it in my coffee and oatmeal. There is both a full and reduced fat version of coconut milk available. I always get the full fat because it’s lower in sugar and adds a more robust flavor.
Green curry paste is another product I love for the bright, herbal flavor it adds to simple dishes. You don’t need much of it so it comes in a pretty small glass jar. You can find both of these items in the “ethnic or global” aisle of any grocery store in the Asian foods section. Thai Kitchen is a great brand for both products.
Takes 20 minutes
Serves 4
2 tablespoons butter or olive oil
2 green garlic, white and light green parts only, minced
1 bunch turnips, greens removed and diced
1 tablespoon green curry paste
1 pound asparagus, tough ends removed and cut into 1/2-inch pieces
1 14-ounce can full-fat coconut milk
1 teaspoon Kosher salt
1-1/2 cups water
1 lemon or lime
- In a large stock pot, melt butter or heat olive oil over medium heat and add green garlic. Cook until fragrant, a couple minutes. Add turnips and cook until completely tender, about 10 minutes. You can add a splash of water if the pan gets too dry.
- Stir in the curry paste and stir so it evenly coats the turnips. Allow it to cook for 2 minutes before adding asparagus, coconut milk, salt and water. Simmer gently for 5-10 minutes then puree with an immersion blender until smooth. If you don’t have an immersion blender, pour into a blender or a food processor.
- Squeeze in half of the lemon or lime into the soup, taste and adjust flavors as needed. If it’s too thick, add some water. If it’s too thin, simmer it gently for a few more minutes.
Welcome!
- On: May 17, 2017
- 0
Welcome to our CSA! Deliveries begin this week for weekly members and for purple every-other-week (EOW) members. Green EOW, your first delivery is next week, May 25/26 (Thursday/Friday sites). Sampler share members, your deliveries begin June 1/2 (moon group) or June 15/16 (sun group). Go here to print the delivery calendar.
Things you need to know.
♦ On Thursday, we deliver CSA boxes to Evansville, Fitchburg, Madison, McFarland, Middleton and Oregon.
♦ On Friday, we deliver CSA boxes to Brookfield, Janesville, Mequon, Milwaukee, Waukesha and Wauwatosa.
♦ We post this newsletter/blog each Wednesday night, with the list of veggies for the week, quantities, information about storage and preparation, news of the farm, recipe list, and a forecast for the next week’s box. We alert you by email on Wednesday night once the newsletter is posted and ready to read.
♦ Want earlier notice of what will be in the box? Check the sidebar on our website homepage around 7 p.m. on Wednesday night. I’ll post the list under “Box Contents.” I also provide a tentative list for the following week in the Veggie List section of this newsletter. The next week’s list is rarely complete but the items listed are ones we feel confident about.
♦ EOW, sampler and weekly members, we assume you read all the newsletters, even on your “off” weeks. This newsletter (and our emails to you) are our means to communicate with you.
♦ The first few boxes of the season are often the lightest. EOW members, do not worry that you have signed up for the wrong share. Our deliveries get heavier and more abundant as the season progresses.
♦ We will sometimes write “OR” in the produce list, e.g. green leaf OR red bibb lettuce. You will receive one of these crops. All the boxes at each site are identical; we pack the same crops for all the members at each site. Please don’t open other members’ boxes.
Up and Running
Whew, it’s a relief to have our first CSA box almost complete. Soon the produce will be in your hands and you can take over. Our farmhands are back to work after a winter furlough. Steve says we have 10% of our fields planted. We are off to a good start Let’s share a few spring moments.
Look what we discovered when transplanting our Swiss chard seedlings. Chard roots are often tinged with color but none of us remember roots this vivid. That’s a red chard seedling on the left and a yellow chard seedling on the right.
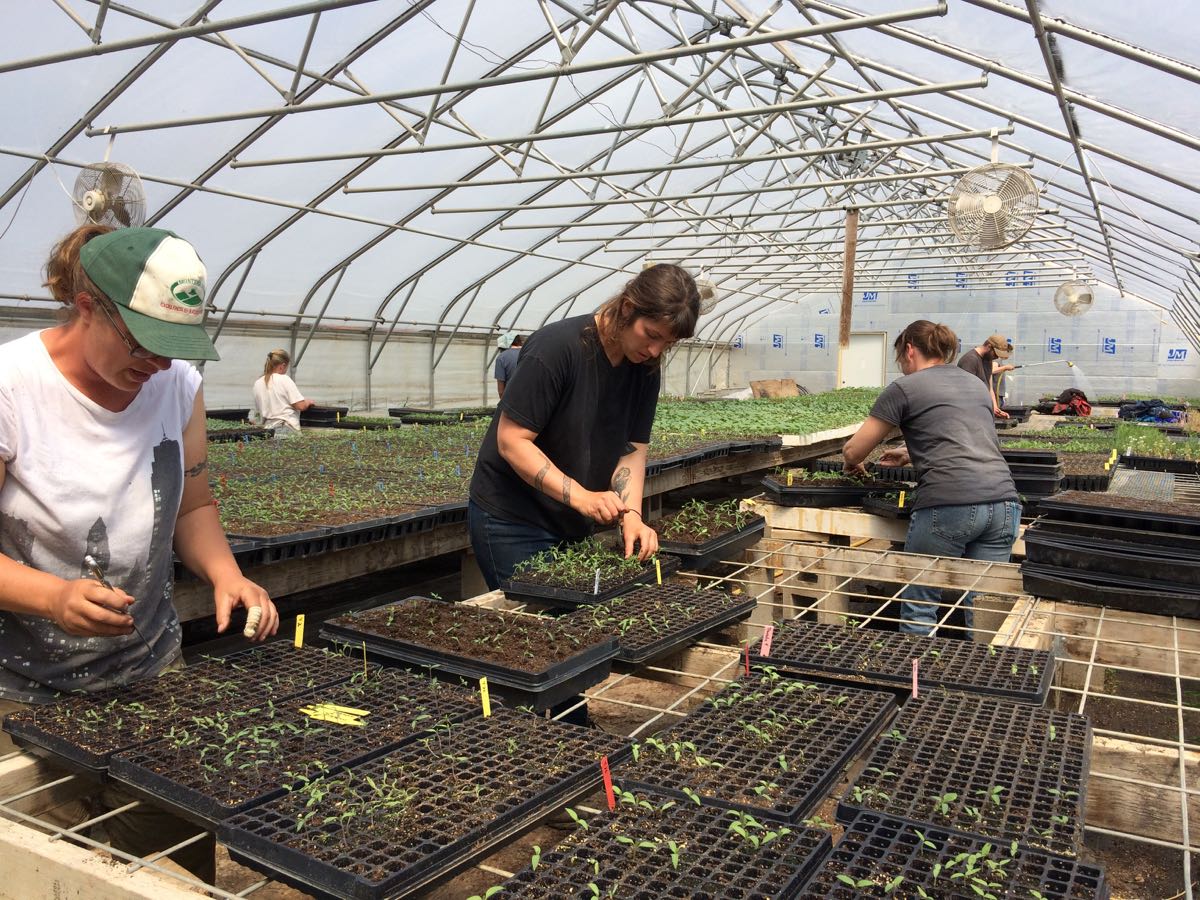
Many spring projects are group efforts. From left, Kristin, Simone, Smitty (in back), Charlotte, Karen, Jim and Kelsie repotting tiny pepper seedlings into bigger pots. We start the seeds in small plug trays to save greenhouse space in early spring when it’s costly to heat the greenhouses. Soon we can turn the heaters off. The transplanting job is a favorite; the work is social and the greenhouse is warm and cozy on sunny days.
![]()
Whenever possible, we prefer to nurture seedlings in the greenhouse then transplant them outdoors once big enough. It’s a great system for slow-growing seedlings like the celeriac being transplanted in the photo above. Simone drives the tractor. Jim, Smitty and Kelsie drop seedlings into the transplanter cups. Karen double-checks planting depth. Lush cover crops ripple in the background.
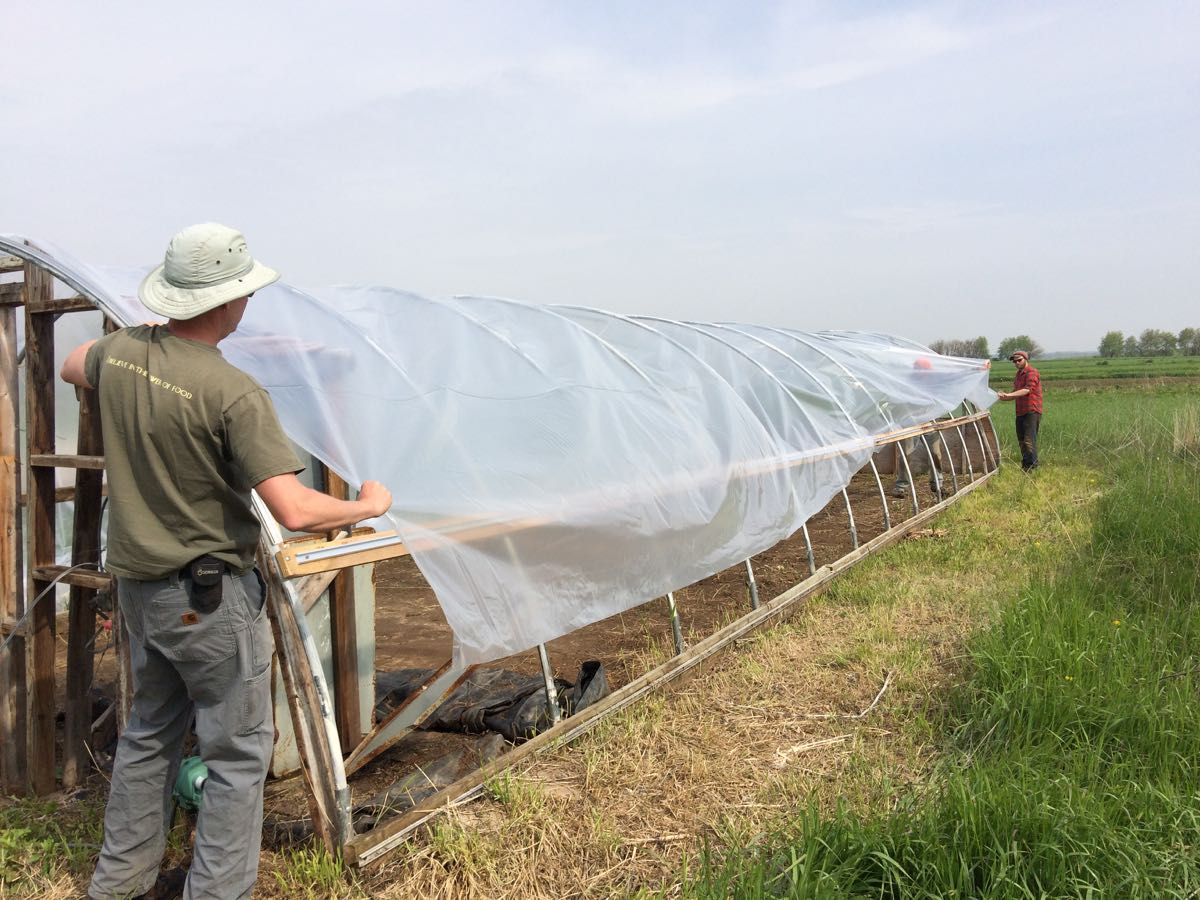
Matt and Kristin replace the plastic on one of our smaller greenhouses where we will grow celery this summer. This is a new experiment but we’ve read that it’s a good way to grow high-quality celery.
Steve enjoys a quiet moment cultivating the asparagus field.
Veggie List and Veggie Notes (May 18/19, 2017, week #1, purple EOW)
Read this section each week for specific information about the produce. For example, see our notes below about how to extend the storage life of your lettuce and spinach. I provide detailed notes on each crop only the first week we pack it. This is another reason to read our newsletter each week.
Asparagus, 1 lb
Oneida Gold potatoes, 3.5 lb
Spinach, 1 bunch
Bok choy
Red leaf lettuce
Salad radishes, 1 bunch
Green garlic, 1 bunch
Rhubarb, 2 lb
Next week’s box will probably contain asparagus, rhubarb, mushrooms, lettuce, spinach, radishes, green garlic and more. Watch next week’s newsletter for the final list.
Asparagus – Enjoy this spring treat! Your asparagus will be green or purple. The purple variety turns dark green when cooked. Its flavor is almost identical to normal green asparagus. Wash your asparagus thoroughly to remove hidden grit. Submerge in water, soak briefly, then swish vigorously and pull out of the water with the tips pointing down. The draining action helps pull the grit out of the asparagus tips. Repeat several times.
Storage: Asparagus is perishable, so eat it as soon as possible. Store it in the paper bag we packed it in, and wrap loosely in a plastic bag. The paper bag protects the asparagus tips from direct contact with the plastic bag. The plastic bag keeps the asparagus from wilting.
Preparation: We snap our asparagus at harvest, rather than cutting. Therefore, there is no need to snap the stalks to remove fibrous ends. For the same reason, it is not necessary to peel the asparagus stalks. It’s OK to trim the end a bit.
Cooking: If your asparagus stalks vary greatly in size, you will want to cook the thicker ones longer. Put the asparagus in a steamer pot over water. Alternatively, you can lay spears flat in the bottom of a broad pan, with ½ inch of water. Cover and steam over medium heat until just tender. Use two forks or a spatula to turn the asparagus during cooking, rotating the bottom spears to the top. Drain and serve. Also excellent broiled or grilled. Good dressed with vinaigrette, or simply with lime juice, salt and pepper.
Oneida Gold potatoes – Please refrigerate these potatoes. They are in great shape now but will sprout within days if stored at room temperature. They’ve been stored all winter and want to grow. Store in a paper bag to protect from light, even in the fridge. We grow everything we send in our CSA boxes except potatoes, some of the garlic, and mushrooms, all of which we buy from organic growers that we trust. We purchased these potatoes from Jesse Perkins at Vermont Valley Farm. This is a new variety for all of us. Jesse says “It is a very good all-purpose potato. They are very good eating.” He also says the potatoes have a higher sugar content because of starch to sugar conversion during cold storage. The potatoes taste a bit sweet, and will blacken slightly when fried. It’s a harmless color change due to the sugar conversion.
Lettuce and spinach – Wash your greens to remove grit splashed into the heads by rain. Cut to the size you like, submerge in water, swish gently, then pull from the water and drain in a colander. Some weeks, you will need to repeat in fresh water.
Storage hint – To extend the storage life of your tender greens, wash them, dry in a salad spinner, then store in a dry container or bag. Lettuce and spinach last much longer when handled this way.
Bok choy (large rosette with thick white stems and green leaves) – This Asian green is good for stir-frying or sautéing or in soup. You can think of the stems and leaves as two separate vegetables. The stems require longer cooking. The leaves will cook almost as quickly as spinach. Bok choy stores well, so feel free to pull off leaves as you need them, or use the whole head at once. Refrigerate in a plastic bag.
Green garlic (looks like scallions, tastes like garlic) – Last fall, we planted garlic cloves that grew into the stalks we harvested this week. If left to grow until mid-summer, the slim white bulb on this week’s garlic would divide and form the usual cluster of cloves in a garlic bulb. This year’s green garlic is robust. I’ll write more about that next week; t’s the result of a few years’ effort.
Preparation: Green garlic is more pungent than scallions, so slice thinly and use sparingly when raw. It mellows when cooked. Chop and add to any cooked dish that would benefit from garlic. Use the white bulbs and pale green stems. Avoid the dark green stems and leaves, as these are fibrous.
Rhubarb – Refrigerate in a plastic bag. FYI, 2 lb of rhubarb yields 6 – 6.5 cups when chopped.
Stewed rhubarb: This is the simplest way to prepare rhubarb. Chop rhubarb into one inch chunks. Stir over medium heat with a small amount of water in the bottom of the pan. The rhubarb will release moisture as it cooks. Stew until it softens and falls apart. Sweeten to taste with honey or sugar. Eat warm on its own, over vanilla ice cream, on pancakes, etc.
Recipes from chef Pat Mulvey at Local Thyme
Comforting Classics
Asparagus and Spinach Risotto
Rhubarb Preserves
Hot Pot with Tofu, Noodles, Bok Choy and Radish
Patatas Bravas with Smoked Paprika Aioli
Outside the Box Recipes
Potato and Asparagus Soup with Lemon Butter Braised Asparagus Tips
Rhubarb Baked Beans
Grilled Chicken or Tofu and Spring Vegetables
Potato, Spinach and Sausage (or Mushroom) Frittata with Parmesan
Quick and Easy Meal
Warm Asparagus, Potato and Egg Salad
Recipes from Lauren
SPRING DREAM SALAD with PICKLED RHUBARB & CANDIED WALNUTS
Just the greens, radishes, walnuts and pickled rhubarb with the creamy honey dressing is plenty to make your lunchbox sing, but I love to toss in some avocado for added creaminess and a little extra heft. If you don’t have one on hand or don’t feel like buying the very non-local ingredient, feta cheese makes a great substitution.
Serves 2-4 as a meal or 6-8 as a side dish
Takes 30 minutes (though rhubarb is best if made the day ahead so it can chill)
2/3 cup walnuts, halved or chopped
1/4 teaspoon Kosher salt
1/4 teaspoon cayenne pepper, optional
2 tablespoons honey
1/2 bunch spinach, roughly chopped
1 head lettuce, roughly chopped
1 bunch radishes, sliced
1 avocado, sliced in half, core removed and sliced, optional
Pickled Rhubarb:
1/2 cup apple cider vinegar
1/2 cup water
1/2 cup sugar
1/4 teaspoon Kosher salt
1/4 teaspoon black peppercorns
1/4 teaspoon cardamom
5 cloves
1/2 pound rhubarb, ends trimmed, cut into 1-inch piece
Honey Vinaigrette:
6 tablespoons olive oil
2 tablespoons apple cider vinegar
2 tablespoons honey
1 teaspoon mustard (I use stone-ground but Dijon will work well too)
1/4 teaspoon Kosher salt
Freshly ground black pepper
- Prepare the pickled rhubarb first so it has time to cool. It’s even better if you can make the pickled rhubarb a day in advance. Bring vinegar, water, sugar and salt to a boil in a small saucepan.
- While waiting, pack a pint-sized mason jar with black pepper, cardamom and cloves followed by rhubarb. Once the pickling mixture is boiling, pour it over the rhubarb. Seal and allow to cool before putting in the fridge to chill. Will store in the fridge for several weeks.
- In a large skillet, toast walnuts over medium heat for five minutes. Add salt, cayenne and honey. Cook 3-5 minutes longer until well toasted and honey just starts to turn a darker shade of brown. Pour out on a piece of wax paper or parchment to cool and prevent clumping.
- Whisk vinaigrette ingredients together in a small bowl until smooth and even. The mustard will help your dressing emulsify and stay together.
- Strain pickled rhubarb (or as much as you plan to use).
- Prepare salads by tossing spinach and lettuce together in individual bowls. Add pickled rhubarb, candied walnuts, avocado or feta, if using, and top with sliced radishes.
- Enjoy the healthy spring welcome!
.
MASHED POTATO FRITTERS
Serves 4
Takes 30 minutes (more if you have to make mashed potatoes first)
2 cups leftover mashed potatoes, cold is fine (actually it’s better)
1/2 bunch spinach, finely chopped
2 teaspoons minced green garlic
1/2 cup breadcrumbs
2 eggs, divided
1/2 teaspoon Kosher salt
1/4 teaspoon freshly ground black pepper
2-4 tablespoon vegetable oil, divided
- Combine leftover mashed potatoes, spinach, garlic, breadcrumbs, 2 eggs, salt and†pepper together in a large bowl until well-mixed. The batter will be pretty wet.
- In a large skillet (preferably cast-iron or something that can go in the oven), heat 2 tablespoons of oil over medium heat until it glistens. Add a 1/4 cup of batter (it can be heaping) into 4 piles with some room between them. You don’t want them to be crowded so if you can’t fit the 4 then just do a few more batches.
- Reduce heat to medium low and cook until the bottom of the fritter is golden brown, 3-4 minutes. Flip gently and then press down with your spatula to make a pancake. Cook another 4-5 minutes until golden brown and cooked through. Place on a paper towel, add remaining vegetable oil to pan (if you need it) and repeat with remaining batter.
- I love to serve these with eggs on top, a side of bacon and roasted asparagus. Sometimes we even get fancy and make hollandaise sauce on a lazy Sunday. That’s truly the best and what I’ll be serving up for a belated Mother’s Day feast!
Spring Forth
- On: April 04, 2017
- 0
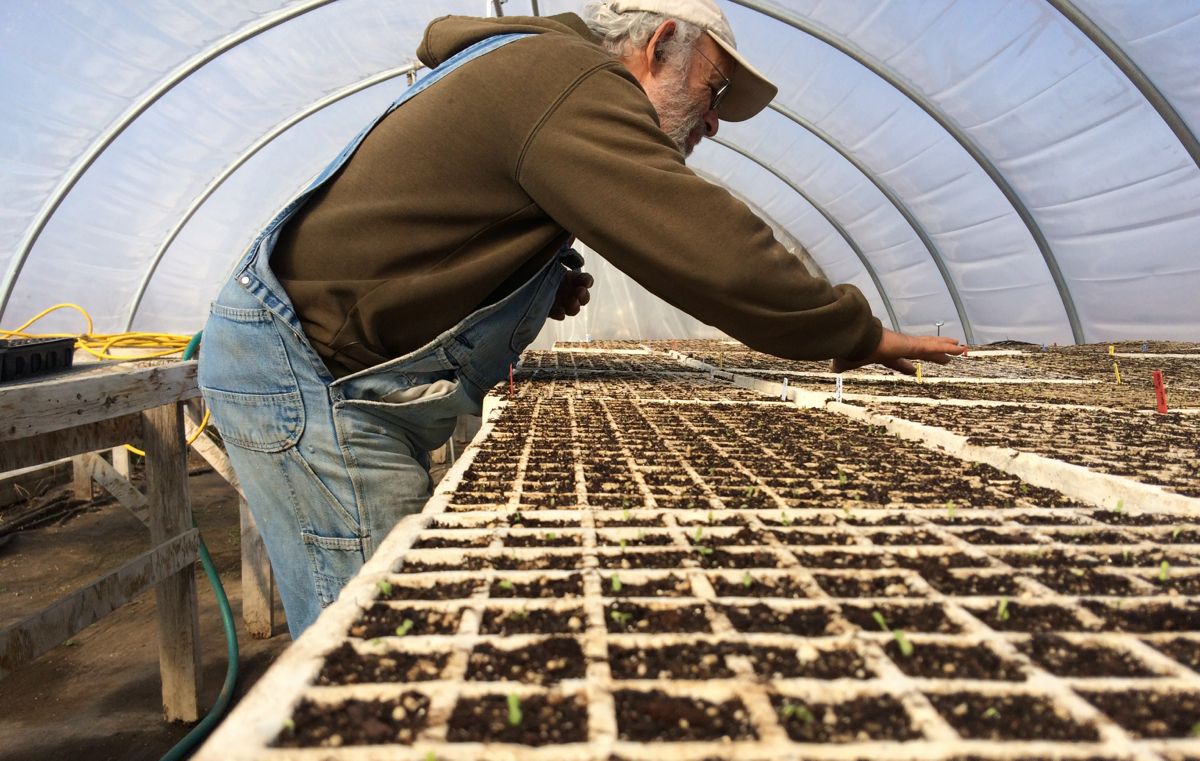
We still have CSA shares available.
Returning Tipi members, go here to register.
New members, go here to register.
Survey Results
I promised to share the results of our end-of-season survey. Participation was terrific – over 50% of households responded. Thank you for participating! Here’s what you told us.
The Good News
The two questions below are important benchmarks for us. We found high satisfaction with the amount and value of produce we packed for you.
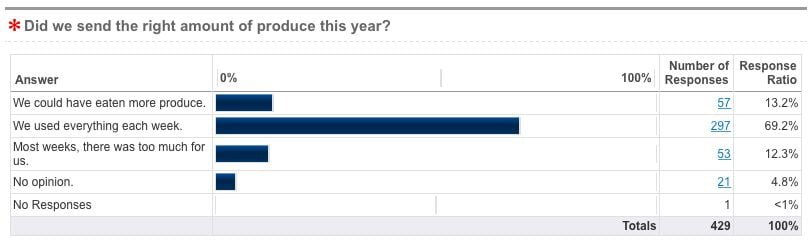
Did we send the right amount of produce? Look at the chart above and you’ll see that the results could not be more balanced. 13% said they could have eaten more produce and 12% would have preferred less each week. With our existing structure (one size box per week), I do not think we could do much better. These results mask a lot of individuality, from weekly to every-other-week shares, from single households to multiple families splitting a share. We conclude that most of you have found ways to make the deliveries work.

Do you feel you’ve received a fair value for the cost? This is an important question and we’re very happy with the result. Averaged over the season, our weekly boxes contain extra value over purchasing the same organic produce at Willy Street or Outpost Coops. It’s part of our commitment to taking care of you. We are glad you recognize the value packed in those boxes.
The Other Good News
We polled you about the crops you want MORE of and the ones you want LESS of. Fortunately, the strongest responses were all for crops that behaved poorly in last year’s wet weather. Given a normal year, we will return to typical amounts of these crops.
- LESS bell peppers. This is the only thing you clearly asked for less of! Yes, we did sent more bell peppers than usual last season. It was a good pepper year, at a time when some other crops failed. We were generous with peppers because we had fewer options to feed you. Peppers remain a very popular crop with CSA members, so I won’t reduce them needlessly. However, I won’t go overboard again this year. Those of you who froze your excess peppers last summer tell us you enjoyed them this winter.
- MORE Brussels sprouts, MORE cauliflower, MORE winter squash. Yes, these all did terribly last year because of the wet weather in late summer and fall. Should bounce back this year. We’ve trialled new winter squash varieties over the last few years, and have a few new ones for this season.
- MORE lettuce later in the summer, to go with the tomatoes and other salad ingredients. Mid-summer lettuce is tricky but we’ve identified a few varieties that do well for us. Heads will be smaller than the spring lettuce, but that’s a good thing in summer when the boxes are so full.
- MORE spinach, later in the season. We attempt fall spinach year-after-year and it fails. We have a few ideas to try. Who knows? This could be the year we crack this nut.
- MORE strawberries, sweet corn and sweet potatoes. I’m sorry but we’re at the maximum we can produce (and pick!) of these crops. We might be able to add another sweet potato delivery. The Extension and Storage shares are likely to have sweet potatoes, so those are good options for sweet potato fans.
We can do these.
Here are changes planned in response to your requests.
- Some of you asked for earlier notice of what will be in the box. I will post the box contents in the sidebar of our website at 7:00 pm on Wednesday night. That’s a few hours earlier than you receive my weekly email. Also, check our weekly newsletter for the next week’s forecast. It’s not a complete list; it’s just the items we are confident will be ready to harvest the next week. The forecast is listed at the bottom of our weekly Veggie List.
- Many of you asked for more information about freezing food from the boxes. I’ll incorporate this into the newsletter.
- Some of you have asked for help finding someone to split a share with. It’s definitely best if you arrange this yourself but I can help. Send me your name, email, pickup site, and the share arrangement you want. If I get multiple requests from one site, I’ll put you in touch with each other.
- Some of you asked for less frequent deliveries. Your lives have changed, whether through retirement or an empty nest, and you need more flexibility. We’ve created a new share, called the ‘Sampler Share.’ The Sampler Share is one box per month (June through October), with the option to reschedule up to two of the five deliveries.
- Many of you recognized that we sent more garlic this past season. Thank you for noticing!! We should be able to deliver the same amount this season (weather permitting) and might be able to increase it next year.
About Recipes
- We will continue to get recipes from Pat of Local Thyme and from Lauren. Members were evenly split in their favorite source. Many of you asked for simpler or quicker recipes so we’ll try to shift focus in that direction a bit.
- Recipe presentation will be similar to last year. Lauren’s recipes will be in the newsletter. Pat’s will be on her website, with direct links from my email and newsletter.
- I encourage everyone to register for Pat’s website this year. I realize there were technical issues with Pat’s website a few years ago but those problems are in the past. Many of you expressed a desire for extra support with the produce, whether photos, or organized access to the previous weeks’ recipes. All of that is built into her website, plus other features like the option to build a shopping list based on your recipe choices. We hire Pat to provide this support, so let’s explore what she offers. I think it’s an excellent resource to help everyone enjoy their CSA produce.
- Quite a few of you are interested in sharing cooking ideas and recipes among the membership. I have a few ideas to explore and will get back to everyone once I’m ready to brainstorm the best way to do this.
Spring progress
Our field work is moving along smoothly. It is so energizing to get plants in the ground.
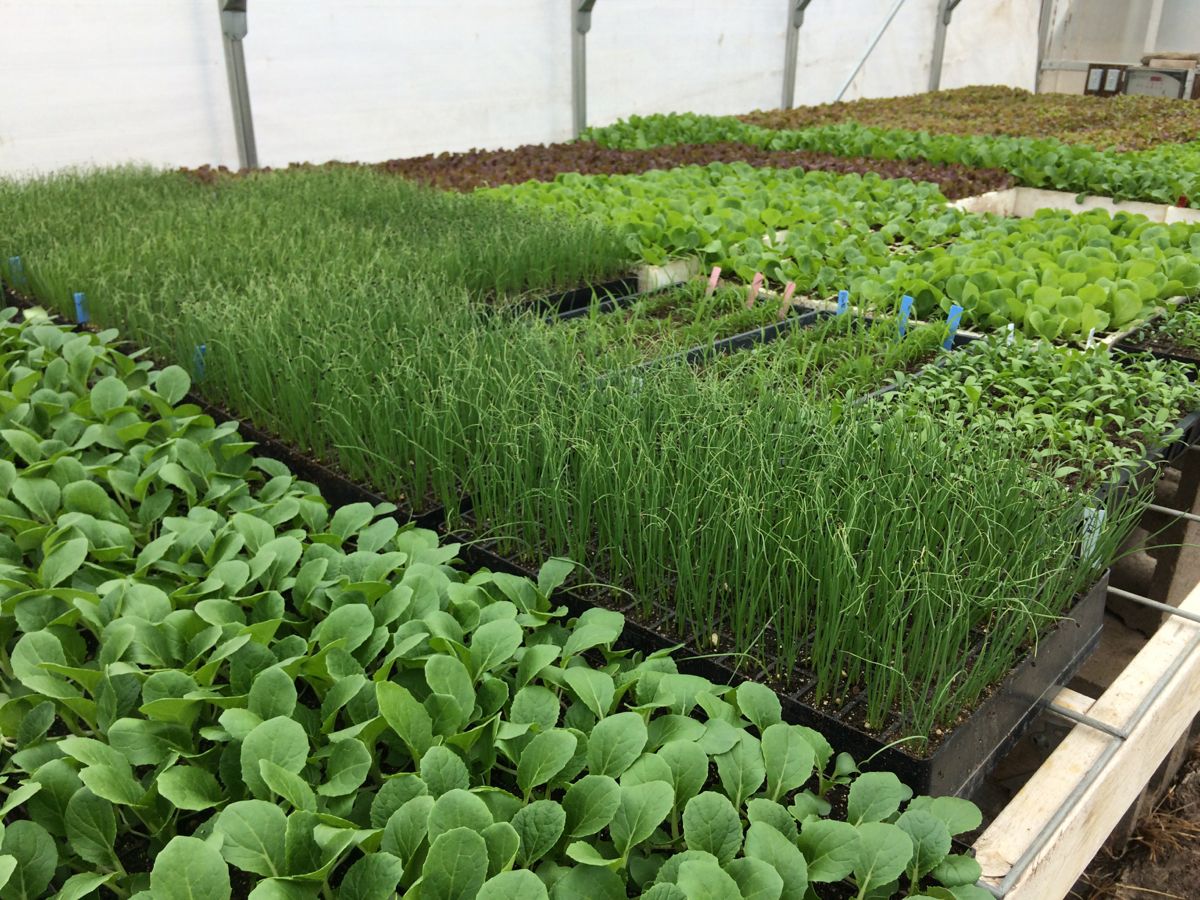
Bok choy, scallions, lettuce and spinach seedlings.
![]()
Transplanting day! Steve, Maggie, Kerry and Matt transplanted the first batch of spring crops last week. We hurried to get them in the ground before the weather turned wet.

It’s been two weeks since Steve planted the first seeds directly outside. He’s planted lots of peas, arugula, salad turnips and spinach.

Simone and Kerry dig up over-wintered parsnips. We will sell these to Willy Street Coop while they are fresh, rather than trying to hold them for the CSA boxes.

We hired local carpenters to rebuild our pack shed this winter. They did a beautiful job and we will enjoy the improved space. My favorite part of the project? The carpenters sang while they worked, and their music changed as they built the building around themselves.
Storage Share, Nov. 17/18, 2016
- On: November 16, 2016
- 0

Take one box labelled “A” and one box labelled “B”.
Things you need to know about your winter share
* Your delivery will consist of two different boxes, labeled “A” and “B”. Take one “A” box and one “B” box. The boxes contain different vegetables.
* Please pick up your boxes on the day of delivery, during the normal hours for your site.
* Outpost members, please get your boxes on Friday. This is the busiest weekend of the year for the Outpost staff, so we cannot ask them to hold boxes past Friday.
* Members at outdoor sites, please carefully put the blankets back on the boxes. That keeps everyone’s produce in good shape.
* The boxes are heavy! It’s OK to take home the packed boxes, then return the empty boxes to your pickup site within two weeks. We’ll swing back and pick them up.
Veggie List and Storage Info (Storage share, Nov. 17/18, 2016)
We hope you enjoy this shipment of veggies! Strategize to use them well, as some will last longer than others. It was not a good winter squash year for us, so there are fewer squash than last year. Fortunately, the sweet potatoes over-performed to compensate.
* These vegetables are the most perishable: broccoli, Romanesco cauliflower, celery.
* These are the next-most perishable: Brussels sprouts, cabbage, leeks and onions. Keep an eye on your butternut, potatoes and sweet potatoes. The last two are susceptible to drying out.
* These will last the longest: Beauty Heart radish, beets, carrots, celeriac, garlic, parsnips.
Box “A”
Beauty Heart winter radishes, 1 to 3
Beets, 3 lb
Broccoli, 1-2 small head(s)
Brussels sprouts, on stalks
Carrots, 6 lb mixed colors
(orange 4 lb, yellow 1 lb, purple 1 lb)
Celeriac, 1 or 2
Celery
Green cabbage
Leeks, 2+ lb
Parsnips, 3 lb
Romanesco cauliflower
Box “B”
Sweet potatoes, 14+ lb
Butternut squash, 1 or 2
Russet potatoes, 5 lb
Superior (white) potatoes, 5 lb
Yellow onions, 5 lb
Garlic, 4
Beauty Heart radishes (round, white with pale green shoulders and bright pink interior) – Refrigerate. The interior color is lovely. Slice thinly and add to salads, cook lightly in mixed vegetable medleys or cut into matchsticks and add to pasta salads. We enjoy grated carrot and Beauty Heart salads all winter.
Beets – Refrigerate in a bag or container. Beets will store for two months or longer.
Broccoli – Refrigerate in a bag or container.
Brussels sprouts – Pluck from stalks and refrigerate in a bag or container. Eat soon.
Butternut winter squash – You will receive one or two Waltham butternuts, depending on size. Store your butternut in a cool, dry place. 50 F is ideal. Do not put in a plastic bag. Inspect your squash frequently and cook promptly if you see any soft spots developing. You can cook, mash and freeze the squash for future use. I find that you can refrigerate cut raw squash for up to one week. This runs counter to the accepted way to store squash, but is useful if you want to cook just half a squash. Try microwaving your squash for one to two minutes before cutting or peeling. This softens the squash and makes a large butternut easier to handle.
Cabbage – Refrigerate. Cut off chunks as needed.
Carrots, orange. Refrigerate in a plastic bag. Will keep for several weeks.
Carrots, yellow and purple. These varieties are pretty AND they taste good. The purple carrots will turn your tongue green. That should get the kids interested.
Celery – It took all year but the celery is finally ready, just in time for Thanksgiving stuffing. Cover and refrigerate.
Celeriac – Will store for months in your fridge. Cut off chunks as needed. Peel before using. I find it easiest to cut the celeriac into flat slices, then peel.
Garlic. Can be stored at room temperature.
Leeks. Refrigerate and eat within three weeks. Leeks are not a long-storage crop. You may need to strip off one or two outer leaves to freshen the leeks before you cook them. Your leeks will probably need washing. We finished preparing them after dark and didn’t realize how much soil was still on them.
Onions: Refrigerate or store in a cool, dark spot and protect from light. Exposure to light stimulates sprouting.
Parsnips (These look like large white carrots.) – Refrigerate in a plastic bag. Parsnips will store for two months but will darken in color. That is a harmless change.
Potatoes, Russets and Superiors – Can be stored at room temperature or in a cool spot, but must be kept in the dark so they do not turn green. A cloth or loose plastic bag draped over the paper bag will help avoid moisture loss, but do not close the plastic bag. Both types will store longer if kept cool. Around 40 – 50 F is ideal. The Superiors were grown by our friends/neighbors Peg and Matt Schaeffer. The Igl family near Antigo grew the russets.
Russets– We got the big ‘baking’ grade from Brad Igl so you have nice bakers for Thanksgiving. Excellent for mashed potatoes.
Superiors– Matt says these are good all-purpose potatoes, their family’s favorite for oven fries or for potato salad.
Sweet potatoes – These are a mix of the Covington and Beauregard varieties. Both types have developed excellent flavor and sweetness. This was our best-ever sweet potato crop. Store at room temperature, no lower than 55 F. Keep them on your kitchen counter where it’s easy to keep an eye on them. I like to keep ours in a paper bag so they don’t dehydrate. Cook promptly if they start to soften. The roots come in a wide ranges of sizes and all are good.
What are you cooking for Thanksgiving?
We are creatures of habit when it comes to Thanksgiving. Here are our plans so far: brined roast heritage turkey (Beth), Brussels sprouts with garlic-mustard vinaigrette (Steve), roasted sweet potatoes with garlicky yogurt dip (Sophie), glazed butternut squash (Beth), crunchy carrot-Beauty Heart salad with sesame-seed dressing (Steve), pickled onions (Beth & Ari), pickled peppers (Beth & Ari), pickles (Beth & Ari), homemade applesauce (Ari), and apple pie (Sophie). I’ll probably make stuffing with lots of celery, onions and mushrooms but that might be overkill. We love celebrating Thanksgiving and the end of harvest season!
Menu Ideas
There are many terrific Thanksgiving menus and recipes online right now. Many include vegetables that you will receive in this delivery. Search any of the sites below if you are stumped about what to do with your storage share. Check out the Thanksgiving collections online soon; they get taken down quickly after Thanksgiving.
* The New York Times Cooking app keeps getting better and better. They post appealing recipes and recipe collections every day. They have gone completely overboard for Thanksgiving this year, and have posted a Thanksgiving menu planner with 14 sub-categories, e.g. “Thanksgiving desserts that are not pies,” and “Thanksgiving appetizers,” and “Thanksgiving Sweet Potatoes.” In my opinion, Melissa Clark is the best NYT food writer. She’s practical and her dishes are always flavorful. David Tanis is my second-favorite. Recipes from Mark Bittman and Martha Rose Shulman are always worth a look. The app and recipes appear to be free to the public, but I think you need to be a NYT subscriber to save recipes.
* I like the lively Food52.com site, and always read the community comments.
* Smitten Kitchen is our go-to site for dessert recipes but has excellent veggie recipes too. Plus blogger Deb Perelman is funny. She has posted her Thanksgiving recipes and says that, this year, she is all about Team Casserole.
* The Kitchn. I found this site after wandering over from their Apartment therapy home-design site. Good recipes. Right now, they are featuring “Twenty Thanksgiving side dishes that travel well.”
* 101cookbooks. Always has good vegetarian and whole-grain recipes.
* Finally, remember that we have access to the entire catalog of Local Thyme recipes all winter. Check them out for Thanksgiving ideas.
Do you have favorite menu sites for fall and winter recipes?
If so, please share in a comment!
RECIPES FROM LAUREN
Autumn Root Vegetable Gratin
Adapted from Food 52
As much as I love stuffing (and that is a whole heck of a lot), I may go so far as to deem this the most festive Thanksgiving recipe that ever existed. It’s something about the abundance of local veggies effortlessly sliced and stacked high and the creamy richness that reminds me of all of my mother’s homecooking. This dish is elegant, decadent and exactly what you need on your Thanksgiving table. Oh and when I mention all that effortless slicing, note that I own a mandoline.†
Serves 8-10
Takes 90 minutes
3 cups whole milk
4 smashed garlic cloves
Pinch or two of ground nutmeg
2 tablespoons olive oil
1 medium to large sweet potato, peeled and thinly sliced (1/8-inch)
1 celeriac, peeled and thinly sliced (1/8-inch)
1 pound Superior white potatoes, peeled and thinly sliced (1/8-inch)
1 pound parsnip, peeled and thinly sliced (1/8-inch)
Salt and pepper
1/2 teaspoon dried thyme
1/4 teaspoon dried rosemary
2 cups of your favorite melty cheese (I always lean towards Gruyere or Fontina), shredded
2 cups finely shredded Parmesan cheese
- Preheat oven to 400 degrees.
- Add milk and garlic cloves to a medium saucepan. Heat over medium low heat until it just begins to bubble. Remove from heat and add nutmeg.
- Find a casserole or baking dish that is oven-safe and holds at least 12 cups. Rub the bottom and all sides with olive oil.
- Now you start stacking. Layer the veggies into the baking dish alternating sweet potato, celeriac, potato, parsnip, etc. in concentric, overlapping circles. You should use about 1/4 of the veggies for each layer. After each layer, season with salt and pepper, a sprinkling of the dried herbs and 1/4 of each cheese. Continue until you use up all the ingredients.
- Remove the garlic from the milk and pour evenly over the gratin. Bake for 45-60 minutes until bubbly and golden brown on top. Let the gratin sit and set for 5 minutes before serving. Enjoy!
—————-
Cornbread Stuffing with Leeks, Brussels Sprouts & Celery
Good stuffing takes a while. There is nothing you can do about it. The most time intensive part of this recipe comes after you pour everything together and get it roasting in the oven. I stirred my stuffing every 15 minutes to get an even browning, but if you want to run away from the kitchen for the 90 minutes it takes to roast, I’d tack on an extra 30 minutes and just expect the edges and bottom to be a little more browned than the center. Both methods will taste delicious.
Serves 10-12
Takes 2 hours, 30 minutes
3-4 tablespoons olive oil, divided
1 large yellow onion sliced
2 leeks, white and pale green parts only, halved and sliced
1 head celery, leaves removed and sliced
2 teaspoons Kosher salt
1/2 teaspoon black pepper
1-2 tablespoons olive oil
4 garlic cloves, minced
2 cups halved Brussels sprouts (quartered if large)
1-1/2 teaspoon dried sage
1 cup dry white wine
4 cups chicken broth, divided
2 tablespoons maple syrup
Large pinch red pepper flakes
2 eggs
2 cups whole milk
10 cups dried cornbread cubes* (see note below)
*For the cornbread you can use leftover stuff that you froze from an earlier meal or make it from scratch. You can also use store-bought. Regardless of what you decide to use, make sure you cut it into crouton-size pieces †the day before you plan to make the stuffing and leave them out on a single layer on a couple baking sheets. You want the cornbread to really dry out. It will still break up a bit when you add the liquid, but don’t distress!
- In a large cast-iron skillet, add 3 tablespoons of olive oil. Add onions, leeks and celery to pan along with salt and pepper. Saute over medium heat for 10 minutes, stirring often. Add garlic, reduce heat to low and cook 5 minutes more.
- Add the remaining tablespoon of olive oil at this time if the pan appears to be getting dry. Add brussels sprouts and sage to pan. Bring back up to medium and cook for 5 minutes.
- Preheat oven to 400 degrees.
- Add wine to pan and reduce until liquid is gone. It will probably be simmering pretty aggressively. Turn down to medium low if there is too much splatter. Add 2 cups of chicken broth and continue to simmer and reduce. This will help make the veggies more tender and flavorful. You want to keep simmering for 5-10 minutes until the liquid is mostly reduced. Add maple syrup and red pepper flakes and stir to combine. Turn off heat. Taste and adjust seasonings as desired. It may be a little salty, but that’s alright. You won’t be adding salt to egg mixture.
- In a large bowl, combine remaining chicken broth, eggs and milk. Whisk until smooth.
- In the a large, deep baking dish (at least 9×11), combine cornbread cubes and cooked veggies. Evenly pour egg mixture over cornbread vegetable mixture. Stir gently with a spatula to just combine. The cornbread pieces may fall apart. It may look like a big sloppy wet mess. Okay, it definitely will. Don’t stress. Let the oven work it’s magic!
- Bake for 90 minutes, stirring with a spatula every 15 minutes for more even baking and moisture.
- Serve warm with all the turkey and mashed potatoes you can get your hands on!
—————-

